
Please find a tear down of the Air Zucker wireless, bluetooth speaker below. Enjoy!

Product Image: Air Zuker, Bluetooth Wireless Speaker

Tear down tools used:
- Screwdriver to remove screws
- X-Acto knife to cut glue/adhesives
- Flat head to pry open joints

Top down image of all parts.

Identifying each component’s purpose above.

Identifying manufacturing process per part above.

Detailed breakdown of PCB above.

Detailed breakdown of Speaker Sub-Assembly above.
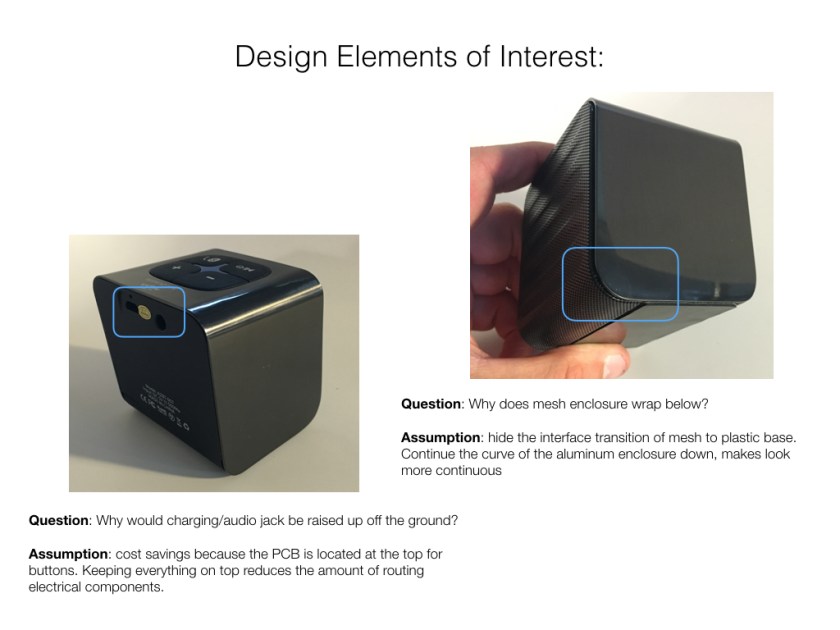
Design elements of interest above with text below.
Location of audio jack and charging port:
Question: Why would charging/audio jack be raised up off the ground?
Assumption: cost savings because the PCB is located at the top for buttons. Keeping everything on top reduces the amount of routing electrical components.
Mesh enclosure design:
Question: Why does mesh enclosure wrap below?
Assumption: hide the interface transition of mesh to plastic base. Continue the curve of the aluminum enclosure down, makes look more continuous
Nice job Andrew! Could you paste your longer bits of text into the blog post itself so it’s easier to read (and more search engine friendly, not that it particularly matters in this particular instance but it’s a good habit to get into)? Great callouts of details in photos, and thoughtful consideration of design details. Watch spelling on silicon/silicone.