Buttons
Digital Pull
State Change Detection
This is my creative button
1.I use the rotary switch to make the button.
2.And I use the reed switch to make the button.

State Change Detection
This is my creative button
1.I use the rotary switch to make the button.
2.And I use the reed switch to make the button.
Here are the videos:
Button Test –
Strandtest –
Switch –
This week I was tasked with designing an innovative switch.
While at brunch in Park Slope I saw a person put out a set of glass and metal espresso mugs with metal saucers. I put down my mimosa and went to retrieve them. The metal and act of removing the espresso mug from the saucer make the perfect parts of a switch.
 I used alligator clips to connect the batter place and led to the espresso saucer and mug. When the mug is on the saucer it completes the circuit turning on the led.


Check out the instagram video below!
Switches
http://www.youtube.com/watch?v=kGHHQWkFC6M&feature=youtu.be
Magnetic Switch
http://www.youtube.com/watch?v=kdcAzhEGU2o&feature=youtu.be

I wanted to make a switch with magnets. The idea was that the magnets which are put on magnetic boards with notes, pictures etc should light up when the two magnets come in contact with each other. The problem is that craft magnets generally dont conduct electricity, unless they are covered with a metallic surface.
This wearable housing for the Adafruit Flora incorporates light, sound and a unique capacitive touch sensing interface to allow a range of potential low-fi functions. This prototype functions as a light-up musical keyboard on your wrist for spontaneous musical interludes to your daily life.
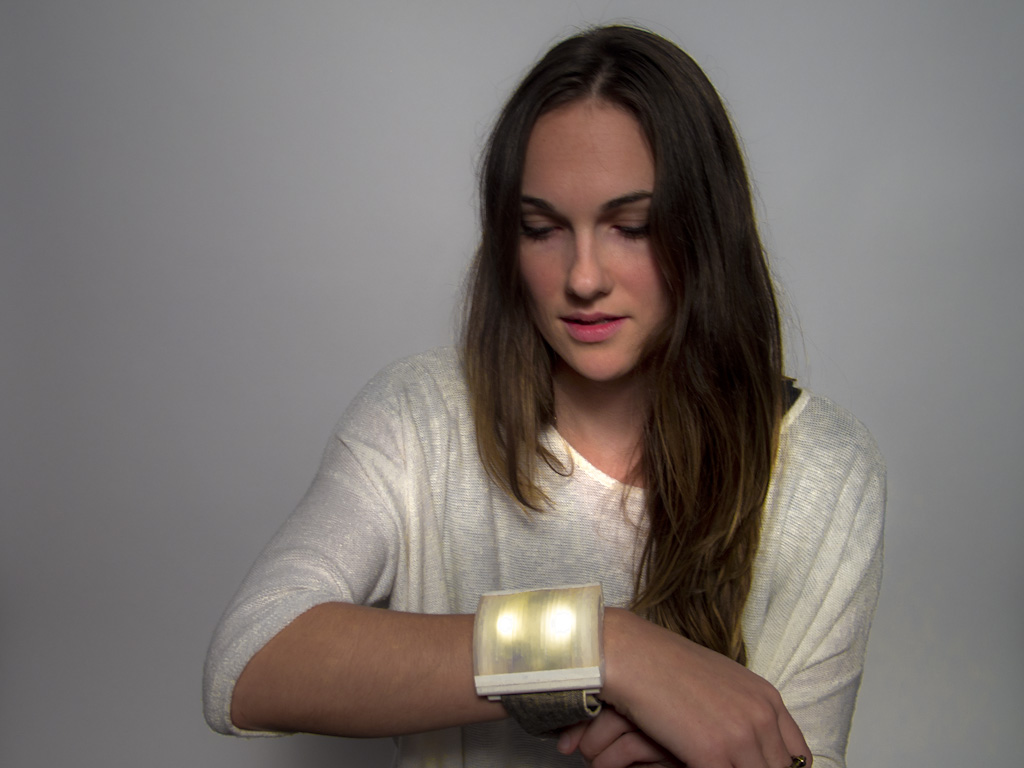


A 3D printed enclosure is capped with a translucent lid of laser-cut and laminated acrylic. The wristband is of muslin, with a Velcro clasp.

These capacitive buttons are very low-cost can be incorporated into a flexible medium, such as the fabric of the wristband, without adding bulk or rigidity. The consist of conductive fabric, with a machine-embroidered border and are connected to the micro-controller via conductive thread.

The Flora board is outfitted with two neopixels soldered directly to the board, a small rechargeable battery, and a piezo buzzer (shown unsoldered).
The computer models of the housing:


The bracelet is programmed to play four different arpeggiated chords in the key of G and flash a different color for each colors for each.
Watch the Video: http://www.youtube.com/watch?v=ey87flPV0ts&feature=youtu.be
Here’s the code:
#include <CapPin.h>
/* CapPin
* Capacitive Library CapPin Demo Sketch
* Paul Badger 2011
* This class uses the bullt-in pullup resistors read the capacitance on a pin
* The pin is set to input and then the pullup is set,
* A loop times how long the pin takes to go HIGH.
* The readPin method is fast and can be read 1000 times in under 10 mS.
* By reading the pin repeated you can sense “hand pressure”
* at close range with a small sensor. A larger sensor (piece of foil/metal) will yield
* larger return values and be able to sense at more distance. For
* a more senstive method of sensing pins see CapTouch
* Hook up a wire with or without a piece of foil attached to the pin.
* I suggest covering the sensor with mylar, packing tape, paper or other insulator
* to avoid having users directly touch the pin.
*/
CapPin cPin_2 = CapPin(2); // read pin 5
CapPin cPin_3 = CapPin(3);
CapPin cPin_4 = CapPin(9);
CapPin cPin_5 = CapPin(10);
#include <Adafruit_NeoPixel.h>
#define PIN 12
// Parameter 1 = number of pixels in strip
// Parameter 2 = pin number (most are valid)
// Parameter 3 = pixel type flags, add together as needed:
// NEO_KHZ800 800 KHz bitstream (most NeoPixel products w/WS2812 LEDs)
// NEO_KHZ400 400 KHz (classic ‘v1’ (not v2) FLORA pixels, WS2811 drivers)
// NEO_GRB Pixels are wired for GRB bitstream (most NeoPixel products)
// NEO_RGB Pixels are wired for RGB bitstream (v1 FLORA pixels, not v2)
Adafruit_NeoPixel strip = Adafruit_NeoPixel(2, PIN, NEO_GRB + NEO_KHZ800);
float smoothed;
float smoothed2;
float smoothed3;
float smoothed4;
#define NOTE_B0 31
#define NOTE_C1 33
#define NOTE_CS1 35
#define NOTE_D1 37
#define NOTE_DS1 39
#define NOTE_E1 41
#define NOTE_F1 44
#define NOTE_FS1 46
#define NOTE_G1 49
#define NOTE_GS1 52
#define NOTE_A1 55
#define NOTE_AS1 58
#define NOTE_B1 62
#define NOTE_C2 65
#define NOTE_CS2 69
#define NOTE_D2 73
#define NOTE_DS2 78
#define NOTE_E2 82
#define NOTE_F2 87
#define NOTE_FS2 93
#define NOTE_G2 98
#define NOTE_GS2 104
#define NOTE_A2 110
#define NOTE_AS2 117
#define NOTE_B2 123
#define NOTE_C3 131
#define NOTE_CS3 139
#define NOTE_D3 147
#define NOTE_DS3 156
#define NOTE_E3 165
#define NOTE_F3 175
#define NOTE_FS3 185
#define NOTE_G3 196
#define NOTE_GS3 208
#define NOTE_A3 220
#define NOTE_AS3 233
#define NOTE_B3 247
#define NOTE_C4 262
#define NOTE_CS4 277
#define NOTE_D4 294
#define NOTE_DS4 311
#define NOTE_E4 330
#define NOTE_F4 349
#define NOTE_FS4 370
#define NOTE_G4 392
#define NOTE_GS4 415
#define NOTE_A4 440
#define NOTE_AS4 466
#define NOTE_B4 494
#define NOTE_C5 523
#define NOTE_CS5 554
#define NOTE_D5 587
#define NOTE_DS5 622
#define NOTE_E5 659
#define NOTE_F5 698
#define NOTE_FS5 740
#define NOTE_G5 784
#define NOTE_GS5 831
#define NOTE_A5 880
#define NOTE_AS5 932
#define NOTE_B5 988
#define NOTE_C6 1047
#define NOTE_CS6 1109
#define NOTE_D6 1175
#define NOTE_DS6 1245
#define NOTE_E6 1319
#define NOTE_F6 1397
#define NOTE_FS6 1480
#define NOTE_G6 1568
#define NOTE_GS6 1661
#define NOTE_A6 1760
#define NOTE_AS6 1865
#define NOTE_B6 1976
#define NOTE_C7 2093
#define NOTE_CS7 2217
#define NOTE_D7 2349
#define NOTE_DS7 2489
#define NOTE_E7 2637
#define NOTE_F7 2794
#define NOTE_FS7 2960
#define NOTE_G7 3136
#define NOTE_GS7 3322
#define NOTE_A7 3520
#define NOTE_AS7 3729
#define NOTE_B7 3951
#define NOTE_C8 4186
#define NOTE_CS8 4435
#define NOTE_D8 4699
#define NOTE_DS8 4978
void setup()
{
Serial.begin(115200);
Serial.println(“start”);
strip.begin();
strip.show(); // Initialize all pixels to ‘off’
// slider_2_7.calibrateSlider();
}
void loop()
{
delay(1);
long total1 = 0;
long start = millis();
long total = cPin_2.readPin(2000);
long total2 = cPin_3.readPin(2000);
long total3 = cPin_4.readPin(2000);
long total4 = cPin_5.readPin(2000);
// simple lowpass filter to take out some of the jitter
// change parameter (0 is min, .99 is max) or eliminate to suit
smoothed = smooth(total, .1, smoothed);
smoothed2 = smooth(total2, .1, smoothed2);
smoothed3 = smooth(total3, .1, smoothed3);
smoothed4 = smooth(total4, .1, smoothed4);
//Serial.print( millis() – start); // time to execute in mS
//Serial.print(“\t”);
//Serial.print(total); // raw total
//Serial.print(“\t”);
//Serial.println((int) smoothed); // smoothed
//delay(2);
//Serial.print(“\t”);
//Serial.println((int) smoothed2); // smoothed
//delay(2);
//Serial.print(“\t”);
//Serial.println((int) smoothed3); // smoothed
//delay(2);
//Serial.print(“\t”);
//Serial.println((int) smoothed4); // smoothed
//delay(2);
if (smoothed>100 and smoothed2<100 and smoothed3<100 and smoothed4<100){
G_5 ();
}
if (smoothed<100 and smoothed2>100 and smoothed3<100 and smoothed4<100){
D_6 ();
}
if (smoothed<100 and smoothed2<100 and smoothed3>100 and smoothed4<100){
G_5 ();
}
if (smoothed<100 and smoothed2<100 and smoothed3<100 and smoothed4>100){
C_5 ();
}
if (smoothed<100 and smoothed2<100 and smoothed3<100 and smoothed4<100){
noTone(1);
}
}
void C_5(){
colorWipe(strip.Color(50, 50, 0), 0);
tone(1, NOTE_C5);
delay(100);
colorWipe(strip.Color(150, 150, 0), 0);
tone (1, NOTE_E5);
delay(100);
colorWipe(strip.Color(250, 250, 0), 0);
tone(1, NOTE_G5);
delay(100);
//tone (1, NOTE_C4);
//delay(30);
colorWipe(strip.Color(0, 0, 0), 0);
}
void G_5(){
colorWipe(strip.Color(50, 50, 50), 0);
tone(1, NOTE_G5);
delay(100);
colorWipe(strip.Color(150, 150, 150), 0);
tone (1, NOTE_B5);
delay(100);
colorWipe(strip.Color(250, 250, 250), 0);
tone(1, NOTE_D6);
delay(100);
//tone (1, NOTE_C4);
//delay(30);
colorWipe(strip.Color(0, 0, 0), 0);
}
void D_6(){
colorWipe(strip.Color(50, 0, 50), 0);
tone(1, NOTE_D6);
delay(100);
colorWipe(strip.Color(150, 0, 150), 0);
tone (1, NOTE_A5);
delay(100);
colorWipe(strip.Color(250, 0, 250), 0);
tone(1, NOTE_FS5);
delay(100);
colorWipe(strip.Color(0, 0, 0), 0);
}
void colorWipe(uint32_t c, uint8_t wait) {
for(uint16_t i=0; i<strip.numPixels(); i++) {
strip.setPixelColor(i, c);
strip.show();
delay(wait);
}
}
// simple lowpass filter
// requires recycling the output in the “smoothedVal” param
int smooth(int data, float filterVal, float smoothedVal){
if (filterVal > 1){ // check to make sure param’s are within range
filterVal = .999999;
}
else if (filterVal <= 0){
filterVal = 0;
}
smoothedVal = (data * (1 – filterVal)) + (smoothedVal * filterVal);
return (int)smoothedVal;
}
Using the selected word “Breakfast” from my original project (see image below), I set out to make a light-up banana that is off when closed and turns on when open.
By peeling back the outer layer, the inner banana is exposed and the light turns on.

to get the banana to glow when it is open I created a circuit using conductive thread and a zipper pull. When the zipper crosses over the path of the conductive thread it send a signal to ground which then turns on the neo-pixel strip.


This is the type of glow that I was going for, unfortunately, once the banana was stuffed and the neopixel strip was pushed to the top surface the individual pixels became more visible. I tried diffusing the light by turning down the brightness of the pixels as well as adding additional layers of fabric in between but neither seemed to do the trick.
I had a lot of difficulty figuring out the code to turn the strip on and off. Those neopixels are smart and then need to be told what to do in a very specific way. Thanks to Richard for all your help.
I would like to animate the strip to do more than just turn on and off, I tried used bits and pieces from the strandtest code to add to my code but I couldn’t quite figure out how to declare these new functions in the scope.


For my plush night light, I used my previous word “chandelier” to come up with a night light that can both act as a hanging light and a portable light source for trips to the bathroom during the night. When I wake up at night, it is too dark to traverse the hallways safely to the bathroom without a light source. As a result, I often bring my phone with me to use as a guiding light. Interestingly, I found that I am not alone, and many people experience this inconvenience too. I decided to solve this problem with my plush candelabra chandelier. When you wake up in the middle of the night, you can pull down on the hanging candelabra, detach it, and use it as a light source while walking around in your home at night. I named it the “Midnight Candelabra” since it is used in the late hours of the evening.


Although it was not a smooth ride to the finish line, I was able to get my candelabra to light up in a different way than I initially set out to. My initial plan was to be able to squeeze the handle to activate the LEDs using a conductive steel fiber. I felted the fiber to create a conductive sensor that is activated by squeezing it. However, I could not get the piece to consistently activate the code so I had to brainstorm other solutions to light my LEDs.

In the meantime, I hooked up my board and wires to a potentiometer to help determine that my code was working properly. I decided another good option would be to use a button switch which could be activated by squeezing the handle of the candelabra. Once I soldered all my wires and LED’s together, the push button would not activate. Although all my connections, code, and soldering were correct, the button still would not budge. I tried 2 different types of buttons which still would not activate the LEDs. As a result, I had to let go of my idea of activating it by squeezing the handle and use the battery pack as a switch instead. If I were to move forward with this project, I would explore other sensor options that would allow me to keep the electronic guts inside the plush candelabra.


Here is my final code:
const int button = 10; // Analog input pin that the potentiometer is attached to
int sensorValue; // value read from the sensor
const int ledPin = 6;
void setup() {
Serial.begin(9600);
pinMode(button, INPUT);
//pinMode(9, INPUT_PULLUP);
pinMode(ledPin, OUTPUT);
}
void loop() {
sensorValue = digitalRead(button);
Serial.print(“sensor = “);
Serial.println(sensorValue);
digitalWrite(ledPin, LOW);
if (sensorValue == 1)
{ //change the value depending on the sensor’s read in serial monitor
Serial.println(“leds triggered”);
digitalWrite(ledPin, HIGH);
delay(5000);
}
delay(100);
}
Hi all!
I managed to delete my entire post earlier today, however, here is the process for my phone case!

I started with a concept sketch of the pattern I wanted to create. These are the materials I ended up using:
-Gray wool, leather, 1 Piezo electric disc, 1 blue LED, Arduino UNO board.

I started by testing out the pattern. I had never used to sewing machine and I knew it was going to be a challenge even though the pattern I drew up seemed simple enough. Getting straight lines in that machine was hard! I will continue to practice this skill for sure.


I used the code from the “Knock” example as a base. I changed the “threshold” and the “delay” in hopes that the Piezo sensor would become sensitive enough to detect the cel phone’s vibration. Regardless of the code ( that works) it seemed that the vibrations of the phone alone wouldn’t trigger the threshold to go above 1.


Go to my instagram to see a video of me tapping the cel phone-case like a crazy man.
http://instagram.com/minuscoco
Thank you : )
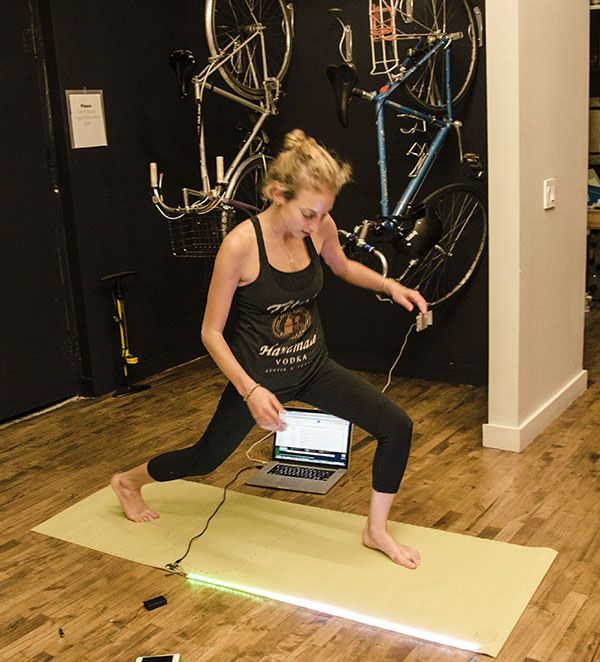
Before I set out to make my yoga superhero mat, I did some research and found a burgeoning yogi/superhero movement. Check it out here! There’s a pose in yoga called “Superman” and yoga helps people find their superhero within.

So first I had to write some code to make a yoga mat with velostat sensors that lights up. I took inspiration from these Firewalker LED sneakers and then made some adjustments so that the different pins corresponded to different velostat pads. You can see the prototype here.
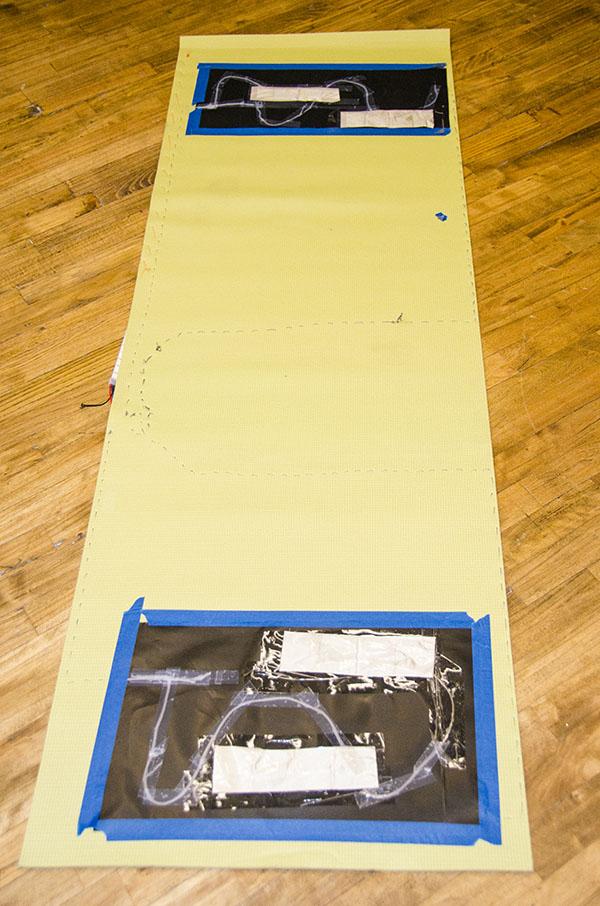
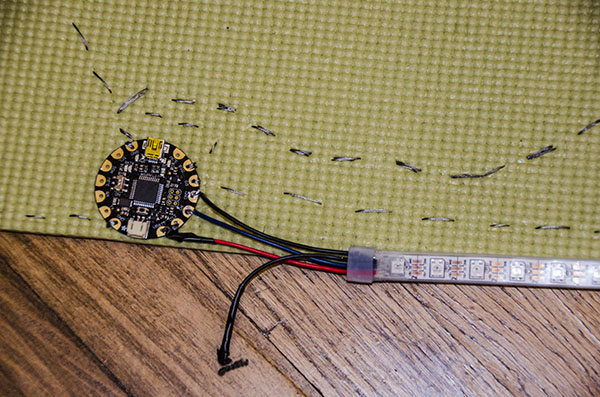
Next, I started to build the mat. I soldered the LED strip on the flora board and used conductive thread to sew from the sensors to the flora board. The code I wrote is for three sensors, but I used two so that things wouldn’t get too messy.
I used conductive thread so that the mat could still easily be rolled up and transported.
Now when I do yoga, the mat changes colors when I move around. I could see that this would make yoga more fun for kids and might propose the idea to Headstand. I also think that this would make for a rad yoga dance party! MC Yogi would LOVE it.

Check out the code and make your own light up superhero yoga mat!
#include <Adafruit_NeoPixel.h>
const int analogInPin = A9; // Analog input pin that the potentiometer is attached to
Adafruit_NeoPixel strip = Adafruit_NeoPixel(60, 6, NEO_GRB + NEO_KHZ800);
int sensorValueR = 0; // value read from the pot
int sensorValueG = 0; // value read from the pot
int sensorValueB = 0; // value read from the pot
const int ledPin = 7;
void setup() {
Serial.begin(9600);
pinMode(9, INPUT);
digitalWrite(9, HIGH);
pinMode(12, INPUT);
digitalWrite(12, HIGH);
pinMode(10, INPUT);
digitalWrite(10, HIGH);
strip.begin();
strip.show();
}
void loop() {
sensorValueR = analogRead(analogInPin);
Serial.print(“sensorR = “);
Serial.print(sensorValueR);
sensorValueG = analogRead(11);
Serial.print(“sensorG = “);
Serial.print(sensorValueG);
sensorValueB = analogRead(10);
Serial.print(“sensorB = “);
Serial.println(sensorValueB);
int r=0, g=0, b=0;
if (sensorValueR > 55) {
r=20;
}
if (sensorValueG > 352){
g=20;
}
if (sensorValueB > 65) {
b=20;
}
colorWipe(strip.Color(r, g, b), 25);
}
void colorWipe(uint32_t c, uint8_t wait) {
for(uint16_t i=0; i<strip.numPixels(); i++) {
strip.setPixelColor(i, c);
strip.show();
//delay(wait);
}
}