Embroidered Lamp Project

UPDATED IDEA

As an update for this project, I decided against the below sketch as I was having complications with my LDR piece, as after multiple attempts, I could get no reading off of the input.  Ultimately, after reconsidering the input, I came up with the little sketch below.

I am more pleased with this outcome, it is a bit more fun as well.


Cartoon sketch with embroidered sketch.


I was able to use one of the example codes File > Examples > .02Digital > Button in conjunction with the description on how to tweak a basic button function found in pages 43 – 50 in the Getting Started with Arduino book.

Was able to stab that little button through the fabric directly into the breadboard.

And the reverse, to show how I secured the LED.  I just embroidered the cord directly into the design.

ORIGINAL IDEA…

For this project I am exploring using an LDR to make a light detector lamp.  I am imagining a embroidered scene you can hang on a wall, which when the ambient light in the room fades, the LED “lamp” automatically turns on.

I have found this instructibles page that seems to explain the process fairly well.

Below is a quick sketch I put together today of the direction I had imagined this going.

Image

The Junkmail Flashlight

Hi all,

Hopefully you’ve noticed, by now, my previous post linking to the Junkmail Flashlight.  Clicking will not give you any email viruses or e-worms, not to worry.  Click and you will be taken to an oversize video, to be projected in class.

Having a bit more experience making three-dimensional works, I felt it would be a decent use of my time experimenting with the creation of an experience.  How effective this experience is, particularly of the flashlight aspect, may depend on the projection during tomorrow’s class.

I have taken the notion of junk mail as, essentially, spam.  Junk mail via email, rather than good old-fashioned snail mail.  I hope to share a bit of how I feel receiving junk mail, though in a slightly more overwhelming manner.

While I am a’ bloggin, let me take a moment to introduce some of my past work at www.dthonis.com

This slideshow requires JavaScript.

Turn the lights down low, get awfully close to your computer screen and double-click for the Junkmail Flashlight.

I hope you’ve enjoyed my spamming efforts.

-David

Durable Animated GIF.

For my “Durable Animated GIF” I first began to think about what it actually means to be “durable”.

I then began to create some rough storyboards on what the concept of my GIF would be to illustrate this adjective effectively.

I decided on myself to be the subject of “durable”. Humans seem pretty resilient & I happen to be one, so I guess I’m pretty durable. “Long-lasting” was a synonym that came up, so I wanted the animation to be a constant cycle in which the last frame transitions to the first frame well in a repetitive sequence. People seem to enjoy watching other people getting punched or kicked over & over again as well (ie America’s Funniest Home Videos & the crazy guy below).

The source file of the GIF I created is copied to 3 of my personal computers, on 4 external drives (3 thumb drives & 1 external hard drive), uploaded to 2 cloud storage servers & attempting to upload it to Amazon Glacier (their super archival secure cloud storage service). The image below shows the final GIF playing in the VFL on the Panasonic Toughbook.

& here’s the final Durable Animated GIF.

Thanks to Richard for being gentle.

Damon

TURN OUT THE LIGHTS STARE REAL HARD DOUBLE CLICK JUNKMAIL FLASHLIGHT

TURN OUT THE LIGHTS!  STARE REAL HARD!  DOUBLE-CLICK!  JUNKMAIL FLASHLIGHT!

TURN OUT THE LIGHTS!  STARE REAL HARD!  DOUBLE-CLICK!  JUNKMAIL FLASHLIGHT!

TURN OUT THE LIGHTS!  STARE REAL HARD!  DOUBLE-CLICK!  JUNKMAIL FLASHLIGHT!

TURN OUT THE LIGHTS!  STARE REAL HARD!  DOUBLE-CLICK!  JUNKMAIL FLASHLIGHT!

(You could be a winner!)

TURN OUT THE LIGHTS!  STARE REAL HARD!  DOUBLE-CLICK!  JUNKMAIL FLASHLIGHT!

Upcycled Teapot

I had the pleasure of creating an upcycled teapot during this past week. This means that the teapot is to be created from other things. Early on I wanted to work with either metal or marble, and after showing up to school with an inch thick steel pipe I chose to downgrade the heaviness. Instead I wanted to create a teapot from only one other thing. My choice fell onto an aluminum coffee bean container. The former lid of the coffe packaging became the handle of my teapot, and instead the user can place his or her saucer as a lid. That means that you can heat the milk of your tea at the same time as you heating your water.


Magnetic Water Carrier

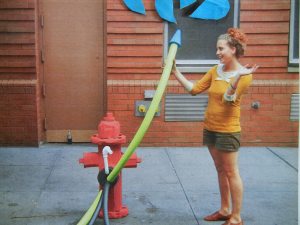
These rambunctious neighborhood kids during a heat wave on a summer day were the inspiration for the fire hydrant extension.  One of my favorite things about living in Brooklyn is the gathering around the fire hydrant to stay cool.

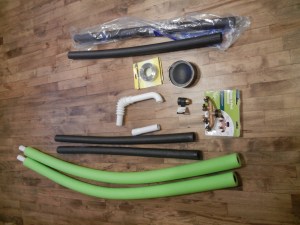
Supplies were investigated and gathered from hardware stores and summer clearance.

I decided to use a low-fi way of crafting to celebrate the ideas of play and fun this design embodies.

The extension has a magnetic attachment which holds to the cast iron of the fire hydrant.  Most fire hydrant water isn’t potable so the magnets have a dual purpose of filtering the water. One can easily fill up a bottle to stay hydrated on those hot summer days.

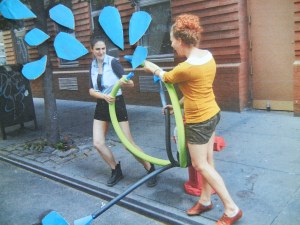
Play can be diverted to the side walk, helping children stay safe from traffic.

Different nozzles on the hoses create different jets and streams of water.

Everyone enjoys cooling off!

DIY Light-up Blow-out Party Favor

The project dictated that I make an electric party favor. I chose to make a tutorial video describing the process by which one can take ordinary inexpensive party favors and “light them up”.

Initially I was very ambitious, thinking of ways to make a breath-sensitive switch to activate the light, or how to make a strip of lights along the blowout, but in the end I chose to make something that could be more readily replicable at home. Also, it was very important to me that what I made, being electrical, be fully functioning and I was not confident in the feasibility of my earlier ideas.

The instructional video I made is lengthy but comprehensive, as if it were made for someone with no real experience with circuitry. I hope that it’s length and thoroughness isn’t too much of a deterrent for it to be useful.

Here is an establishing shot of the supplies and a picture of the circuit concealed under the face.


Project One: Vegan Phone Dock

Research, Tutorials and Hacks:

The Vegan Iphone Dock:

This is an iphone dock designed specially for vegans. It is based on multi level Kit-set distribution model. The highest level is the Deluxe kit, with comes with everything needed excluding the fruit and crate. The Standard kit requires the user to find, hack or purchase a dog clip, copper wire, galvanized wire, fruit and a crate. There is also a free demo that shows hacker-vegans to make the entire kit from scratch by themselves.

The system works of a fairly well know chemical reaction that causes ions to move when the citric acid comes into contact with the zinc on the galvanized wire. Although sometime the iphone doesn’t indicate that it is charging it actually is, just at a much slower level than is required to switch on the charging indicator. Over time the fruit and wire will need replacing but that is the fun of the kit.

The kit was designed to suit a range of vegans from ‘standard vegans’ to ‘ultra vegans’ who criticize anything that removes natural landscapes and habitats from animals, sometimes this includes conventional electricity systems, thus the v-dock was born.

Coming to Etsy late 2013 starting at $49.90 + shipping.

Context Image 1.

Context Image 2.

Main Image 1.

Main Image 2.

by Richard Clarkson

Paperavioli (paper craft ravioli cutter)

My object was “Kitchen Utensil” and my descriptor was “Paper Craft.”  I found a site online that described how to make a 16 pointed modular star: origami That made me think of a ravioli cutter that scores pasta. I also wanted to do something I had never done before and using the laser cutter for the first time seemed like a great way to do that!

For the handle I was inspired by Damon who ordered and assembled a deer and moose, cardboard laser cut model for our studio: cardboard safari

After printing the components I assembled and bonded the pieces. To make the ravioli cutter “semi” functional I proxy glued x-acto blades to the points in the star. Here is a slide show of some images from my process.

This slideshow requires JavaScript.

Below is a demo video of the Paperavioli scoring pasta:

Paper Bag Pub Game

For Project #1 (Paper Bag Pub Game). I was really inspired by the beer coasters and the way recent designs have been made to incorporate the drinker with a game that is printed on the coaster. I cut up a green garbage bag and ironed it so it became a square. Then I cut out smaller pieces of plastic bags and wrote certain things that needed to be performed while at the bar. The top of coaster can be ripped open and inside the green plastic pouch would be all these pieces of plastic with dares written on them. Hopefully Your Still Standing When The Games Over!