Tools I used:
- 8-in-1 Precision Slotted and Philips Screwdriver
- A single driver
- 4 double-sided bits include #000, #00, #0 and #1 Philips tips and 1/16 in., 5/64 in., 3/32 in. and 1/8 in. slotted tips
It’s my first time fully tearing down a mouse and the result surprised me. I have not imagined before how many components/parts can go into one fist-sized mouse after laying them all out on a flat table. For example, just the internal body part consists of 22 screws, which is more than some furniture that I have built. During my teardown process, I also realized how some parts are specifically made to be more adhesive and difficult to dissemable.

For example, I was stuck at the very first step, trying to figure out how to get into the inner parts of the mouse. Then I found out that the screws were all hidden under the nylon feet with adhesive materials under the mouse. I am impressed at how the mouse included the nylon feet to cover the screws to make the design as a whole look seamless while providing a smooth surface to support the mouse to better sense the movement.

Some other difficulties I came across was taking apart the scroll wheel that was fixed with a spring and a few plastic pieces that helps stabilizing it while scrolling. Taking apart the scroll required the help of a second person. Also, the metallic piece located on the left side of the mouse that lets the finger rest was tightly attached to the main surface with adhesive, so I tried using a screwdriver to pry it open with force, but I ended up breaking it into two pieces.

After unscrewing all the tiny screws located below the exterior body parts from the mouse, there are many little round “buttons” that lock the three main body parts together. I inserted the screwdriver into the slit between the body parts, and tried lifting it from one side first and as the gap in between gets bigger, I break apart the body parts like how I would open a crab.

The first part of the mouse that I like is the OMRON D2FC-F-7N switch which serves as the mouse’s right and left clicks. How it functions is that there’s a leaf spring under the microswitch that reflexes when we hit on them and it only works when the leaf spring is placed at the very bottom notch of the microswitch. A click will send electrical signals via metallic contact to the computer. This is the core of a mouse and always wanted to know how it responds when interactions occur.

The second component of the mouse that I found interesting was the Atmega324PA microcontroller. This is the microchip that enables the mouse to run. It is incredible to see how a finger-sized chip can store so much data and information to make a mouse functional. For example, this microchip alone has “32 KB ISP Flash memory with read-while-write capabilities, 1 KB EEPROM, 2 KB SRAM, 32 general purpose I/O lines, 32 general purpose working registers, a real-time counter, three flexible timer/counters with compare modes and PWM and many more.” And this microchip operates in a single clock cycle that delivers specific instructions throughout to balance the power consumption and the processing speed.
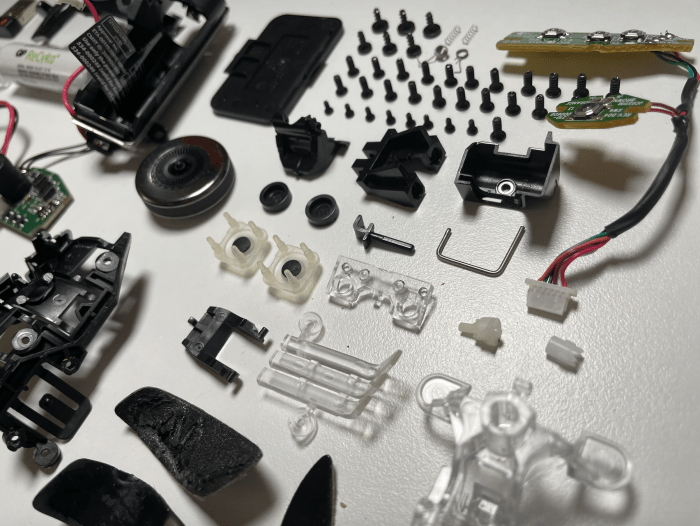
Logitech Performance MX Mouse Parts:
- 4 nylon feet
- 1 scroll wheel with a black locking pin
- 2 springs for the scroll wheel
- 2 Double-click culprit: OMRON D2FC-F-7N switch
- 22 mouse internal screws
- 8 small Philips head screws
- 4 screws that hold the two body parts
- 4 PH1 and 2 T5 screws on the bottom

- 3 exterior body parts
- 1 interior body part
- 1 internal plastic clip under thumb rest
- 1 flat flex ribbon cable/connector
- 1 Atmega324PA microcontroller (enables the mouse to run)
- 1 circuit board
- Nordic NRF24L01 chip with trace antenna (Bluetooth wireless communication)
- 1 power switch
- 1 battery holder
- 1 battery cap
- 1 thermistor within the battery housing to prevent over-temperature
- 1 optical mouse lens
- 1 USB dongle
- 1 optical encoder