
Author: Ted Scoufis
Homework 3
I tried to change the LED fade speed when pushing the button but I couldn’t figure out how to integrate the code.
<pre>
/*
Button
Turns on and off a light emitting diode(LED) connected to digital pin 13,
when pressing a pushbutton attached to pin 2.
The circuit:
– LED attached from pin 13 to ground
– pushbutton attached to pin 2 from +5V
– 10K resistor attached to pin 2 from ground
– Note: on most Arduinos there is already an LED on the board
attached to pin 13.
created 2005
by DojoDave <http://www.0j0.org>
modified 30 Aug 2011
by Tom Igoe
This example code is in the public domain.
http://www.arduino.cc/en/Tutorial/Button
*/
// constants won’t change. They’re used here to set pin numbers:
const int buttonPin = 2; // the number of the pushbutton pin
//const int ledPin = 9; // the number of the LED pin
// variables will change:
int buttonState = 0; // variable for reading the pushbutton status
int ledpin = 9; // the PWM pin the LED is attached to
int brightness = 0; // how bright the LED is
int fadeAmount = 5; // how many points to fade the LED by
void setup() {
// initialize the LED pin as an output:
pinMode(ledPin, OUTPUT);
// initialize the pushbutton pin as an input:
pinMode(buttonPin, INPUT);
}
// the loop routine runs over and over again forever:
void loop() {
// set the brightness of pin 9:
analogWrite(ledPin, brightness);
// read the state of the pushbutton value:
buttonState = digitalRead(buttonPin);
// change the brightness for next time through the loop:
brightness = brightness + fadeAmount;
// reverse the direction of the fading at the ends of the fade:
if (brightness <= 0 || brightness >= 255) {
fadeAmount = -fadeAmount;
}
// check if the pushbutton is pressed. If it is, the buttonState is LOW:
if (buttonState == LOW) {
// turn LED on:
delay (30);
} else {
// turn LED off:
delay (5);
}
}
}
</pre>
Assignment II
Today marks the second day of my expedition into Arduino education. So far the geography has been manageable. I look forward to the challenges that await me. Additionally, I need to make sure that the legs of the LEDs, resistors and jumpers are all connected properly.
iPhone 6 Tear down
I began with a whole but broken iPhone 6. I used a suction cup to pull of the screen, a plastic prying lever, and several small screw drivers: a flat head, a Phillips head and a small torx head for the first two bolts on next to the lightening port. 
I proceeded to slowing peal away the layers.

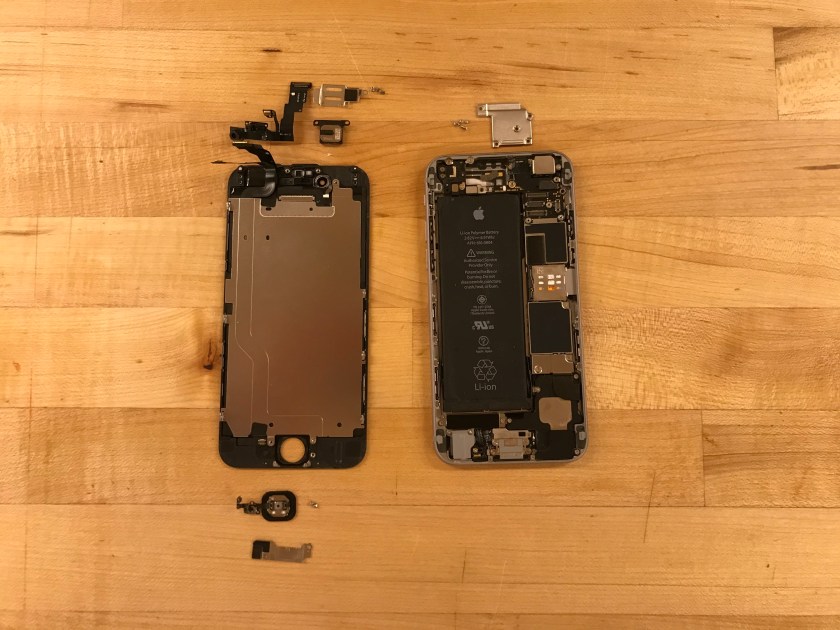


There are so many parts in the iPhone it is hard to say it is made from one primary material. Clearly, when holding on I phone we can readily identify the CNC’ed aluminum receiver and the LCD touch screen. Once inside there is the battery which takes up a 50% of the real estate inside the receiver. Surrounding it is a complicated network of connections between chips, plugs and buttons.
There were several chips with numbers on them:
- dtv44434 j5jfyphay
- 1AA1C7H44872 02AG16QAY
- QUALCOMM MDM9625M OBA B4Y882.0 H244403: this is a mobile data modem
- AVAGO A8020 KA1444 JR172 OB00M: power amplifier
- AVAGO A8010 KA1444 JP157 OT00M: power amplifier
- 77356-8 08161.1 1446MX:power amplifier
- 77802-23 6411573.1 1446 MX: power amplifier
- 77803-20 6415705P 1447 MX: power amplifier
- APPLE A8: processor
Two design design elements I found interesting were the polished logo on the back of the receiver and the shock absorbing corners. The log was interesting because it was a separate piece from the receiver that fit into holes cut into it. I tried to pry it out but I was unable to The corners showed how the receiver cleverly hid shock absorption into the phone.


I am Ted Scoufis
 Hi all, I am Ted. I love challenging settings. I am looking forward to immersing myself in the world design. Before Products of Design I served in the Army and attended Columbia University. I served for four years in the Army as a member of the 75th Ranger Regiment. This last spring I completed my undergrad in Political Science. In spite of my urban condition I yearn to be in the outdoors. Prior to moving to NYC I strove to become a high altitude mountaineer. In this process I became rather comfortable climbing Mt. Rainier and I summited Mt. Denali. I would say that my appreciate for design came from extensive experience in its application both in the Army and mountaineering. I look forward to finding ways to inform my prolific experience as a user with my political science education.