Designers spend time on matching colors. However, the best matching inspirations sometimes come from the nature around us. The lamp is designed to help designers get objects’ RGB color. (See details in Instructables)
Process
Step 1 – Ideation
Project started from concept ideation. I created ideas from abstract shapes to realistic products. Sketching will help you to visualize ideas flying in your head. Meanwhile, you can also find “smart product project” online for getting creative inspirations. The channels related to smart object, physical computing, IoT, etc are listed below:
Once you get clear idea of concept, you can start making a shopping list. Before you go to check, make sure all the parts are available with each other. I recommend you to buy circuit on Adafruit, which has clear spec and instruction.
When soldering components together, remember to differentiate channels with different colors. The circuit I designed having Uno, color sensor, neopixel strip, and photoresistor.
Black – Uno Ground + Color sensor Ground + Neopixel Ground + Photoresistor Round
Red – Uno 5v + Color sensor VIN + Neopixel 5v + Photoresistor Positive
Yellow – Uno SCL + Color sensor SCL
Blue – Huzzah SDA + Color sensor SDA
White – pin for Photoresistor
Green – pin number for Neopixel
Step 4 – Physical Structure
Cutting basal foam for making structure and hiding circuit. Using solid ring wood piece as the base of Neopixel strip.
Step 5 – Finalize
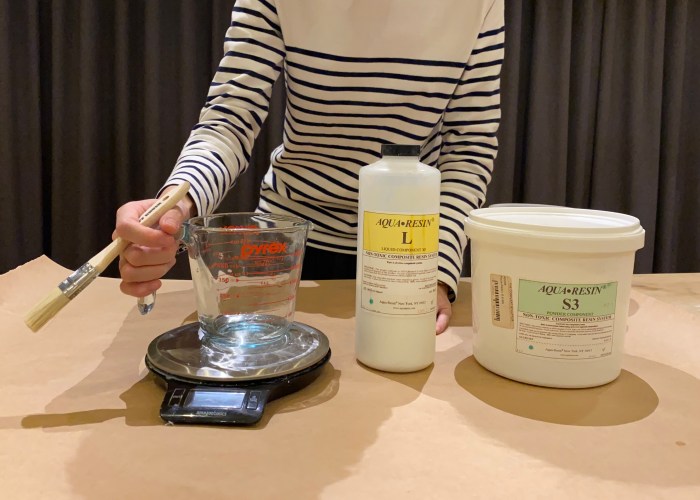
In order to get smooth and high-quality texture of product surface, I used aqua resin(the most typical mix ratios of liquid and powder are 1:3 by weight or 1:2 by volume) to coat the balsa foam and sanded with sanding paper.
Next Step
In order to using color efficently, the next step will use Huzzah instead of Uno and send objects’ RGB Decimal Code to users through the internet.
Material preparation – Soldering – Coding – Test – Drill – Spray Paint – Re-soldering – Add diffusion paper – Combining parts – Final test
Material List
Black boots – Borrow from second year students
Black cape – PartyCity
Vader’s helmet – PartyCity
Diffusion paper – Blick
Button – Adafruit kits
Wire – VFL
12 inches Translucent Tube – Canal Plastic
Steel Tube – PoD scrap
Neopixel Strip – Adafruit
Plastic Cap – Homedepot
Spray Paint – Homedepot
Battery – Adafruit kits
Learning
Soldering: shorten the cut parts of wires to avoid touching each other. Shrinking cover the wire and strip’s cover.
2. Hiding: think in advance how to hide the wire, battery, circuit, and especially how to put the button stably.
3. Diffusion: think about how to better diffuse light more equal in 360 degrees’ angles. (Drafting paper V.S. translucent polystyrene paper)
Coding
// Simple demonstration on using an input device to trigger changes on your // NeoPixels. Wire a momentary push button to connect from ground to a // digital IO pin. When the button is pressed it will change to a new pixel // animation. Initial state has all pixels off — press the button once to // start the first animation. As written, the button does not interrupt an // animation in-progress, it works only when idle.
include
ifdef AVR
#include // Required for 16 MHz Adafruit Trinket
endif
// Digital IO pin connected to the button. This will be driven with a // pull-up resistor so the switch pulls the pin to ground momentarily. // On a high -> low transition the button press logic will execute.
define BUTTON_PIN 2
define PIXEL_PIN 1 // Digital IO pin connected to the NeoPixels.
define PIXEL_COUNT 34 // Number of NeoPixels
define BRIGHTNESS 220
int led = 1; // the PWM pin the LED is attached to int brightness = 0; // how bright the LED is int fadeAmount = 5;
// Declare our NeoPixel strip object: Adafruit_NeoPixel strip(PIXEL_COUNT, PIXEL_PIN, NEO_GRB + NEO_KHZ800); // Argument 1 = Number of pixels in NeoPixel strip // Argument 2 = Arduino pin number (most are valid) // Argument 3 = Pixel type flags, add together as needed: // NEO_KHZ800 800 KHz bitstream (most NeoPixel products w/WS2812 LEDs) // NEO_KHZ400 400 KHz (classic ‘v1’ (not v2) FLORA pixels, WS2811 drivers) // NEO_GRB Pixels are wired for GRB bitstream (most NeoPixel products) // NEO_RGB Pixels are wired for RGB bitstream (v1 FLORA pixels, not v2) // NEO_RGBW Pixels are wired for RGBW bitstream (NeoPixel RGBW products)
void setup() { pinMode(BUTTON_PIN, INPUT_PULLUP); strip.begin(); // Initialize NeoPixel strip object (REQUIRED) strip.show(); // Initialize all pixels to ‘off’ }
void loop() { // Get current button state. newState = digitalRead(BUTTON_PIN);
// Check if state changed from high to low (button press). if((newState == LOW) && (oldState == HIGH)) { // Short delay to debounce button. delay(20); // Check if button is still low after debounce. newState = digitalRead(BUTTON_PIN); if(newState == LOW) { // Yes, still low modeNum = modeNum + 1; if(modeNum > 3){ modeNum = 0; } if(modeNum == 0){ // turn off colorWipe(strip.Color(0,0,0), 0); delay(1000); } if(modeNum == 2){ // colorwipe to red then stop. // this only run once after button click, so this part is // put inside the button click block colorWipe(strip.Color(255,0,0), 100); } /if(++mode > 3) mode = 0; // Advance to next mode, wrap around after #8 switch(mode) { // Start the new animation… case 0: colorWipe(strip.Color(255,0,0), 0); // Black/off break; case 1: colorAll(strip.Color(255,0,0), 50); // Red break; case 2: analogWrite(strip.Color(255,0,0), 50); // Red break; }/ } }
// Set the last-read button state to the old state. oldState = newState;
/if(modeNum == 0){ // turn off colorWipe(strip.Color(0,0,0), 0); delay(1000); }/ if(modeNum == 1){ // colorwipe red, then fully dark colorWipe(strip.Color(255,0,0), 100); colorWipe(strip.Color(0,0,0), 0); } /else if(modeNum == 2){ // this part cannot be run with loop }/ else if(modeNum == 3){ // all fade in and out fadeInOutOnce(10); } }
// Fill strip pixels one after another with a color. Strip is NOT cleared // first; anything there will be covered pixel by pixel. Pass in color // (as a single ‘packed’ 32-bit value, which you can get by calling // strip.Color(red, green, blue) as shown in the loop() function above), // and a delay time (in milliseconds) between pixels. void colorWipe(uint32_t color, int wait) { for(int i=0; i<strip.numPixels(); i++) { // For each pixel in strip… strip.setPixelColor(i, color); // Set pixel’s color (in RAM) strip.show(); // Update strip to match delay(wait); // Pause for a moment } }
void fadeInOutOnce(int wait) { for(int j = 0; j < 160; j++){ for(int i=0; i 0; j–){ for(int i=0; i<strip.numPixels(); i++) { // For each pixel in strip… strip.setPixelColor(i, strip.Color(j,0,0)); // Set pixel’s color (in RAM) strip.show(); // Update strip to match } delay(wait); // Pause for a moment } }
The helmet is the most important part of his suit. The most apparent purpose it serves is to help Vader breathe.
The rest of Vader’s suit is mostly made up of protective materials to shield his fragile body, which include garments, an armored breastplate, a girdle, and the system status belt.
A lightsaber in red.
Making Process
Step 1: Cut a 4-5 inches cuboid wood in the half, make a groove in both of pieces, and clue together.
Step 2: Make a specific shape with Wood Lathe Machine.
Step 3: Code in “buttoncycler” with 4 different modes(off, normal on, one by one, and vibration switch) on Gemma.
Step 4: Cut a long clear pipe(size TBD) and put NeoPixel strip inside of it. (TBD: light diffusion)
Step 5: Hide Gemma in a Pingpang ball on the bottom.
Step 6: Spray paint, the end!
Material List
Costume(done)
One PingPang ball(ask CA)
Long clear wipe(Home Depot)
Wood piece(VFL)
Red Long LED Strip(Check with Becky)
Coin-size Batteries(Amazon)
Have a Try on “ButtonCycler”
 case 0:
      colorWipe(strip.Color( 0, 0, 0), 50); // Black/off
      break;

 case 1:
      colorWipe(strip.Color(255,   0,   0), 50);    // Red
      break;

 case 2:
     void setup() {
      pixels.begin();
      }
      void loop() {
      setColor();
      for (int i=0; i < NUMPIXELS; i++) {
      pixels.setPixelColor(i, pixels.Color(255, 0, 0));
      pixels.show();
      delay(delayval);
       }
      }

 case 3:???
Target User: People who always lose bracelets and rings in somewhere.
Scenario: 15 mins later when you get home, the bracelet hill and the ring hill will remind you to keep your items in the right place for avoiding losing them.
Material: 3 blue LED, 1 green LED, 4 resisters, 2 different colors’ fabric, chipboard, 2 magnets, wires, solder, white thread, 2 fabric balls, stuffings, electrical tape instead of heat shrink.
Process
Experience
Remember to put tube before soldering. Wire tabs could be the alternative materials, but not as robust as tube.
The size of circuit would be best to match the size of plush. Otherwise, you need to find a cover for it.
Target User: People who always lose bracelets and rings in somewhere.
Scenario: 15 mins later when you get home, the bracelet hill and the ring hill will remind you to keep your items in the right place for avoiding losing them.
Material: 2 different colors’ fabric, 5 LED(3 in white and 2 in blue), a wood box, box cover(fabric probably), chipboard, heavy stone or sth.