SMART FORT

Interactive play space for kids

A hideout space for kids with interactive lights and sounds embedded in 3 cushions. One cushion using conductive fabric acts as a control to choose the combination of light and sound to create a fun environment. One cushion is embedded with a speaker. The third cushion has RGB lights inside.

DSC_0092DSC_0056

DSC_0096DSC_0050

Smart Fort Video

Instructables for the Project

Web

It got featured on Instructables today and got ‘popular’.

http://www.adafruit.com/blog/2013/12/11/smart-fort-interactive-hideout-for-kids-wearablewednesday/


Secret World – II

Secret World Tent idea –

Designing for – Kids between age 2-6

Concept – To create playful environments through light and sound while playing, reading stories, sleeping etc.

Interactions –

1. Lights up when you enter – Infra red sensor

2. Choose color of light – LED STRIP, Buttons mounted on a board to switch on.

3. Choose from different modes (sleep, jungle, dance, play, rhymes) -Speakers, recorded sounds, Buttons mounted on a board to play.

Secret World

I am really interested in doing something for kids. Although I almost sealed on the idea of safety device for women, the idea for designing something for kids is holding my interest more.

From one of my previous project, I have been really interested in how kids create space and environment with their imagination. Under the desks, inside cartons, surrounding with pillows, etc.

Fotor0808161826-630x350

I want to create something for this space which celebrates their imagination, encourages story making and telling, stimulation for crafting own fun activities etc. I can either build a simple tent shape with wood, or work with an existing one like this below – Froggy+Fun+Play+Tent

I will update with a more concrete interaction soon. Open to suggestions and teaming up!

Switches and Innovative Switch

Switches

http://www.youtube.com/watch?v=kGHHQWkFC6M&feature=youtu.be

Magnetic Switch

http://www.youtube.com/watch?v=kdcAzhEGU2o&feature=youtu.be

whiteboard with yellow note for a message

I wanted to make a switch with magnets. The idea was that the magnets which are put on magnetic boards with notes, pictures etc should light up when the two magnets come in contact with each other. The problem is that craft magnets generally dont conduct electricity, unless they are covered with a metallic surface.

Illuminadrum

DSC_0626

Drum

Sourced a drum after 4 hours of roaming Manhattan. This one was loud, meant to be played kids, was open from the bottom to give me space to fit electronics.

Started out playing with different codes http://www.arduino.cc/en/Tutorial/Knock after making a temporary circuit on Arduino Uno. It was fun to play with the piezo sensor. I wanted to ambitiously change the brightness with the impact on the sensor. I was almost there but the light wouldn’t go out in static position. Learnt about Mapping, countdown etc in coding.

Untitled-1

DSC_0630 (2)

DSC_0634

Soldered the LEDs in a parallel circuit

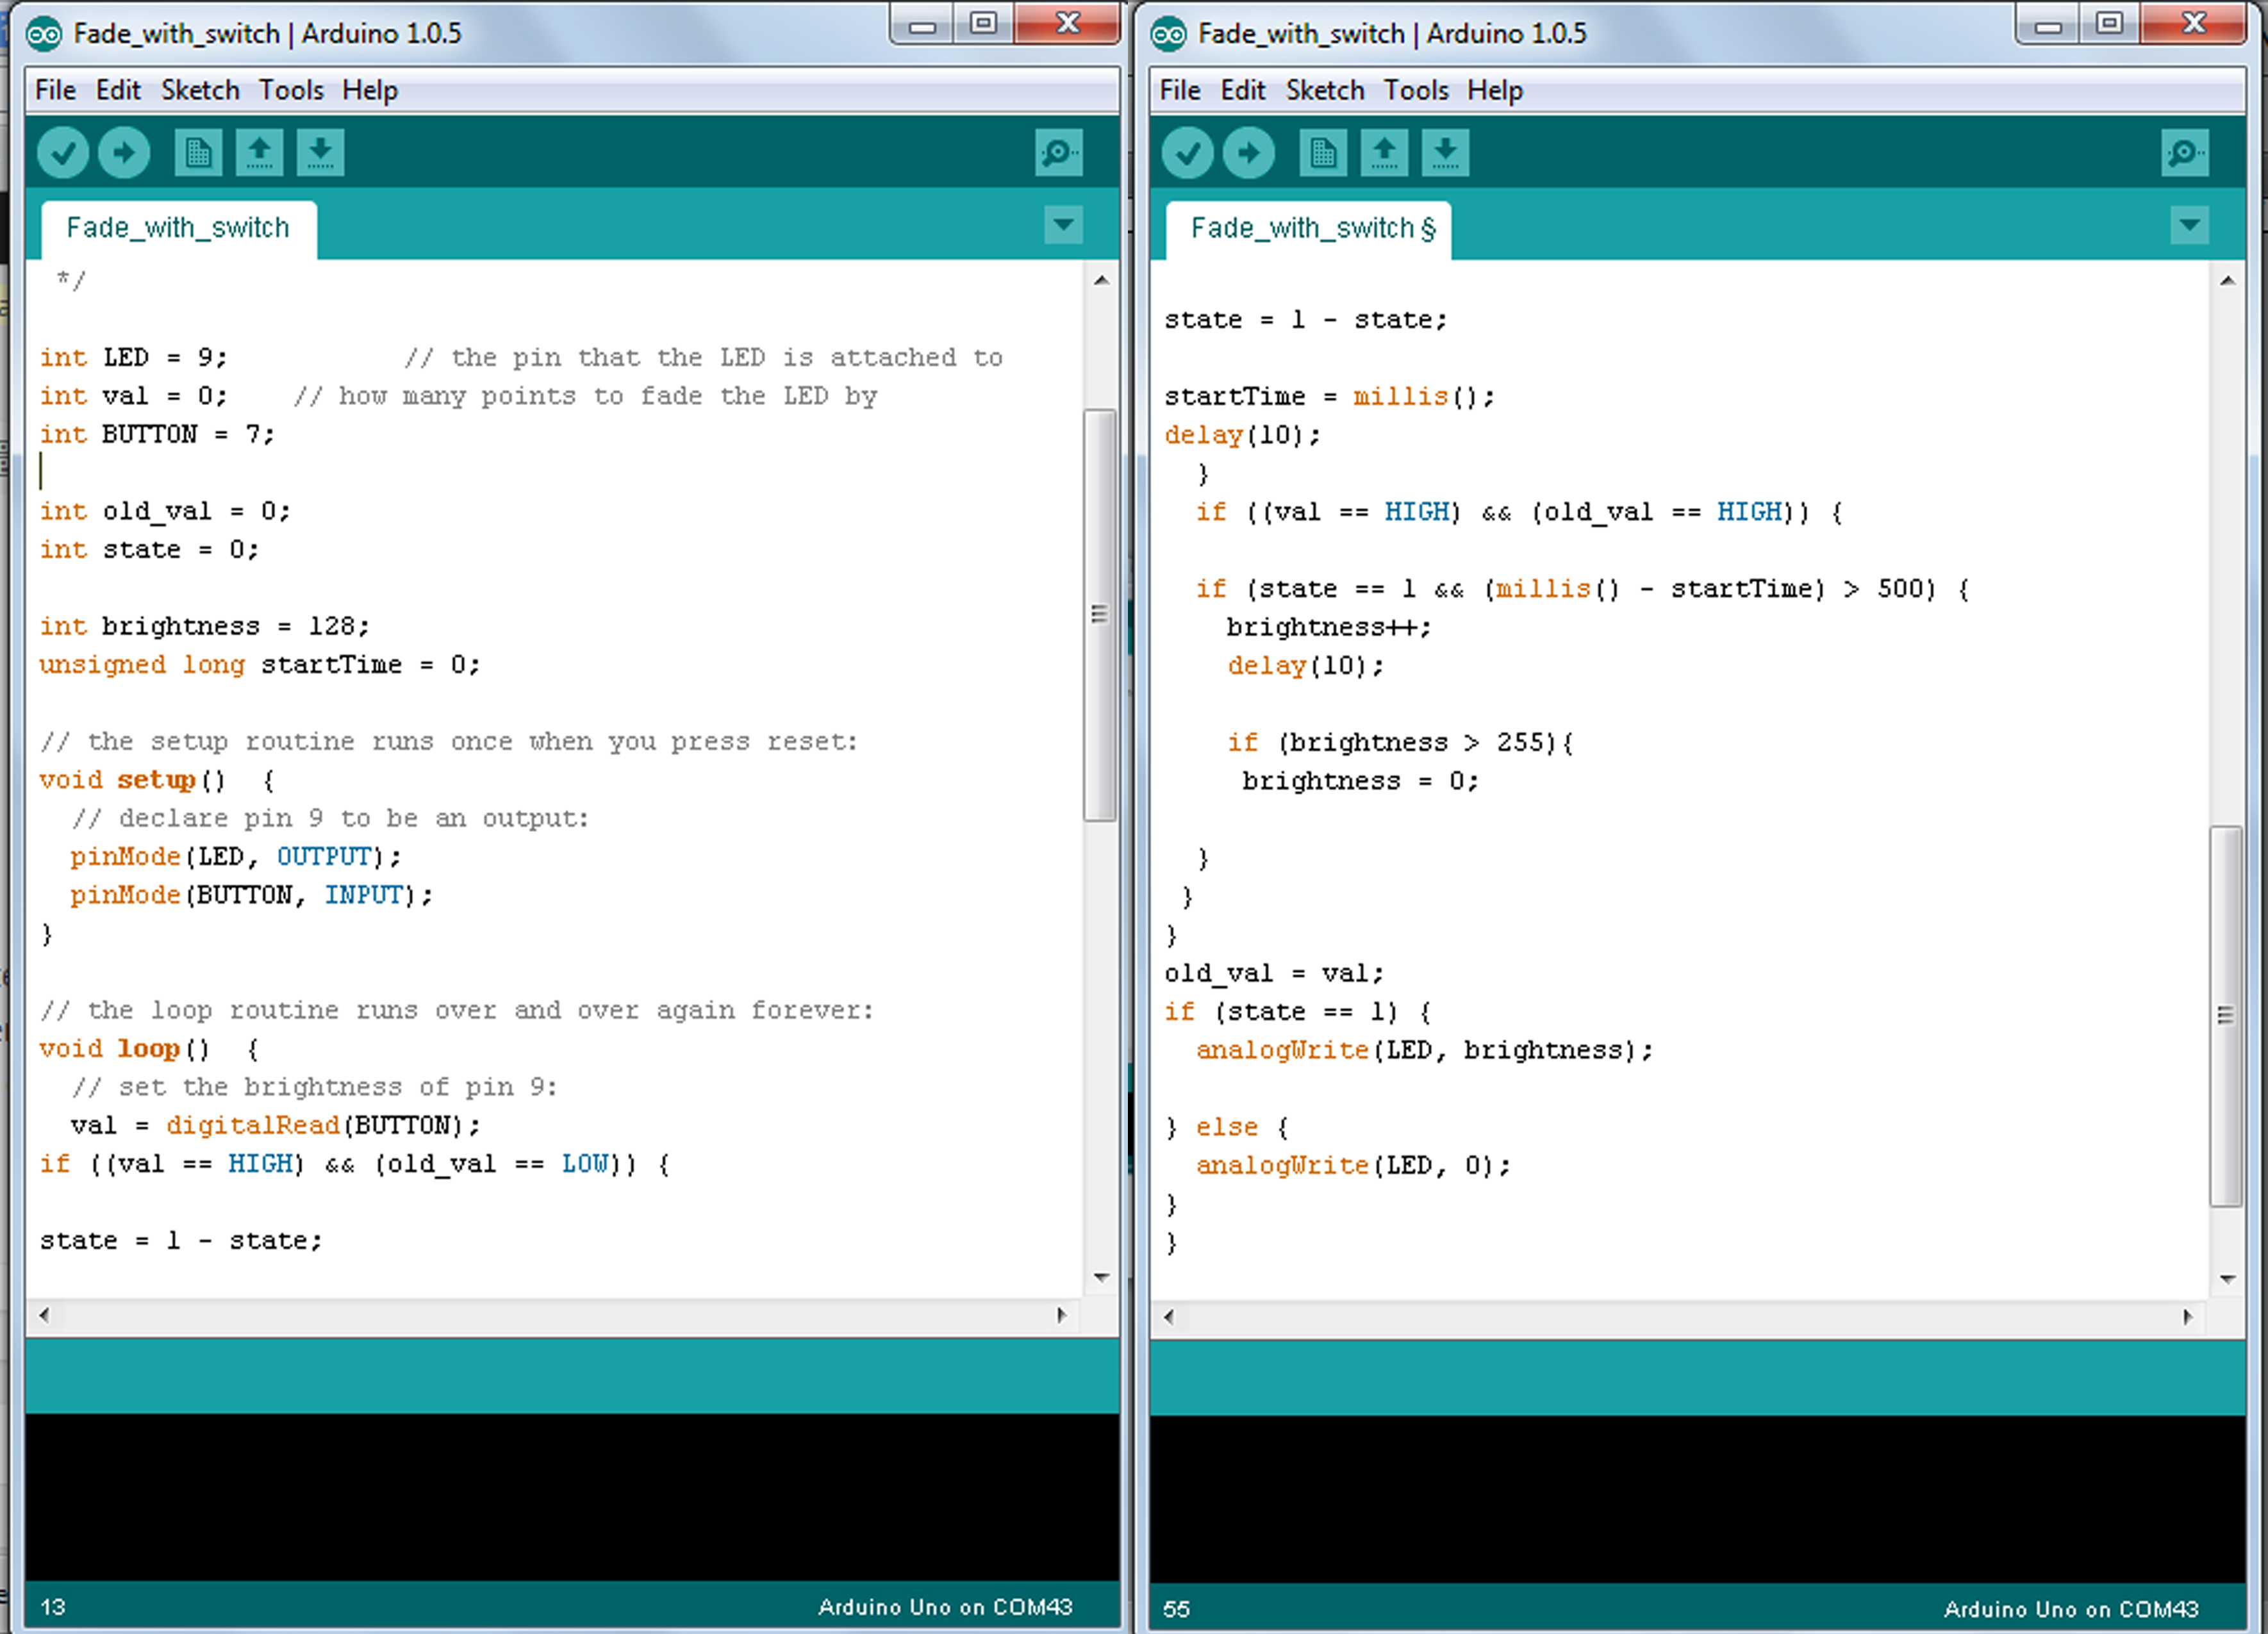
Finally used a Digital interaction instead of Analog one. Code:
// these constants won’t change:
const int ledPin = 11; // led connected to digital pin 13
const int knockSensor = A0; // the piezo is connected to analog pin 0
const int threshold = 1; // threshold value to decide when the detected sound is a knock or not
// these variables will change:
int sensorReading = 0; // variable to store the value read from the sensor pin
int ledState = 0; // variable used to store the last LED status, to toggle the light
int mapFade= 0;
int brightnessLED = 0;
int countDown = 0;
int fadeDown = 0;

void setup() {
pinMode(ledPin, OUTPUT); // declare the ledPin as as OUTPUT
Serial.begin(9600); // use the serial port
}

void loop() {
// read the sensor and store it in the variable sensorReading:
sensorReading = digitalRead(knockSensor);
// if the sensor reading is greater than the threshold:
if (sensorReading >= threshold) {

// send the string “Knock!” back to the computer, followed by newline
int cSensorReading = constrain(sensorReading, 0, 50);
mapFade = map(cSensorReading, 0, 50, 0, 255);
brightnessLED = brightnessLED + mapFade;

digitalWrite(ledPin, HIGH);

Serial.print(“knock!”);
Serial.println(sensorReading);
Serial.print(“constrain”);
Serial.println(constrain(sensorReading, 0, 10));

} else{digitalWrite(ledPin, LOW);}

delay(10); // delay to avoid overloading the serial port buffer
}

DSC_0010

Ad_blue man group

SEE THE VIDEO 🙂

http://www.youtube.com/watch?v=PQ_t-vmfd3I&feature=youtu.be

Thank you

Led FADE

Fading the Led —-

Fading the Led with a switch —–

code

Then I was playing with a infra-red proximity sensor. I wanted to change light color according to proximity, but that didnt happen. I did however learn how to read the readings on the serial monitor, which shows that it is working and reads different numbers and different proximity to the sensor.

Embroidered + Musical Instrument

research

Exploring : different meanings of Embroidered, Musical instruments, techniques, integration of the two words

Untitled-1

Challenge : How to learn an old technique while keeping it unpredictable. How to embroider an instrument into being. 

Blog 1

process

Making : I decided to embroider an instrument (not over it). It would feel like its the embroidery which helps it make music. After many glitches and failures, I made a guitar like instrument which plays with the idea of old and new. Metal and electric guitar strings + embroidery.

girl in a red dress

brand 2

blog3

🙂