The Costume Summary
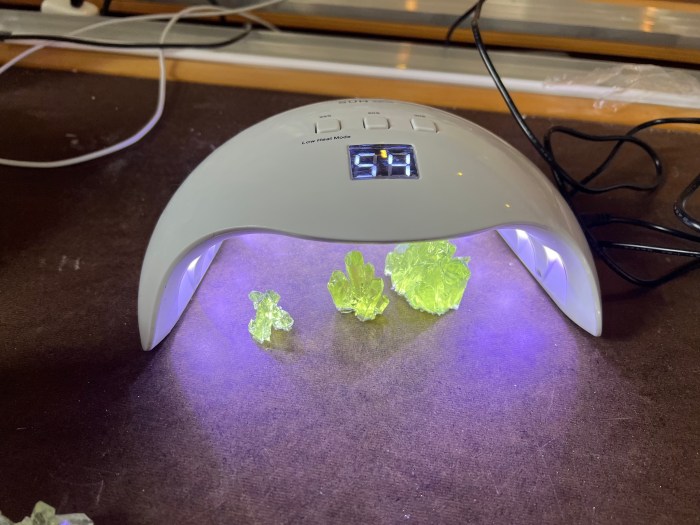
My costume is a headless skeleton holding their own glowing crystal skull. I made it because I thought it was an interesting concept to try and pull off. I’ve never worn or created a headless costume. I also loved the idea of creating resin crystals that would light up. The crystals light up with light pulses and then a rainbow animation.
Wearability
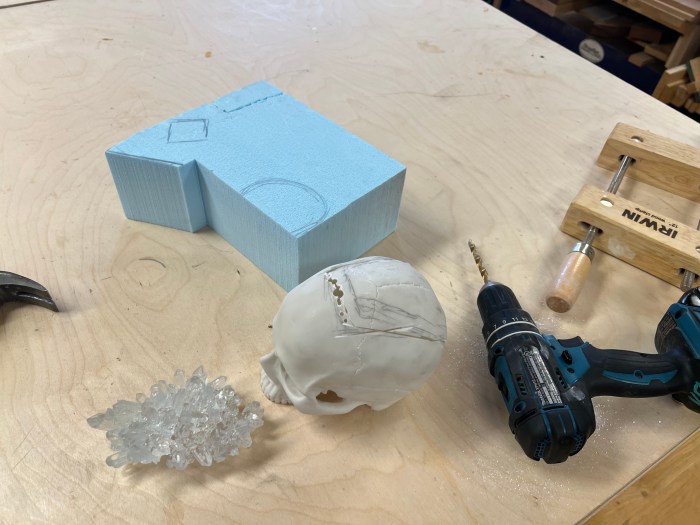
In terms of wearability. The skeleton is easy comfortable outfit. It’s made from an existing skeleton costume with reflect vinyl bones cut out and pasted over the top of the bones. The head is the delicate part. It is not completely secure so that the crystals can be removed and the LED and batteries inserted.
My Takeaways
The process took much longer than I expected. The skull took the majority of the time because making the crystal piece took lots of playing around to get right. Cutting the vinyl bones was also tedious.
Overall, I really loved making the skull it was really satisfying to see it all come together. It look a lot of problem solving in terms of figuring out how to get the LED and crystals to sit properly in the skull. Next time, I’d anticipate spending more time on problems solving for something I’ve never made before. Also the resin took a lot longer because of the cure time and because I ended up making many more crystals since the molds were smaller than expected.
For the future, I wouldn’t want to shy away from doing something that seems difficult or that there is no real reference point for. I learned a lot it just takes longer!
Materials
plastic skull
Crystal Resin molds
Resin mix + UV curing light
Flexible NeoPixel LED strip (60 LED) – cut into 2 pieces (14 LEDS/strip)
Gemma MO – adafruit
Li-Ion 500 mAh Battery
Blue Foam
Hot Glue & X-acto knife
Gorilla glue
Small plastic Tupperware container
Flexible plastic cutting board
Arduino Code
#include <Adafruit_NeoPixel.h>
#ifdef __AVR__
 #include <avr/power.h> // Required for 16 MHz Adafruit Trinket
#endif

// Which pin on the Arduino is connected to the NeoPixels?
// On a Trinket or Gemma we suggest changing this to 1:
#define LED_PIN   A1

// How many NeoPixels are attached to the Arduino?
#define LED_COUNT  30

// NeoPixel brightness, 0 (min) to 255 (max)
#define BRIGHTNESS 50 // Set BRIGHTNESS to about 1/5 (max = 255)

// Declare our NeoPixel strip object:
Adafruit_NeoPixel strip(LED_COUNT, LED_PIN, NEO_GRB + NEO_KHZ800);
// Argument 1 = Number of pixels in NeoPixel strip
// Argument 2 = Arduino pin number (most are valid)
// Argument 3 = Pixel type flags, add together as needed:
//   NEO_KHZ800  800 KHz bitstream (most NeoPixel products w/WS2812 LEDs)
//   NEO_KHZ400  400 KHz (classic 'v1' (not v2) FLORA pixels, WS2811 drivers)
//   NEO_GRB     Pixels are wired for GRB bitstream (most NeoPixel products)
//   NEO_RGB     Pixels are wired for RGB bitstream (v1 FLORA pixels, not v2)
//   NEO_RGBW    Pixels are wired for RGBW bitstream (NeoPixel RGBW products)

// Change These Variables
int maxBrightness = 100;
int minBrightness = 6;
int fadeSpeed = 15;

void setup() {
  // These lines are specifically to support the Adafruit Trinket 5V 16 MHz.
  // Any other board, you can remove this part (but no harm leaving it):
#if defined(__AVR_ATtiny85__) && (F_CPU == 16000000)
  clock_prescale_set(clock_div_1);
#endif
  // END of Trinket-specific code.

  strip.begin();           // INITIALIZE NeoPixel strip object (REQUIRED)
  strip.show();            // Turn OFF all pixels ASAP
  strip.setBrightness(BRIGHTNESS);
}

void loop() {
    pulseColor(strip.Color(27, 103, 107), fadeSpeed); // Teal
    pulseColor(strip.Color(27, 103, 107), fadeSpeed); // Teal
    pulseColor(strip.Color(27, 103, 107), fadeSpeed); // Teal
    pulseColor(strip.Color(240, 40, 140), fadeSpeed); // Pink
    pulseColor(strip.Color(27, 0, 240), fadeSpeed); // Blue
    rainbow(13);

}

void pulseColor(uint32_t c, uint8_t wait) {
  //Increase Brightness / Fade In
  for(int i=minBrightness; i<maxBrightness; i++) {
      strip.setBrightness(i);
      for(int x=0; x<strip.numPixels(); x++){
        strip.setPixelColor(x,c);
      }
      strip.show();
      delay(wait);
  }
  //Lower Brightness / Fade Out
  for(int i=maxBrightness; i>minBrightness; i--) {
       strip.setBrightness(i);
      for(int x=0; x<strip.numPixels(); x++){
        strip.setPixelColor(x,c);
      }
      strip.show();
      delay(wait);
  }
}

//GRADIENT RAINBOW

void rainbowFade2White(int wait, int rainbowLoops, int whiteLoops) {
  int fadeVal=0, fadeMax=100;

  // Hue of first pixel runs 'rainbowLoops' complete loops through the color
  // wheel. Color wheel has a range of 65536 but it's OK if we roll over, so
  // just count from 0 to rainbowLoops*65536, using steps of 256 so we
  // advance around the wheel at a decent clip.
  for(uint32_t firstPixelHue = 0; firstPixelHue < rainbowLoops*65536;
    firstPixelHue += 256) {

    for(int i=0; i<strip.numPixels(); i++) { // For each pixel in strip...

      // Offset pixel hue by an amount to make one full revolution of the
      // color wheel (range of 65536) along the length of the strip
      // (strip.numPixels() steps):
      uint32_t pixelHue = firstPixelHue + (i * 65536L / strip.numPixels());

      // strip.ColorHSV() can take 1 or 3 arguments: a hue (0 to 65535) or
      // optionally add saturation and value (brightness) (each 0 to 255).
      // Here we're using just the three-argument variant, though the
      // second value (saturation) is a constant 255.
      strip.setPixelColor(i, strip.gamma32(strip.ColorHSV(pixelHue, 255,
        255 * fadeVal / fadeMax)));
    }

    strip.show();

    delay(wait);

    if(firstPixelHue < 65536) {                              // First loop,
      if(fadeVal < fadeMax) fadeVal++;                       // fade in
    } else if(firstPixelHue >= ((rainbowLoops-1) * 65536)) { // Last loop,
      if(fadeVal > 0) fadeVal--;                             // fade out
      } else {
      fadeVal = fadeMax; // Interim loop, make sure fade is at max
    }
  }

}

 // Rainbow cycle along whole strip. Pass delay time (in ms) between frames.
void rainbow(int wait) {
  // Hue of first pixel runs 5 complete loops through the color wheel.
  // Color wheel has a range of 65536 but it's OK if we roll over, so
  // just count from 0 to 5*65536. Adding 256 to firstPixelHue each time
  // means we'll make 5*65536/256 = 1280 passes through this outer loop:
  for(long firstPixelHue = 0; firstPixelHue < 5*65536; firstPixelHue += 256) {
    for(int i=0; i<strip.numPixels(); i++) { // For each pixel in strip...
      // Offset pixel hue by an amount to make one full revolution of the
      // color wheel (range of 65536) along the length of the strip
      // (strip.numPixels() steps):
      int pixelHue = firstPixelHue + (i * 65536L / strip.numPixels());
      // strip.ColorHSV() can take 1 or 3 arguments: a hue (0 to 65535) or
      // optionally add saturation and value (brightness) (each 0 to 255).
      // Here we're using just the single-argument hue variant. The result
      // is passed through strip.gamma32() to provide 'truer' colors
      // before assigning to each pixel:
      strip.setPixelColor(i, strip.gamma32(strip.ColorHSV(pixelHue)));
    }
    strip.show(); // Update strip with new contents
    delay(wait);  // Pause for a moment
  }
}
Process Photos