The video of my final project experience follows.
Author: carterbrigham
Carter’s Works in Progress/Proposal/Arduino Attempt


I tried at school, on my hotspot and at home and could not connect to the internet.


Carter’s IoT and final proposals

I was able to get the onboard LED to blink red but was unsuccessful at the other points:(.
My 3 ideas are for the lights to blink when the front door opens, for the light in the bedroom to get brighter to wake you in the morning or to get a notification if the temperature in the house goes too low.
Carter’s Halloween Costume
Winkin’, Blinkin’ Shirt

My costume was a shirt with the light of 5 neopixels diffused by white ping pong balls. I downloaded the code with help from Becky to get a random pattern of white lights. The hardest part beyond looking with glassy-eyed wonder at the Arduino code was keeping a steady (and once, a red-hot) hand to solder such a tiny thing repeatedly to 6 different wires per pixel. I had to resolder a few pieces and learned that the energy flow only goes one direction on pixels. The thread I had to sew the neopixels through the tiny holes in the fabric and around the wires was weak so I sewed it many times through creating a wild mass that looked like a bird’s nest…..but it held. Between the sewing and a small amount of hot glue for attaching the ping pong balls, I was sure the costume would fall apart in route to school so I brought plenty of supplies. Much to my amazement, the costume was perfect for the whole evening.
While I picked the costume because I thought it would be cute and doable, I would probably refashion my plush nightlight to be an eyeball and make another 10 or more blinking eyes. I think a multitude of lights would create a more impactful visual show. Also, other than the ball on my back the other lights ran down my arm. I would probably have varied the placement to be in different parts of my trunk too.
Items needed for costume.
https://www.adafruit.com/product/4356 for the neopixels
one Adafruit Gemma circuit, 3 different colors (for keeping things straight) of many-thread wire, solder, ping pong balls, one cheap long black shirt from Goodwill, battery pack and 3 AA batteries, hot glue, thread.
Circuit diagram

Arduino code – eyeball


Progress pics


Carter’s Halloween Progress
I have soldered all my neopixels to the Gemma and the strand test was successful to all lights. Starting tomorrow I will begin cutting the shirt and attaching ping pong balls to the outside to look like eyes. I need to figure out how to make the lights white and blink at random intervals. I didn’t create a Tinkercad circuit because they don’t have Adafruit Gemmas as options.


Carter’s NeoPixels practice/Halloween proposal
NeoPixel circuitry vid and Tinker cad.

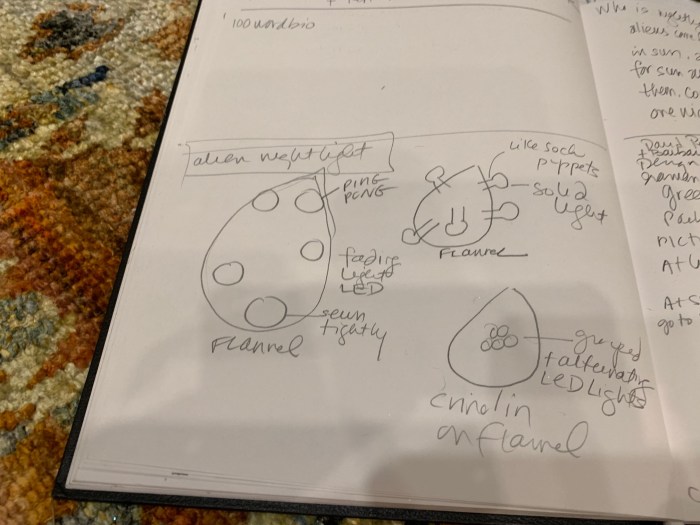
Three costume ideas (maybe more tomorrow..)- a black dress or jacket with two eyes blinking- on both front and back or blinking one at a time, like a wink. or a dress with lots of eyes- different colors, blinking on and off. A BIG ALIEN-SOOTHING NIGHTLIGHT 🙂 . materials- flannel, ping pong balls, wire, glue, led, solder, dress, thread, battery pack, battery, microchip.
Alien Soother: Plush Night Light. – Carter


The nightlight is for aliens who live on a planet always in the sun. They arrive on Earth on a moonless night, down a country road where the only light is from a little kid’s room. The Alien Soother Nightlight is there, the balm needed. The target audience is for young children who are afraid of the dark and aliens, AND aliens afraid of the dark and humans.
The nightlight is very calming and relaxing (and I’m not saying that because it’s late…;) because of it’s muted light source and the white and orange glow.
I used fleece, white ping pong balls, white thread, a battery pack with 2 batteries, wire- red, white, orange, gray, classic fiber fill, heat wrap, LED lights, resistors, solder.
This was a super-fun process. I did not know exactly how it would roll out as so much is new and yet a repeat of what we did in class and viewed on line helped… A gentle introduction and confidence-builder for those of us new to sewing, soldering, electricity. I had to repeat a few steps because my soldering was sub-par or I’d forgotten to include the heat-shrinking material before I soldered. I used way too much wire length-wise. If I’d had more time I would have made a more expressive object, done a more exacting sewing job and figured out why my 5th ping pong ball lit less brightly than the others.


Carter’s Plush Night Light Proposal
Works in Progress

Chiffon Heartbeat


These nightlights (and the third in sketch) are for aliens who arrived at night on Earth from a planet always in the sun. Terrified they landed on a country road where the only light was from a little kid’s room. These were the nightlights that soothed the aliens. The target audience is young kids afraid of the dark and aliens AND aliens afraid of the dark and human kids.
The materials are chiffon, flannel, nylon, ping pong balls, electrical wires, resistors, LEDs, battery pack.
My sketches are below but for my first try and with the battery pack, I think a simple on and off switch with is more likely than using the fading or alternative blinking lights….

Carter’s homework class 2 – Arduino
Avent Electronic Breast Pump Teardown
Carter Brigham


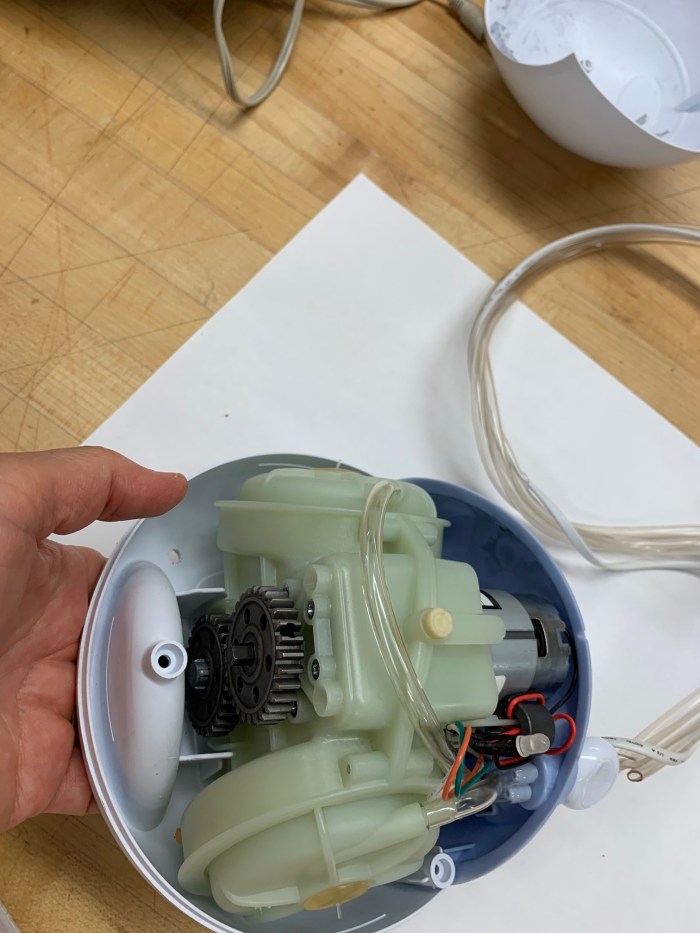


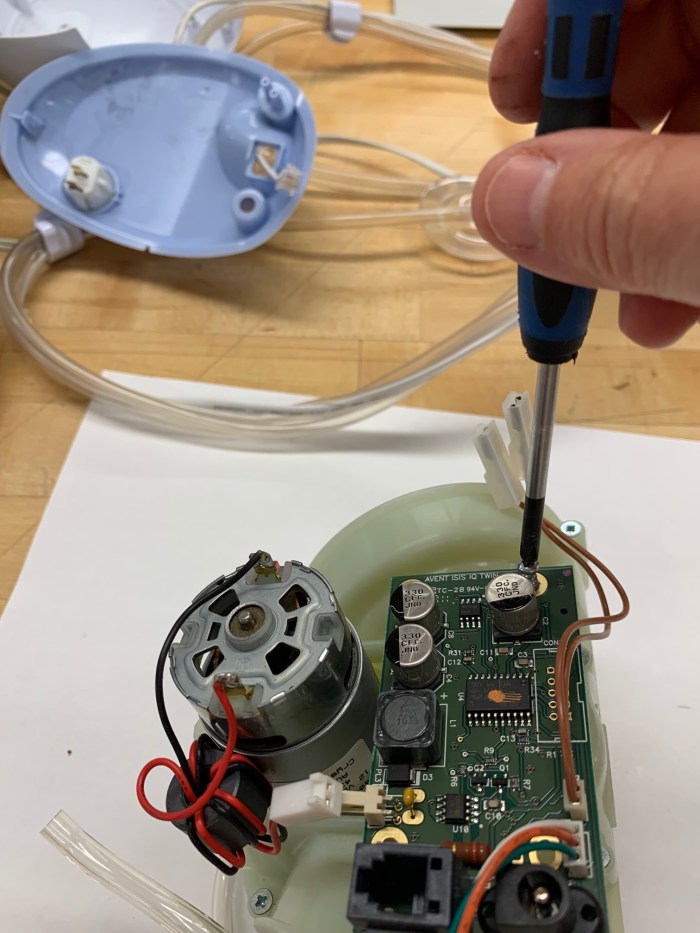


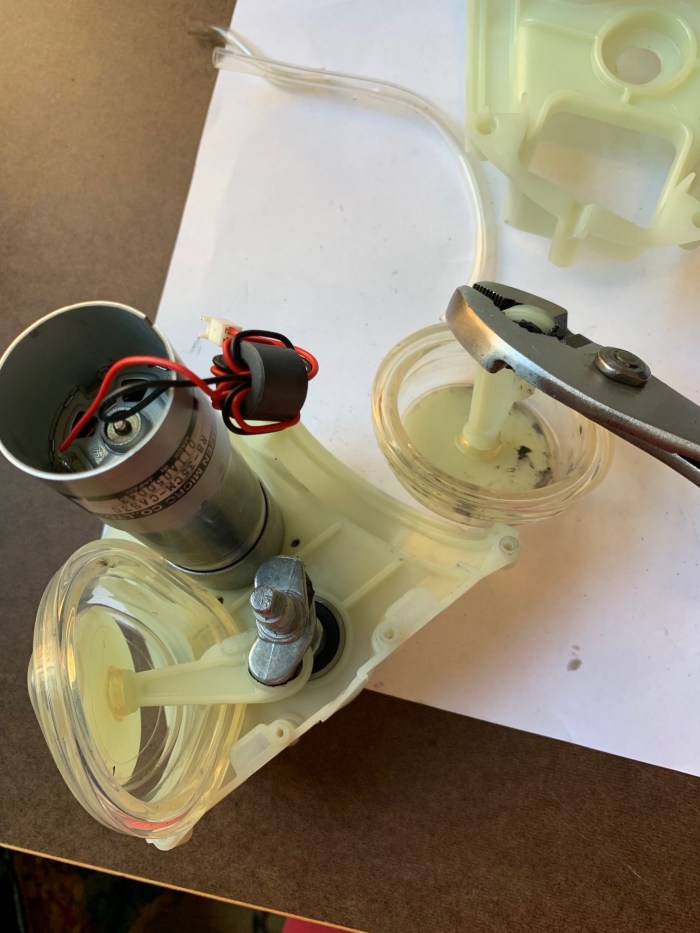


The materials in the pump were hard plastic (high-density polyethylene- HDPE), plastic tubing (polyurethane), gears (steel, gear oil, magnet), flexible diaphragms (polyurethane, hard plastic fittings to attach – HDPE), clips (HDPE), screws (steel), screw covers (polyurethane), circuit board (copper-plated fiberglass material, epoxy resin, polyamide and polyester film), resistors (metal, PVC insulation), capacitors (electrodes, metal plates, dielectric insulating material, ceramic material), microchip (semi-conductor material, silicon, wires -copper, PVC insulation), motor (steel, wire, brush, electro-magnet, gear oil).
Manufacturing techniques needed to make a breast pump include, but are not limited to, injection molding for hard plastic (reciprocating screw, venting air, coolant, ejector pins/sprue removal, stamping), machining aluminum mold for injection mold (16,000 lb machine, reamers, end mills, torque wrench, gauges, cobalt steel twist drill, coolant), electrical wire (copper block, lubricated pulleys dye and stretch, low voltage conductors, insulated plastic extrusion machine, coat with PVC, precision laser confirm uniformity, cool in water trough, stamp information, voltage test), plastic tubing (vacuum hose, dry, augers mix, heat, extruder, heat, cool in trough, pulled through water through rollers, laser measure uniformity, pull by conveyer), gears (automated band saw slice, drill, cool, turret with blades drill, stamp, titanium cutter shape gears’ insides, gear hopper cuts outside, furnace, inject with carbon, grinder), circuit board (cut board, apply resin and film, etch, chemical bath), resistors, capacitor, motor, microchip (ventilation, vacuum to maintain dust-free space, cut silicone, oxidize in furnace, centrifuge, stepper exposure machine, plasma etching).
To take apart the breast pump I used a Phillips-head screwdriver, a wrench, hand saws and my hands.
The designers chose to create a device that allows the machine to mimic the woman’s own baby’s sucking rhythm. By manually pumping, she can press a button on the handle when she finds a match. The machine will then repeat or ‘remember’ the timing. I don’t understand how this works but it is the selling point of this model.
An electric breast pump exists because the diaphragm covers the breast and the motor pulls at regular intervals mimicking the real experience so milk is released and expressed into an easy-to-use container. The action begins with sharp, short pulls of suction and then increases to longer and stronger motions. As a working mother this invention made my intentions for the health of my babies what I wanted.