 Here is the link to my Instructables tutorial.
Thanks a lot to all my class mates, and specially to Becky for all the help and support.
Here is the link to my Instructables tutorial.
Thanks a lot to all my class mates, and specially to Becky for all the help and support.


Here is the first prototype I made, the Hanging Soul light. It’s based on my first idea I posted last week, which is an attempt to help humans accept death and normalise the natural fact that living organisms are born and die, and we shouldn’t make death a taboo subject. Instead we should come closer to the idea throughout our lives in order to achieve acceptance in a natural manner when we have to say goodbye to a loved one.
Ideally it could hang from the ceiling and float in the room, instead of against the wall.
I would like the LED to be inside of the felt circumference in order to get a diffused cool light, and not be able to spot the light source.


The circuit would be simple, battery powered and would like to include a switch button inside of the white hanging sphere. I may need to make the sphere diameter bigger in order to fit also the battery inside of it, as well as add an access point like a velcro or button.

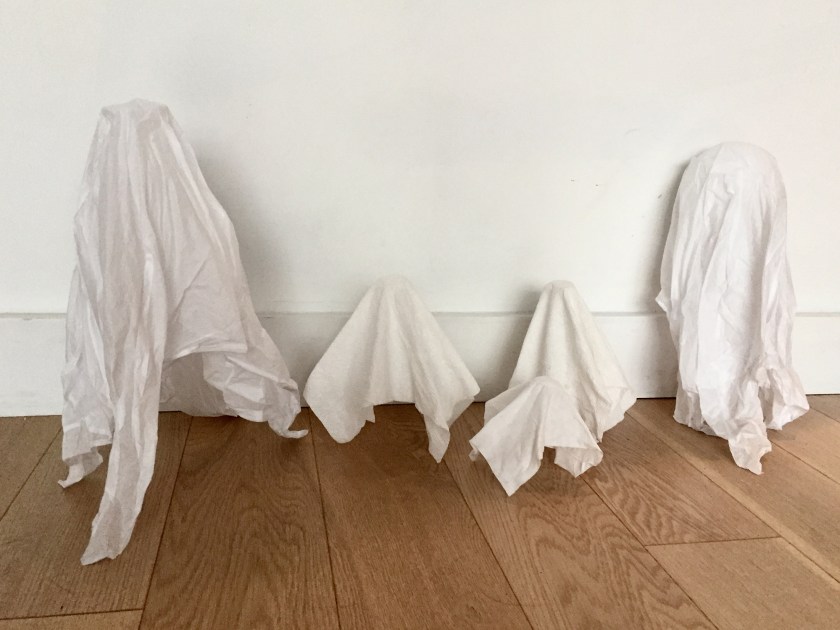
GHOST LAMP – 2nd Prototype
I made a few experiments using different types of paper or paper towels, soaking the, into water with glue dissolved in it. Once the paper is saturated with water and glue, I put it over different objects to see how the paper would hang and drip in order to make the lamp shade look like a ghost. Once the paper dries, it hardens with this shape and can act as a lamp shade.
For the final prototype, I would like the ghost lamp to be a much bigger scale, so that it’s the real size of a person. To achieve this I will have to make a wire structure to hold the paper up and make the ghost lamp safe and stable.
The light would softly shine from inside of the ghost.
PROCESS PICTURES


The first night light idea is based on the concept of life and death. Being ok with living organisms dying is a culture issue and I think everyone could benefit from accepting death as it is. Through design, we could induce people’s acceptance of life and death as inevitable and beautiful at the same time.

The second idea has less meaning but more functionality. I would like to make a a night light that consists of a sphere, that has two sides to it, two different opacities. This could be achieved by using the same fabric with two different densities, or by layering the one density fabric on half of the sphere and not on the other. The idea is that the user could choose between two different ambiences and rotate the sphere to achieve brighter or softer light depending on the moment.

The third night light design would be based on magnets. One would be wall mounted and the other magnet is what includes the fabric and light. Once the magnets come together, the light would be turned on and diffused by the hanging fabric in between the magnets. This concept could also be hanging from the ceiling instead of wall mounted.

Digital Input
The Serial Monitor
2 Buttons – On/Off
int ledPin = 13;
int inputPin1 = 3;
int inputPin2 = 2;

void setup() {
  pinMode(ledPin, OUTPUT);
  pinMode(inputPin1, INPUT_PULLUP);
  pinMode(inputPin2, INPUT_PULLUP);
}

void loop(){
  if (digitalRead(inputPin1) == LOW) {
    digitalWrite(ledPin, LOW);
  } else if (digitalRead(inputPin2) == LOW) {
    digitalWrite(ledPin, HIGH);
  }
}

I chose this Walkie Talkie for kids to teardown. I did not expect the insides to be complex, although I thought the way some of the components were fixed to the walkie talkie’s main body was rough (some taped parts and cables). However this is a children’s toy and was probably design to be as affordable as possible, without putting much emphasis on the quality of materials, manufacture or function.
I used only a screwdriver to take it apart and did not need to break any parts in order to see all the components. Here are some of the parts inside the walkie talkie:

More LEDs
Fade
RGB
H i, I’m Eugenia.
I come from Madrid, Spain. I’m currently at SVA doing Products of Design MFA. This is my first experience in the states, (New York is awesome). Before coming here I studied product design (undergrad) in Madrid and had some work experience after graduating in a graphic and product design studio called Johnpepe.

