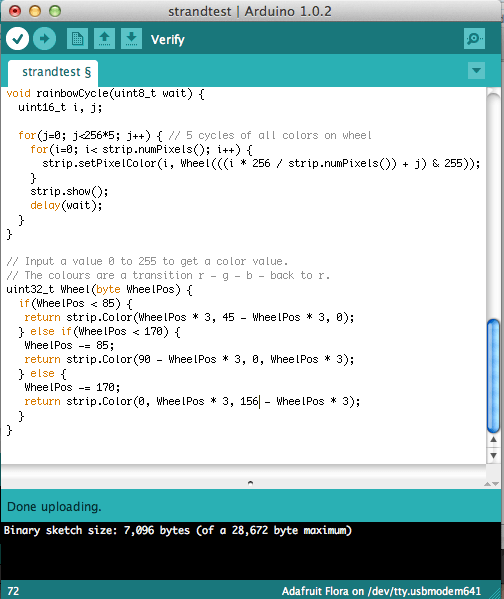

I had a great challenge trying to get the code to flicker like I wanted. You can see the flicker effect here. The problem I incurred is that i wasn’t sure how to loop the 1st LED to the 2nd LED. What i figured out is that you have to change the =0 value of the 1st LED to corresponding with the send LED value of =1.
I did couple color wipes test. Here’s the process pictures.


The video
Thanks!
I have done a series of rainbow test which looks awesome! I like the gorgeous colors and I feel more confidence in the Arduino now !
Please click the address and watch the video:https://vimeo.com/74588376
Here’s a link to the video I took after changing the code to alter the original “RGB” colors in the strandtest. Colors!
I had some confusion when it came to altering other parts of the code so I decided to pick 3 colors from the color picker in photoshop and replace the RGB.
 Hot Pink
 Purple
 Turquoise
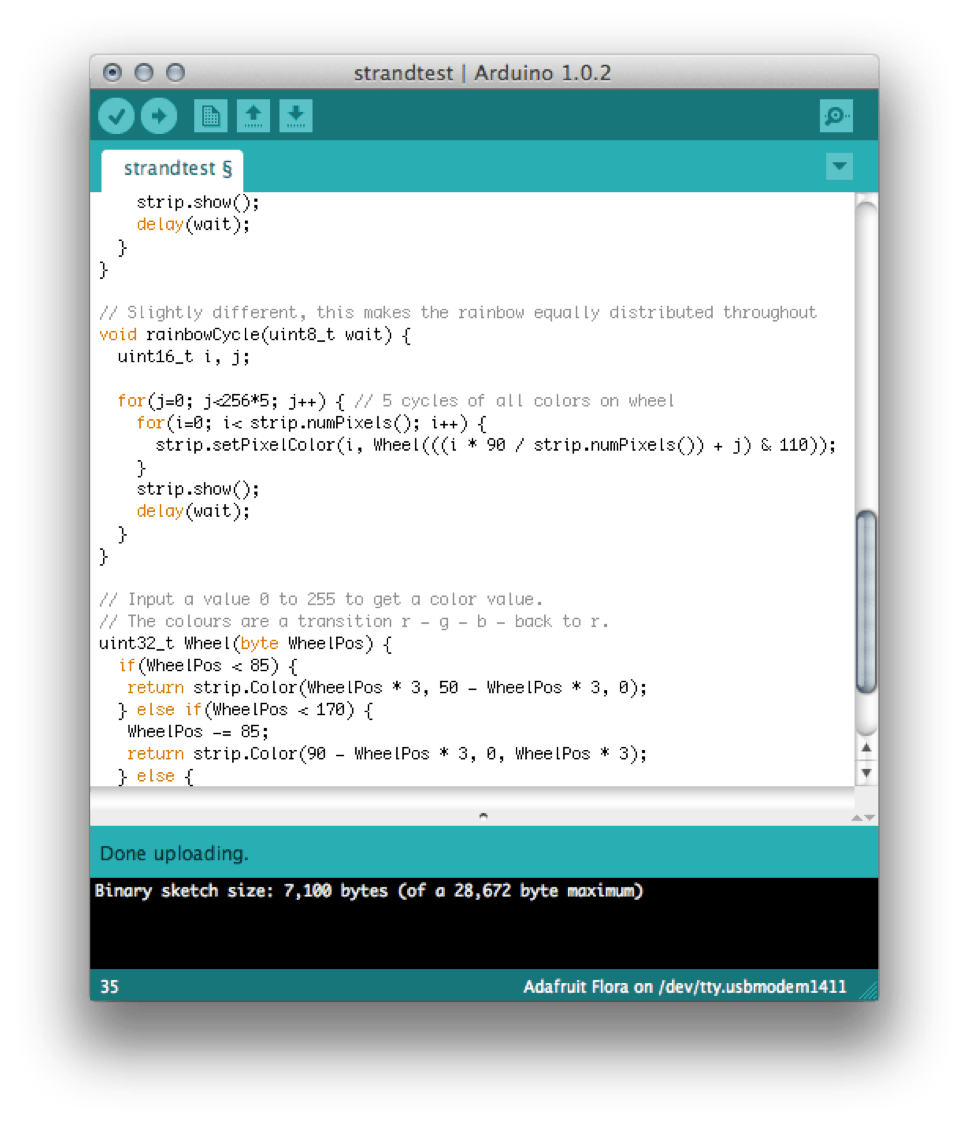
Below is a screenshot of the code that has been adjusted to the color values above.

Hey everyone,
I figured out how to make the noepixel strip wipe in reverse…pretty exciting stuff! here’s how:
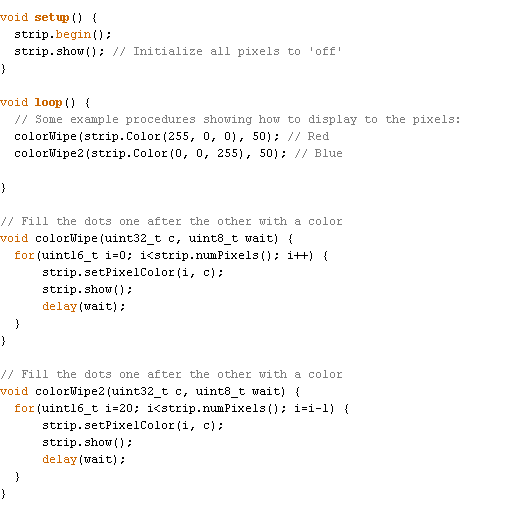
1. Starting with the strandtest sample, I deleted everything under the loop except two of the color wipes (red and blue).
2. I changed the name of the second color wipe to colorwipe2
2. Scrolling down the page I copied the “void colorwipe” code and pasted it below changing the name to “void colorwipe2”
3. In the void colorwipe2 code I changed “i=0” to “i=19” meaning that the pattern is starting from the 20th led instead of the 1st
4. I changed i++ (which translates to i=i+1) to i=i-1
The result: http://youtu.be/7pjPmuowgHc
This project began with a simple hands-on exercise – the construction of a series of kaleidoscope-like objects of varying shapes and sizes using metallic faced card stock. This exploration not only produced some pretty neat effects but offered hands-on insight into the interaction between light and mirror, and inspired ideas for how the construction might be tweaked to produce effects beyond that of the traditional kaleidoscope.


The Selfy
The Selfy is a conceptual tool for reflection. The lens of the traditional kaleidoscope is twisted back on on the viewer who, looking into his own multiplied eyes, is compelled to contemplate the phenomenon of self-awareness.


Spider Eyes
prototypes for a revolution in eyewear fashion


Projection
These formal explorations moved towards the idea of projection. It was discovered that by shining a light through a kaleidoscopic object a large surface could be illuminated with a relatively small aperture and from a close distance. The width, length and shape of the tube can drastically alter the pattern created, creating limitless opportunities for experimentation. A next step might be to incorporate slides which (as initial tests have confirmed) produce a grid of duplicate images on the the surface.


The Kaleidoscopic Projector Light
The experiments with projection produced this wall or ceiling-mounted lighting design. A kaleidoscopic tube scatters the light from a single 3-watt led onto the back of a sheet of translucent rice paper to create a diffuse but visually interesting light source. The pattern can be varied by changing out the mirrored tubes, and in some instances is reminiscent of dappled light filtered through tree canopies.


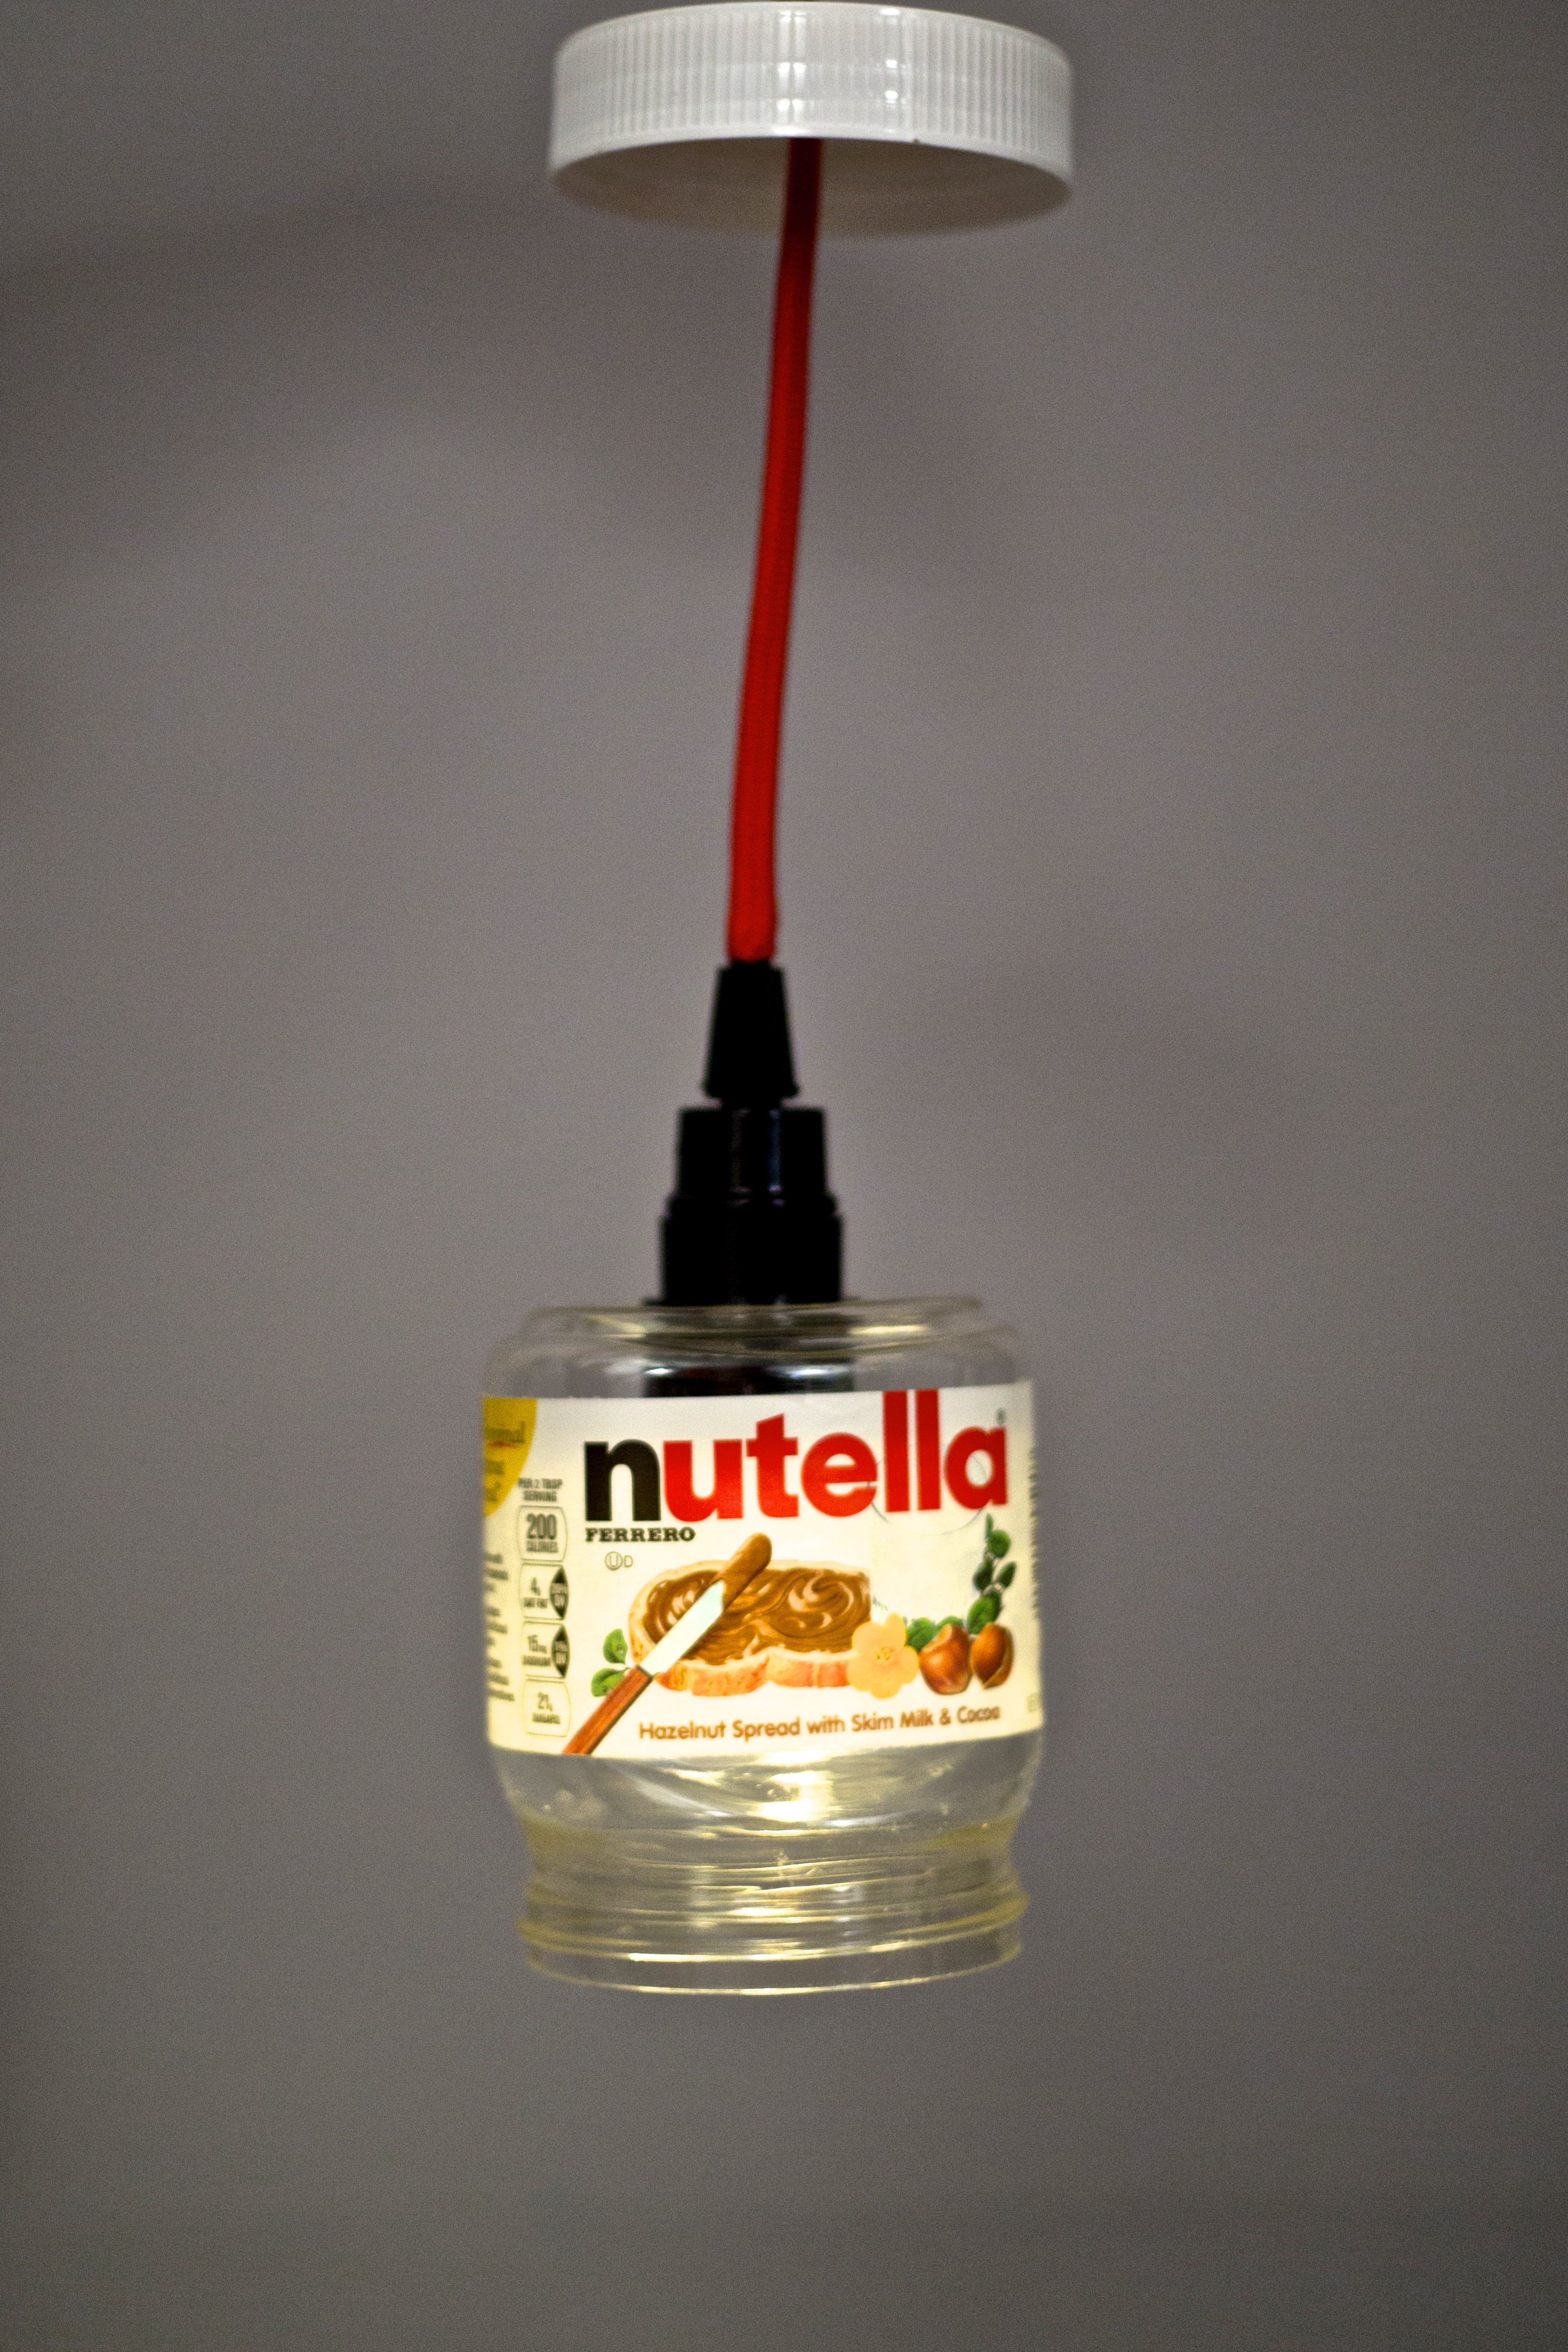
For the mash up project, one of my words is a perishable food while the other is a timeless object. This combination allowed me to explore how a chandelier, a decorative hanging light, can be created out of Nutella, a much loved chocolate hazelnut spread that people across the world enjoy. In fact, it is so addictive and fantastic that one jar is sold every 2.5 seconds. Nutella has quite some fame which I enjoyed learning about here. With further research, I found that nutella has been an inspiration for other products on the market. Check out this Nutella phone case. I guess having a chandelier in your dining room that constantly reminds you of chocolate spread isn’t too bad of a thing, right?
Although Nutella is great in any shape or form, I had to keep in mind that a chandelier is a sustainable light fixture. I started thinking about how I could change the composition of this gooey spread in order to better preserve it through time. Although it is possible to liquify it or harden it, I decided that using the packaging rather than the spread itself would be not only more durable, but also much more maintainable.

While learning about what types of chandeliers are on the market today, I felt inspired by contemporary hanging light styles. One recent trend in particular has been glass jars that expose the light bulb. I love this raw and simple look and decided to use the Nutella jar as a light pendant for my project.


After taking a shopping trip to Canal Lighting and Parts, I began the handy work. First, I drilled a hole through the bottom of the jar in order to fit the socket. Since the drill was not large enough, I expanded the hole by filing down the edges.

After that, I began the wirework. I stripped both ends of the fabric cord and attached one end to the socket. Next, I drilled a hole into the lid of the Nutella jar and slid it onto the cord. I chose to use the lid as the top piece of the chandelier, which will be installed flush to the ceiling and serve as the platform where the jar hangs down from.

Next, I stripped the power cord wires and used a soldering iron to bind them to the light pendant wire. Then I covered the soldered wires with heat shrink tubing. Although a minor electrical explosion occurred along the way, I finally was able to successfully bind the two cords together and light the bulb.

My last touch to the lamp was putting the label back onto the jar right-side up. I used a spray adhesive to bind the label to the plastic. Although a simple procedure, it is the most important since it adds the mmm delicious touch.

And here it is: a nutella chandelier. This is intended to hang in the homes of avid nutella lovers that can never get enough of it. With this chandelier, they can get an eyeful anytime.

Using duct tape to design a mousetrap, I started to think about the traditional mousetraps. The traditional mousetraps would kill the mouse immediately and you have to deal with the situation with your hands. So the design of Duct Tape Mousetrap is giving people choices, either to keep mouse alive and release it, or to bury it underground.
Working process
Material: hard board, duct tap, iron wire


Final products


Usage
Choose the handle you will use, install it into the box, then put the mousetrap in corner of your home or backyard.


After you catch the mouse (when the duct tap got damaged), take the mousetrap to release the mouse.


If you don’t want the mouse to come back, dig a hole to bury the mousetrap as a mouse grave.


Thank you!

I’m really excited to share the Music Box Portrait with you. As you all know, I’m obsessed with analog photography (thats why many of my prototypes at SVA have been focused around cameras). This project is a 3D printed camera body that plays music and takes a picture when the user turns a crank. I even included some mirrored plexi so that you could check your hair before the big shoot.
Its a little absurd, but thats the point.
This particular iteration, “Version 2.0 ” is outfitted to work with a disposable camera.

Here is an early prototype made out of foam core and acrylic. I had a lot of fun in the early stages of development, figuring out how this would work. I felt a tad nostalgic for my architecture school days, making sketch models!

This photo shows the in-progress 3D print. I designed the parts in Solid Works with the help of some of my classmates. I’m a Rhino guy, what can I say? But Solid Works is a lot better for precise modeling and engineering. Yes, yes I actually calculated the gear ratios for this bad boy.

I had to saw off the handle for my little music box, but was able to attach the itty-bitty gear to it using acrylic glue. This photo shows – Nuts. Bolts. Prints. Music.


The finished product! Please check out my video.