About Me:
I am a Strategist interested in the relationships between people, culture and technology. My ambition is to create products and services that have commercial and cultural impact.
Siduri named after the Sumerian god of happiness and merriment, is a smart coaster for your drinks. It recognizes when a glass is near empty and then glows yellow to alert waiters that you will be in need of a refill soon.
Designed specifically for lounge and club settings, Siduri helps nightlife revelers politely draw the attention of barmaids and helps bartenders to keep the drinks flowing.
The coaster is powered by Ardunio and uses an FSR sensor that recognizes the difference in the weight of a drinking glass. A button located near the base of the coaster allows bar staff to calibrate the coaster to an unlimited amount of drinking glass types into the coaster’s memory. Hidden under the white acrylic top are three surface mount LED’s that breath a soft yellow light when the FSR sensor recognizes when a glass is 3/4 empty. The remaining materials were laser cut out of 1/8” wood to give the coaster a manly, yet classy aged feel.
If you would like to make your own smart coaster, here is how I did it…
Since we last met I did a lot of field research. I visited several bars. I shared my prototype with bartenders, got some feedback and made many observations about my audience. All of which improved on my product design (see the above).
The physical prototype is still a work in progress but I learned alot about how to improve my design. Below are my learnings so far:
The Bartenders
This is Rebecca. Rebecca is a bartender at Bedford Hall. She told me that as a bartender she can’t attend to everyone, so it’s more important that the wait staff that takes drinks over to the tables be her eyes and ears. She thinks the smart coaster idea is more important to the waitresses than to her because its their job to go over to the people and bring drink orders back to the bartender. Rebecca also suggested that I move the LEDs from the outside of the coaster to the middle of the coaster. Her feedback was that the LEDs could be distracting in a dimly lit space, so its better to defuse the light through the drinking glass.
The Glasses
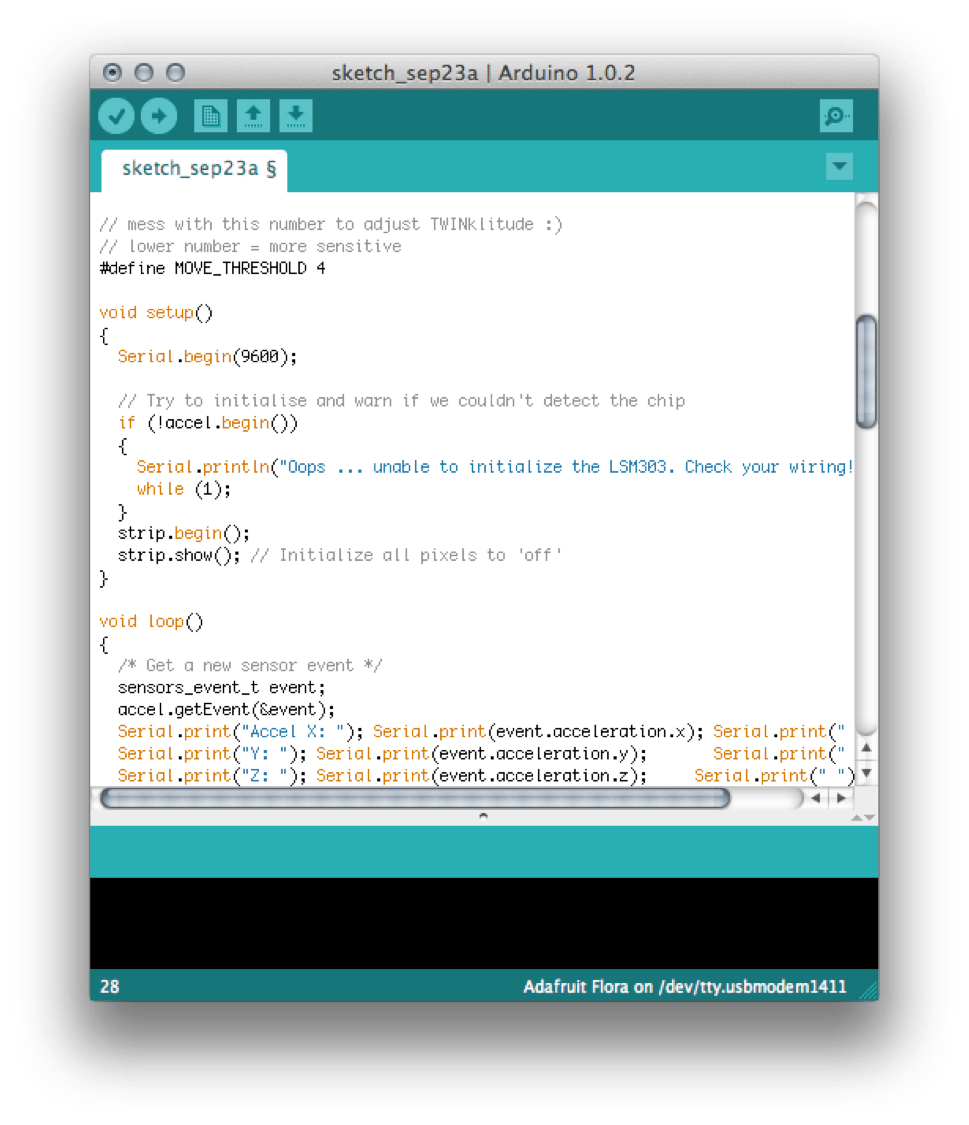
After visiting several different bars I learned that I have to account for six different kinds of drinks glasses. There is water, wine, beer, martini, whiskey and a mixed drink glasses. When placed on my FSR sensor each register a different weight. This presents a challenge because in my current arduino sketch the bartender would have to calibrate the coaster to each glass.
My current design solution is to calibrate the coaster to recognize all the weights. I did this by storyboarding the optimal use case scenario of my coaster.
Storyboarding
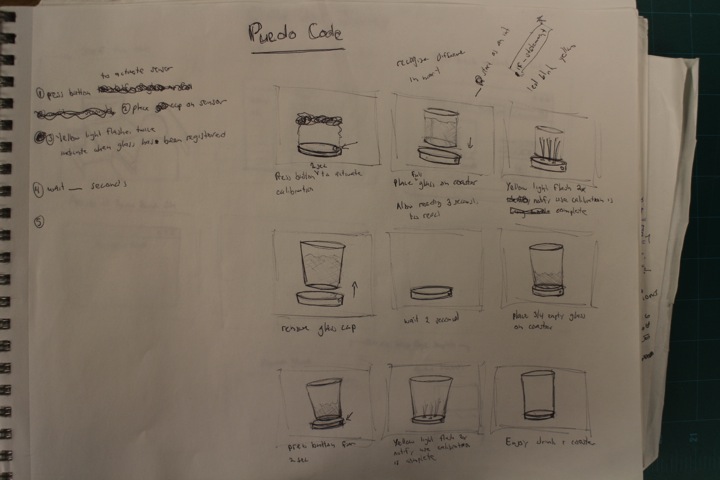
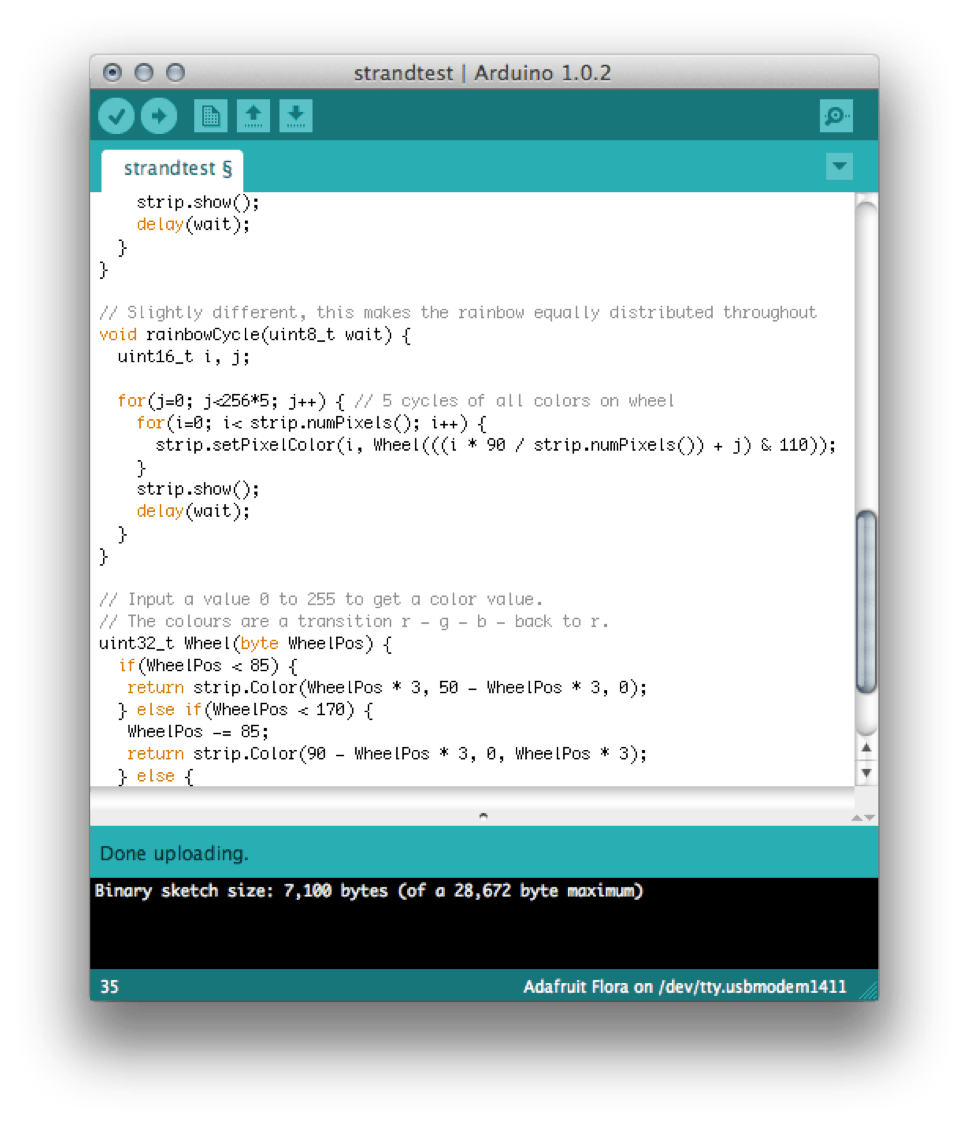
I learned quickly that it is far easier to show how to use the coaster than to explain it. So I sketched out what the ideal scenario would look like when the smart coaster is in use. I also found this technique helpful when it came to re-writing my code.
When planning out how to revise my code I sketched out what each step should look like. This is slightly different than sketching out a storyboard for users. Sketching out code is called Puedo Code. It maps out each technical step of my use case scenario. For example “flash yellow LED’s when the coaster is processing”, this helps me understand how I need to write code to meet these conditions.
Prototype
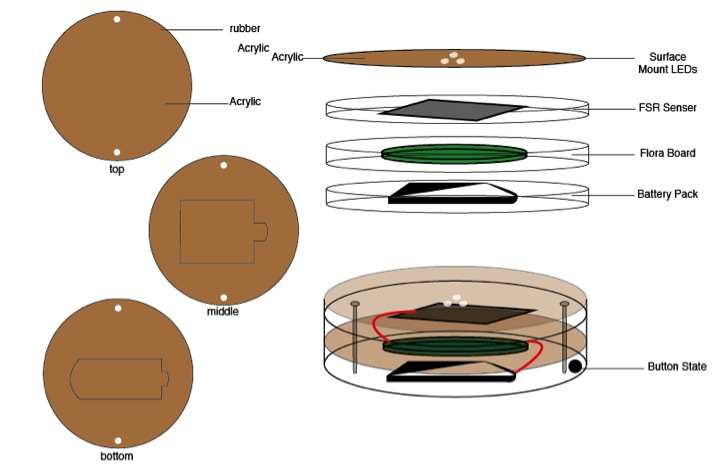
After taking in lots of feedback, I began to plan out how I wanted to revise my concept. the above photo shows how I began thinking about revising my cardboard prototype into wood. I used a laser cutter to cut out my materials.
Currently I am considering different way to reduce the size of my concept. As is the form factor is to large. I found some sample projects on instructable here and here I want to take a look at. Revisions coming soon.
For my final project I want to revise my waiterlite coaster.
The initial concept was designed to alert wait staff when patrons need help getting a bartender’s attention during high traffic times such as happy hour. I would like to revise and build on this concept.
The challenge I face with my current sketch and prototype is that my FSR sensor only works for specific type of glasses. This is because my current sketch is design to recognize the weight a single type of cup. Each time a new cup is placed on the sensor I have to reset the sensor to recognize new thresholds for each new glass.
My next steps will include calibrating an FSR sensor to automatically recognize when a glass is full or empty. I will attempt to revise my arduino code using motor limits to automatically recognize the upper and lower thresholds that a glass will exert of the coaster.
I also would like learn how to use the CNC machine so that I can cut out a nice coaster made out of wood. Ideally the coaster will be designed to house and conceal the flora board and the battery pack in single form factor.
Next Steps:
Target Audience
Although the concept is designed to help bartenders to quickly recognize when users need a new drink, they are not the true target audience. The real challenge is to identify a bar that is not able to meet consumer demand during volume. Three places I am considering are places with
A coaster with LED light indictors that notifies waiters when you need service.
I used an FRS censor to create three thresholds that identify when a class in full, half drank or empty. Within the arduino code I used several “if else” statements that distinguish between the weight of the glass.
Then I used a glue gun to and wooden sticks to connect the two parts.
The FRS censors are calibrated to recognize three thresholds or weights. When the glass is full a red LED indicator turns red. When the glass is half full the LED indicator turns tell. This tells a waiter that you are ok and don’t need help. The final LED state turns green when the glass is near empty, indicating that you need a refill.
This assignment was fun. Through exploration, trial/error I learned that the Digitalpullup button needs a resistor in order to recognize the full circuit. When a resistor is not used the flow of energy circles around in a “high” state from the LED to GND. A resistor is need to resist the flow of energy to return to GRN enabling the LED to light up.
A seconding finding for me was within the StateChangeDetection sketch. Defining input and output is crucial to defining the state of the LED (on vs. off). The pushbuttoncounter is also important and dictates how many “clicks” it take to turn the LED on and off. I also found that if you added-in a delay feature you can change the timing of when the LED turns on and off.
A travel size pillow that contain two LED lights for reading.
I observed that most people that own a travel pillow like to read. Often these people are in transit and don’t have good reading light. This pillow is intended for those that like to read in the dark.
Sketches
I began the project by creating two sketches. The first is a concept sketch where I tinkered with a form factor design and I figured out what electronic components I would need to bring this idea to life. The second sketch was why electronic component sketch. I outlined how I wanted the circuits to flow and designed a template for how I would fit the cables into the housing.
Wiring and Testing
Next I bought several types of LED light, a breadboard to test proof of concept
Sewing
Then I went to Mood Designer Fabrics in the Garment District with an actual travel pillow. I matched the fleece and spandex material and bought 1 yard of each. Then I created an outline of the pillow, cut out the material and then sewed them together. Finally I stuffed the pillow and added all of the electronic components.
Next Steps
Given more time, I would like to use a laser cutter to cut out the material precisely and them take the materials to a seamstress to sew the seams together properly. I would also like to create an enclosed housing fixture for my flora board and battery pack so that I can swap out the components as need be.
I’d also like to explore using proximity sensors that automatically recognize gesture behaviors like the opening of a book or the turning of pages as a trigger for the LED lights
I’d like to create a picture of the night sky. The material inside the picture frame will be fuzzy. Everytime someone passes by, the stars will “automatically” twinkle. Maybe I can include a little jingle that plays in a 10 second loop as well.
This assignment was very difficult for me because I had a hard time sewing the circuit board to the cardboard and a result my wire connection kept failing. So I wasn’t sure if I was doing it correctly.
What I end up doing was changing the #define MOVE_THRESHOLD to “4” making the accelerometer more sensitive so when I shake the board the light flash very quick
I had a great challenge trying to get the code to flicker like I wanted. You can see the flicker effect here. The problem I incurred is that i wasn’t sure how to loop the 1st LED to the 2nd LED. What i figured out is that you have to change the =0 value of the 1st LED to corresponding with the send LED value of =1.
Wallets were once considered containers for paper currency. That has since changed, today what you carry is not as important as how much information it retains. Introducing the Automatic Wallet…
A wallet that automatically scans business cards and receipts, reducing pocket clutter.
The Process
I began by looking up the definition of what “wallet” means, then I did a mind map of how that definition has evolved over time.
Painpoints
Next I asked my fellow classmates to share some painpoints about their wallets. What I found out is that men and women have very different needs. But the common attribute is that both groups want to reduce clutter.
My hypothesis: Wallets are filled with junk. People want to digitalize things like receipts and business cards quickly so they can access them later.
Solution
My concept is based on the small card reading technology of Square and a small ID holder wallet. I’ve decided to create a men’s wallet that can scan business cards and receipts so that information can be accessed later. I sketched a couple of ideas and looked for some inspiration online. My final design incorporates an LCD screen that displays credit card balances and newly inputted contact details. The information can then be portered to a person’s email or phone contact list.
Prototype
I started out by making a cardboard version by hand. The results were effective but a bit crude. The edges frayed and the integrity of the fold was compromised because of the scoring.
To refine the design I used a laser cutter. I created an illustrator file that contained the blueprints and then printed out the design several times, exploring different cardboard materials and thicknesses. Then I used glue to put the components together.
Next Steps
I’d like to insert a real LCD screen and Square card reader into a wallet. I’d also like to bind the prototype with leather to make the material more durable. I found several leather shops in the garment district that have thickness that will house a small LCD screen.