Cosmic Jellyfish Lamp by Isioma Iyamah

My final project explores one of my favorite topics, space. I was inspired by a recent supermoon to design a lamp that simulated lunar phases. However, as time went on, my interest in the project began to wane and I decided to look to the galaxy as a source of inspiration.

This project then took on another level of abstraction: space is like a vast sea; what creatures could then live there? Does it emit light? Could this exist as a lamp?

Somehow I ended up designing a jellyfish lamp. I am captivated by their form, and also wanted to express their beautiful yet menacing nature. The lamp spins, but in future iterations, I will want to eliminate that feature: it’s not as versatile as a non-rotating lamp! But it looks fine.

FEATURES:
Rotation of the main body of the galaxy – spinning – controlled by a 12V Stepper Motor, which can be found many places, but I got mine from here.
Blinking lights – simulating stars / planets – 10mm, 5mm and 3mm diffused LEDs. (Mostly white; with some isolated greens, reds and blues)
Motion-activated – PIR sensor as motion detector.

OTHER MATERIALS:
Two plastic hemispheres from Canal Plastics 20 inch diameter: http://canalplastic.com/
Clear acrylic for LED bed (home depot, canal plastics)
Threaded metal rod
Hot glue
Wire snipper and stripper
Wires
Solder iron
Patience
Confidence

JELLYFISH:
I then drew up a pattern of spirals and circles in illustrator.
I sent it to a laser cutter. This object will serve as an LED bed and help to consolidate the arduino and battery. It needs to be symmetrical because the faster the motor rotates the more wobbly the system will become. But it’s unlikely to reach those speeds if you’re reasonable about your stepper motor code!

MECHANICS / CIRCUITRY / CODE:
STEPPER MOTOR
I decided to use a stepper motor to spin my jellyfish. Stepper motors, unlike servo motors, allow for smooth rotation.
How stepper motors work:
I need to figure what motor speed / rotation rate to use.
Code: Adafruit Arduino – Lesson 16. Stepper
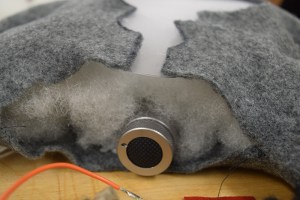
PIR SENSOR
The PIR sensor calibrates to the temperature of environment, and then detects all subsequent changes in it, within a specific range, that is. This translates to motion-detection, technically, although by definition, this isn’t exactly what occurs. PIR sensor activation allows current to flow into the rest of the circuit. In the following sketch, LEDs light up upon PIR sensor activation. This is a step to test if your PIR sensor works.

I have modified a PIR sensor code to account for the number of LEDs (and therefore output pins)

THE LEDs —
TIMING THE TWINKLE:
I ended up incorporating a code that made the LEDs blink at random. This was a rather elegant and simple looking code that eliminated the busywork that comes with using a code that includes delays. Including delays in the code would interfere with the movement of the motor.

TENTACLES:
​Next step was to solder the wires to the LEDs. I cut the wires to various lengths.
I next encased the wire/LED combination in thin rubber tubing. The texture mimicked that of a jellyfish’s tentacles. I also nestled hot glue between the LED positive and negative legs to keep within the organic theme. Using the typical black electrical tape would not look good with the rubber tubing!

Putting it all together:
12V Stepper Motor –> chrome plated threaded rod —> laser cut acrylic —> arduino breadboard/battery –> LEDs (rubber tubing encased)

Here are some images!
Follow this link for my instructable: http://www.instructables.com/id/Cosmic-Jellyfish-Lamp/

Screen Shot 2014-12-17 at 5.54.48 PM

Screen Shot 2014-12-17 at 5.55.24 PM

Screen Shot 2014-12-17 at 11.34.02 PM

Screen Shot 2014-12-17 at 11.33.53 PM

Screen Shot 2014-12-17 at 11.33.31 PM

Screen Shot 2014-12-17 at 11.33.18 PM

Three Final Project Ideas (Isioma)

My favorite thing so far about learning to use Arduino is incorporating responsive elements into my projects. Interaction – simulating real life systems – it’s awesome.

1. Lonely / Moody / Confide – Bot:
I want to make a motion-detecting, pressure sensing and speaking ‘robot’. It will be a white acrylic cube with a face laser cut out of it.
Bot
At different distances from the cube it will say something different like: ‘Closer’… ‘closer’…’touch me i’m cold’… and then ‘thank you’, once you do. The touching response will require some pressure sensing mechanism. I will also need to sync response to movement / distance with the recorded voice.

I was interested also in giving the robot fortune telling powers. You ask it a question about your future, and it responds with a prediction. In another scenario, (thanks Boris!) the robot acts as a ‘keeper’ of secrets. You tell it a secret, and it tells the next user your secret, and so on. Kinda sinister. But – if used for good, can be a playful way to unload tensions.

2. Pet Field
This project brings the outdoors into your desk, or your wall.
Small-scale; desk installation. Large-scale; wall hanging!!
Touch and movement activated. The blades of grass move either towards you or away from you; simulating the way grass ripples in a field during a breeze.
Field

3. The Moon
I wanted to make a nightlight that tracks moon phases and replicates the experience of moon gazing in the privacy of your room. It is synched with the 30-day moon cycle, transitioning from ‘new moon’ to crescent, to full…and so on. I love moon.

Moon-Phases_

Screen Shot 2014-11-13 at 1.24.53 PM

So, possible components:
PIR sensors
Motors
Ambient Light Sensors / Photo-resistors
LEDS
Sound (input / output?)
Pressure sensor
Timer

Somni Lamp (Isioma’s Innovative Switch)

The brief for this project was to explore innovative switches and user stories. I am, as a newly initiated graduate student, rather short on sleep, and often go to bed jittery, either dwelling on the day I had, or the projects I have due in.

I designed the lamp that would help center a user’s thoughts and mood before bed. It is supposed to initiate a meditative pause before he or she succumbs to exhaustion, thus guaranteeing a good night’s sleep. It is a soothing, ethereal light that is able to provide calm to the user if or when woken up  during the night.

—-

The Lamp Structure:

1.  Soldered, galvanized steel frame. It was a little difficult to solder the steel at first, so I sanded down the touch-points: that helped.

2. I used urhyu paper – the texture is beautiful and also as dream-like as the light emanating from the lamp.

3. I soldering together two ultra-bright white LEDs

4. I used a photo-resistor as well as an ambient light sensor.

5. I modified the photo-resistor code found on Adafruit. This meant that the LEDs would burn brighter in low light, and be dimmer in bright light. This I controlled using the serial monitor function; I was able to calibrate the light response by restricting the input range.

This was fun! I enjoyed making something I would definitely use in real life.

6 3 1 5 4 2

Isioma’s ‘From Barium Meal to Roadkill Revenant”

Hello!

This was an exercise in sewing and light diffusion techniques. For this brief, we were asked to design a plush light and explore the use of various materials to make our product a plausible item. I initially wanted to design an object based on ‘the barium meal’: a diagnostic tool that involves swallowing a dose of barium sulfate in order to render your upper intestine opaque enough to be viewed under x-ray. 

I ended up diverging a little from this idea, although I think I might go back to it in future. Instead I decided to make a plush toy that tells the sad tale of a cat road-killed and re-animated (ZOMBIE ROADKILL)

.kitteh

MATERIALS: Felt, white and red LED, soldered ON-OFF switch, poly-fill, and colorless vinyl to expose the gut.

USER: myself and other strange kids, Halloween for babies

DSC_0344DSC_0346

THE SCENE:

Cat squishCat zombie  IT’S ALIIIIIVE

IMG_0261 IMG_0262

IT’S COMING!

DSC_0369

VIDEO:

Tear-Down Post! By Isi

This was really, really fun. Cord-phone guts. Beautifully simple elements coming together to make a cohesive, functioning whole. A lot of injection molding (I think). I kind of miss the heft of these phones. I also like the feel of these – holding them is very natural. I can’t believe this was $2.00! (Or can’t I?)

Torn

Arduino Sketch 2 by Isi

Here is a multi-LED loop sketch I undertook for Becky’s Making Studio course. The more I stared at the code, the more it made sense, although at first, when I ran the sketch, it didn’t work. Turns out I had my pin legs oriented the wrong way; the current couldn’t flow the way I had them set up. Luckily, by back-tracking and running a single-LED sketch, I was able to see where the problem was!

Isioma Iyamah

Oh haaay

Hi! I’m Isioma, or Isi (pronounced E.C.)

I’m a former molecular neurobiology student interested in exploring design as it relates to psychology, art, culture and the environment. I’m fascinated by everything from forests to construction sites; from science fiction to climate change. I’m inspired by the micro- and macro- networks that dictate the different ways in which we inhabit and create our spaces.

Also! I like making perfumes, and concocting mega spicy dishes. I will (unfortunately) snicker at any fart joke (or sound).

Also! Also!  @isioma__ is my instagram account