The Tidal Clock is designed to bring an awareness of the ocean into users’ daily lives, reconnecting city dwellers with their maritime environment. I have lived in New York City for many years and I travel daily between Brooklyn and Manhattan, which are both located on islands, yet I am rarely made aware of the surrounding ocean. The Tidal Clock serves as a pleasant reminder of our closeness to the water. It can be set to one’s local tide chart, or to the tides of a favorite far away beach.
I have been tracking my process of building my initial prototype for the Tidal Clock. The final prototype uses displacement and a stepper motor to change the water level of the clock to reflect the ebb and flow of the tides.
On average the cycle from high to low tide on the coast of New York and New Jersey is 6 hours and 13 minutes. I wrote my code for the stepper motor to reflect this cycle. Moving forward with this project, I would like to use programming to pull the exact tide charts for specified locations.
Here is a link to my Instructable where you can see details on how I built the prototype. It has been getting great feedback and is even a featured Instructable!
I have been working hard on my Tide Clock. I have been making progress and throughout the process some things have changed since my original post. Initially, I planned on using a water pump and a solenoid valve to pump and drain water between the two chambers of my clock. After purchasing a water pump and experimenting with it I decided that the noise and size of the pump, in addition to a valve, were much too loud and large for what I want to achieve. The experimentation process with the pump was frustrating, but it was worth it because it lead me in the direction of water displacement!
My new plan is to use a large volume to displace the water from a back hidden chamber to a front visible chamber. I made a quick prototype to test my new plan. I simply created a divide between the front and back of a container of water and lowered and lifted a volume into the back section. With very little water overall, I was able to cause the water level in the front section to rise and fall:
I then sketched out how this would work in a circular form:
I created a more detailed prototype to test out the size and shape of the volume that will be causing the displacement:
It works really well! I am going to use a stepper motor to move the volume. It will be mounted above the water line and attached to gears that turn the volume.
Here is a side view:
My next step is to work on the electronics. I am going to control the stepper motor using Arduino. I will calculate how many steps it takes to get through a full cycle from high to low tide. I started by assembling my Real Time Clock. I will have more detailed instructions of this in my step-by-step tutorial . Here is a preview:
I am now in the process of getting the stepper motor up and running. I have it wired it up but I haven’t successfully managed to get it running.
As New Yorkers, we live on islands but can easily forget that we are surrounded by water. Manhattan and Staten Island are their own islands, and Queens and Brooklyn are part of the larger Long Island which is lined by many small barrier islands. The East River, separating Manhattan from Brooklyn and Queens, is in fact not a true river but a tidal straight. Its current is affected by ocean tides and its flow changes direction up to four times a day. I typically cross the East River twice a day but do so by underground subway. I rarely feel much of an awareness or connection to the water. One can easily go through days and weeks in New York City without any thought of the surrounding ocean. Unfortunately, it is usually disastrous events, such as the 2003 Staten Island Ferry crash or the increasing number of regional hurricanes, that bring water into our daily focus.
With this project, I plan to design a tidal clock that will bring an awareness of the ocean into users’ daily lives, reconnecting city dwellers with their maritime environment. My goal is to make a clock that pulls tidal information from the web and then uses that information to control a tank of water that will rise and fall accurately with the tides. I will do this by using programming in conjunction with an Arduino controlled water pump.
This will be my first exploration into the world of programming so I expect that it will be challenging. Thanks to Boris for pointing me to processing.org, which is a great starting point. I plan to use processing to pull XML feed of weather data from the Internet. By entering specific zip codes into the program, I will be able to pull location specific tide charts. I will then use serial communication to relate this information to Arduino. I will write code to control the rate of my water pump to accurately reflect the rise and fall of the actual tide.
I have begun looking into parts. For pumping the water, I am going to start by experimenting with solenoid water valves to see how much control I can achieve with pumping and draining. Here is an example:
I will also need a RTC, or real time clock. In my research I have learned that most microcontrollers, like Ardunio, have built-in time keepers but these only count the milliseconds since the Arduino has been turned on, not real time as related to calendar time. A RTC keeps consistent track of time even if the Arduino is reprogrammed or runs out of battery. You can read more about RTCs here: http://learn.adafruit.com/ds1307-real-time-clock-breakout-board-kit/what-is-an-rtc
Here are a few images of visual inspiration for my tide clock:
I used an aluminum clip to create a switch. I wired a piece of chipboard with one LED. When the board is clipped into the metal clip the circuit is completed and the LED lights up.
The entire metal clip is conductive so I had to find a way to break the circuit. I attached a piece of felt to one of the inner faces of the clip. I then ran a coated wire along that side of the clip. By doing this I was able to run both the power and ground through the clip. The circuit is only completed when each face of the clip meets the end wires from the LED.
My original two words were ‘fuzzy’ and ‘terrarium’. My initial plan was to move forward with the word terrarium and create a terrarium mobile. After exploring wiring possibilities, I realized that I would not be able to execute the mobile quite the way I was envisioning. I decided to move forward with the word ‘fuzzy’ and the result was Galactic Apartment Bowling!
I set out to create a fuzzy game that people can enjoy from inside their cramped apartments. The game consists of a small bowing ball and a single pin. The pin is wired with a string of LEDs and a FLORA accelerometer. When the pin is struck, the accelerometer reads the variation in movement and lights up the LEDs. To make the one pin bowling game more difficult and engaging the bowling ball is weighted to give it a wonky roll. This project allows the user to experience the fun and excitement of galactic bowling in limited small spaces.
I began my making process by creating a sewing pattern for the bowling pin and ball:
I sewed two complete layers for the pin, an inner layer out of muslin and an exterior sleeve out of felt. I made the inner layer as a structure where I could sew on the electronic components. This allowed me to hide the components and keep the outer layer nice and clean. The white felt turned out to be too sheer so I ironed on a layer of fusible interfacing as a backing. I weighted the bowing ball with an interior pouch of rice to give it a wobbly roll.
I then set out to create my circuit and write the code. This is where I came into the most difficulty. I successfully used conductive thread to attach the accelerometer to the Flora board. Initially, I had planned to sew individual NeoPixels throughout the bowing pin with conductive thread. I planned on using the Sparkle Skirt code to create a variation of color and sparkle delay when the pin is struck with the ball. After much frustration and no success trying to lay out a circuit and get my code up and running with the NeoPixels, I made the decision to use traditional LEDs. I soldered together a strand of LEDs and altered the Blink and Sparkle Skirt code to have the accelerometer read the movement and then flash the LEDs.
The result was not as dazzling as I had originally hoped it would be, but the circuit works and Galactic Bowling is a success.
I have gotten the idea of making a light up terrarium mobile in my head and I’m not quite ready to give it up. It has been brought up to me that I may have trouble dealing with messy wires that may make this project difficult. I am hoping that I will be able to work around that issue by using conductive thread or yarn to hang the objects from my mobile. I want to make a mobile that has hanging pods for air plants. These pods will light up. Here are a few photo inspirations:
I plan on sewing little pods to hold the air plants. I also plan on making a push on-off switch that would be one of the elements hanging from the mobile. Below are some material possibilities:
This week I played around with the accelerometer and the code from the sparkle skirt. First, I made sure that my sewing connections were good between the accelerometer board and Flora main board. I then connected the Flora to a pixel strand. I had some difficulty getting everything up and running. After testing all of my connections I was able to narrow it down and I discovered that the mini USB port of my Flora is not working. Thankfully, I had a little help from a friend and Wolfgang let me use his Flora. Wolfgang was also gracious enough to take some time to explain some of the code functions to me. Code still feels like a foreign language at this point so I appreciate any help I can get.
I was able to get the sparkle skirt code up and running on the pixel strip. I changed the code to reflect the number of pixels in the strip. I altered the colors and I lowered the move threshold all the way to 4 so that it was more sensitive. Here is the part of the code I altered:
For my plush nightlight, I am thinking of making a plush terrarium mobile. Terrariums are typically used to house and display small wonders. Rather than enclose objects inside a structure, I want to make a mobile out of plush wonders. I want the wonders to light up either as you approach the mobile or depending on the sound level in the room.
I had a hard time trying to decipher all of the code in the strandtest sample. I couldn’t quite figure out how to isolate the series of functions within the entire cycle. I did manage to figure out how to manipulate a few individual functions.
My favorite alteration was significantly slowing down the first series. I did this by altering the delay function. This function pauses the program for the amount of time (in milliseconds) specified as parameter. To slow down the sequence significantly I altered the code from delay(wait) to delay(5000). This added a 5 second break between each pixel lighting up.
Terrarium and fuzzy easily go hand-in-hand. Terrariums have recently seen a huge resurgence since their glory days in the ’70s, as noted by this New York Times article. Nearly all of the terrariums in this new craze house soft, fuzzy moss. Not only is the moss warm and fuzzy, terrariums in general can make people feel warm and fuzzy inside. They are usually beautifully designed, house small wonders and are overall very pleasant, like this one from Twig Terrariums:
Seeing that fuzzy and terrarium go so well together, I googled ‘fuzzy terrarium.’ Immediately, I discovered the dark side of fuzziness and terrariums. Countless terrarium owners struggle with unwanted mold growing in their terrariums. These little ecosystems are difficult to balance and white fuzzy mold easily flourishes in the warm, damp environment.
Rather than ignore the dark side of terrarium fuzz, I decided to embrace it. If mold easily grows in terrariums, why not intentionally grow it? That is the basis for the Fuzzy Terrarium.
Mold on food is usually a sign that it lacks preservatives and is natural. I’m sure many of us are still haunted by the images of the never molding McDonald’s fries in Super Size Me. After 10 weeks in a jar, the McDonald’s fries showed absolutely no sign of molding. You can check out that video here . The Fuzzy Terrarium is a way for you grow healthy mold as an indication of the amount of preservatives in your food. If you have ever wondered if the fries you get from the corner bodega are any better or worse for you than one’s from McDonalds or other fast food restaurants, the Fuzzy Terrarium can help you decide.
I did some tests to see how much mold would grow on different foods over the course of a week. I compared organic tomatoes from the Union Square farmers market to non-organic tomatoes from the corner bodega. The organic tomatoes, on the right, definitely started to mold faster, but then the non-organic caught up and they produced about the same amount of mold:
I also compared never frozen, fresh cut fries from an organic burger joint, Bareburger, to McDonald’s fries. There was very little action in both jars for most of the week, but now some white fuzz has started to develop on the fresh cut fries. I think in a few more days there will be plenty of mold. I knew going into this test that nothing would happen with the Mcdonald’s fries. Even though I knew this was the case, it is scary to see it in person.
Below is my process for building the case of the terrarium.
First, I made a prototype out of foam core:
Then, I laser cut pieces of acrylic. I beveled the edges by hand on the band sander since the laser cutter cannot cut at an angle. I then built a jig so that I could assemble the dodecahedron at the precise angles:
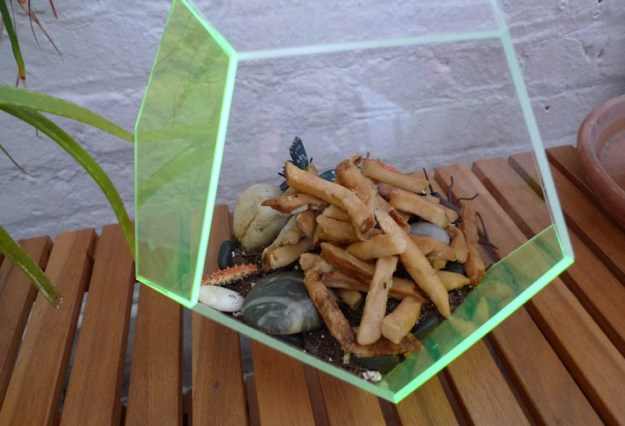
Next, I gathered typical terrarium supplies including sand, soil, charcoal bits, rocks and little figurines and layered these inside of the case:
Hey there! I’m Lucy. I grew up in Vermont but I have called NYC my home for over ten years. During this time I have worked in many different fields, from hospitality to event planning, fashion to furniture design. To balance out the intensity of New York, I try to sneak away as often as possible. The photo above is from an adventure in Galicia.
Up to this point, I have worked mostly with metal, wood and textiles so I am really excited to delve into electronics and technology. Below are a few images of my personal work. You can see more at: Lucy Knops
I have also recently developed a casual obsession with archery. Here I am taking aim: