Reminise is a digital photo frame that lights up every time a new photo is added to your shared album. The idea behind this project is very personal since this is my first time away from home and hence, I miss everyone at home quite often. It is designed for everyone who is living alone, away from home. It is a great way for your family and loved ones to let you know every time they miss you by adding a photo to your shared albums, making you feel loved no matter the distance. Here is how you can build this interactive photo frame.
For my final project, I will making a digital photo frame that creates a light animation every time a new photo is added to the album on your phone. The idea is designed for students who frequently feel homesick and help them feel less lonely in the new, unfamiliar, country. How the product works is that every time a family member or a close friend adds a photo to the shared album, the photo frame lights up, alerting the student that a new photo has been added and her family or close friends back home is thinking of her.
For the final project video, I have created a storyboard to better help understand how the product really works.
I dressed up as Mrs. Knight, a self-interpretation of Mr. Knight from the Marvel show Moon Knight. I teamed up with Vani and Brydon for the Halloween costume.
Mrs. Knight, Moon Knight and KhonshuMrs. Knight
We were extremely excited about the idea of dressing up as characters from Moon Knight. I decided to become Mr. Knight as I wanted to dress up in a suit! We assembled all the materials required for our costume first and below is the list of the materials I ended up using for my final costume:
Since the main objective of the project was to get something to light up, I started with programming the code for the eyes and the batons. For the eyes, we did a simple white light but since the batons has a button attached to the circuit, I used the buttoncycler code that would switch between white light, blue light, and a fade from white to blue.
White eyes arduino codeButtoncycler arduino code for the baton
I did a series circuit for both the eyes and the baton lights, similar to the one Becky had done in the Mystic LED halloween hood. Since the NeoPixel mini buttons were extremely small, I had solder the NeoPixels to the Gemma a couple of times as the NeoPixels were getting fir
Getting the mask right was a challenge. I tried to sew a white mask with fabric but that wasn’t successful. After a lot of brainstorming, I decided to play around with the mask in my own. Rohitha helped me in getting the right shape for the mask. Using foam, I added in the details on the mask, like the crescent and the stitch marks across the face. After attaching a surgical mask onto the white mask, I added a coat of white acrylic paint and smudged with some light grey paint using a sponge to give it some worn our texture. I did 2 layers of the painting and smudging. To keep the paint intact and give it a finish, I mod podged my entire mask. Overall, I am happy with how the mask turned out! For the batons, I taped my circuit to where I will be holding it so that I easily click on the button. Moreover, I taped the entire wooden dowel, painted it grey and glued the golden leather pieces to the ends.
Mask and baton process work
It was fun to dress up in an all-white costume for a change. Since I already owned a white shirt, I just had to purchase the white pants. Even though I sewed the vest, it didn’t turn out the way I wanted it to but I am okay with it since this was my first time sewing a piece of clothing all by myself.
There was definitely a lot of learning involved and a lot of frustration points too. Learning to improvise as you go was one of the biggest takeaways for me.
If I had more time, I would have definitely experimented with the lighting for the batons and make the baton themselves look more “authentic”. Since I couldn’t successful complete the vest, I would have finished the vest and added that to the final costume. And lastly, I would have played around with some other NeoPixel lights for the eyes and batons, something that was easier to solder but looked cooler too!
Vani, Brydon and I were focusing on finishing up the Arduino code this week. The materials we are using are:
NeoPixel stick (Brydon)
NeoPixel mini button (Vani, Brydon, Heba)
Gemma M0 (Vani, Brydon, Heba)
Photocell (Brydon)
Resistor (Brydon)
Lithium batteries (Vani, Brydon, Heba)
Vani and I will be using the NeoPixel mini buttons for our masks and our weapons and hence, have programmed 2 different codes.
Since we couldn’t solder the button to our NeoPixel yet, we ran a test to check if our button works.
Since we received our NeoPixel mini buttons yesterday, we were not able to code exactly for the mini buttons. Instead, we wrote down the code for the eyes and the weapons for a NeoPixel strip since we will only need to make minor changes on the code for our NeoPixel buttons.
Code for white light for the eyes Buttoncycler code for the weapons where the color changes between black, white, blue and a combination of both white and blue. We want to try to incorporate a fade between white and blue.
For the weapons, the lights will change between blue and white for me and between yellow and white for Vani’s.
The purpose of the Khonshu costume is to have a really cool staff that lights up upon staff-falls while walking. Everything else is completely secondary. For this week Brydon has been mostly working on his code, he didn’t get it quite on tinkercad yet but he hopes to have it done today and finish soldering the circuit by tomorrow, seeing as its a relatively straightforward circuit.
For the Halloween costume, Vani, Brydon and I are dressing up as characters from the Marvel show Moon Knight. I will be dressing up as Mr. Knight. The costume is completely white, which includes a white suit, white mask with a moon symbol, white gloves and a pair of batons.
For the materials, the 3 of us went to Fabscrap to get fabrics for our costume. For my Mr. Knight costume, I am planning on stitching the waistcoat and tie and got the material for both from Fabscrap. Vani and I got plain white masks. I will be adding a white mask made out of white fabric on top to make it look similar to Mr. Knight’s mask. My costume also includes batons, which will be made from the wooden dowels. The materials left to buy now are the white gloves and pants.
Fabrics for the costumeFabric and buttons for the waistcoatMask and batons
For the light elements, I will be adding 2 NeoPixel RGBW PCB mini buttons, one for each eyes in the mask. We have already placed the order for it. I will also be adding the NeoPixel mini buttons on the ends of my batons and might add a sensor to it so that it lights up when you shake it hard.
For this weeks homework, I started off with the soldering of the NeoPixel stick. The soldering part of the homework was pretty direct and easy to do. Since a demo Arduino code was already given to us, I was able to figure out that my NeoPixel stick was soldered and connected to the circuit correctly.
NeoPixel circuit soldering
NeoPixel strip circuit demo
Creating your own code was a bit of a challenge and took a bit more time.
blue and white lights
slowed down lights with the random command
random color pattern
Halloween Costumes
Mr. Knight from Moon Knight
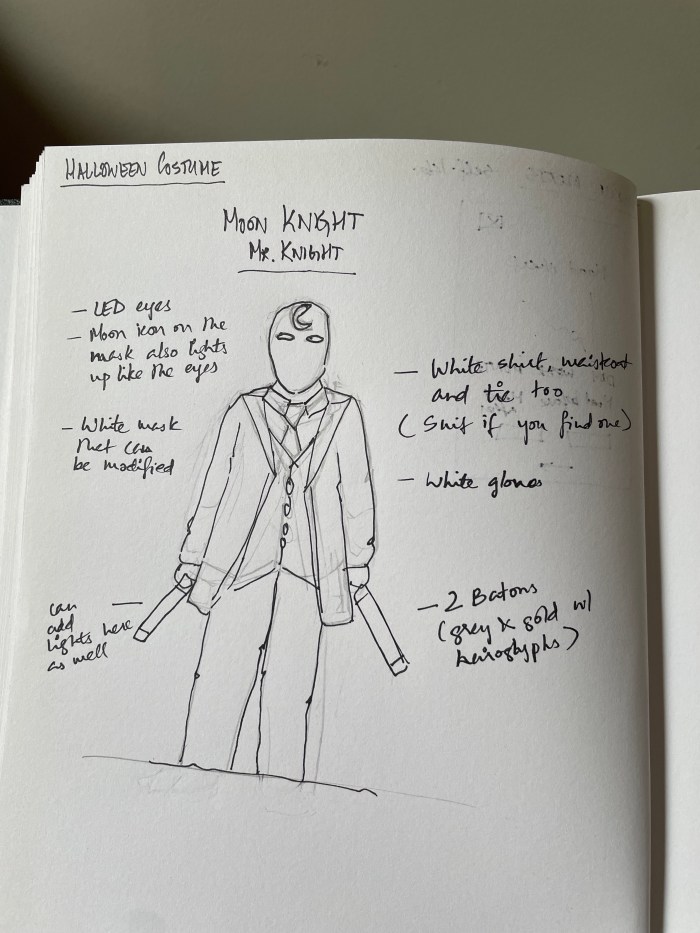
Vani, Brydon and are planning on doing a group costume based on the Marvel show Moon Knight. My plan is dress up as Mr. Knight. For the costume, I will be wearing a white mask made from cloth. LEDs will be used for the eyes and the moon symbol on the mask. The 2 batons will also include an element on light and might include a sensor so that it lights up every time you shake it. For the costume, I am planning on making the waistcoat and tie myself with a light greyish cloth. I will need to purchase a white mask, white gloves, a white suit and 2 wooden sticks (for the batons).
Mr. Knight sketch
2. Severus Snape
Since I wanted to do an all black costume, Severus Snape was another character that came into my mind. Since Snape’s wand is an important element, I was thinking of adding green lights to it as he is from the Slytherin house. The wand would light up anytime you shake it. LEDs, preferably some shade close to purple, would be added to the ends of the cape as well.
Snape idea sketch
3. Recreation of “Girl with a Pearl Earring” painting
For my third idea, I wanted to recreate a popular painting. I thought of recreating the “Girl with a Pearl Earring” as I can add highlight the earrings by creating it with LEDs. I can also add lights to the head scarf. The lights on the scarf would be running lights and not static.
The idea for my night light was inspired from the concept of how kids are scared of “monsters under the bed”. I wanted to change or reduce the fear within kids by creating a cute monster that the kids can hug when they go to sleep. My monster, named Randall Boo, lights up when you hug. The lights are placed in the main hug touch points, like the arms and the heart.
The materials I used for the project were:
Soft stretchy orange fabric
Dark blue silk-like fabric
Thread – white and orange
3 white LEDs
Stranded wires
3 100 ohm resistors
Heat shrink tubes
Battery pack with switch
3 AAA batteries
White cotton stuffing
My Journey
I was very excited for this project as a lot of things I did were for the very first time. I made a plan on what materials to use, where to place the LEDs, how to sew the pieces together and so on.
I started my process with the soldering of the LEDs as I wanted to make sure I had enough time to get the lighting up of the LEDs right. The soldering was a lot of fun and getting the LEDs to light up was a very proud moment for me!
The LEDs lit up yay!
The sewing was a little challenging since my plush monster had a few parts that had to be stitched together. I had to plan out my sewing steps as my LEDs were positioned in different areas of the plush toy. Since I had LEDs in the arms, I had to place them before stitching it all together. Hence, I used the machine to sew the different parts and hand sew the different parts together instead of using the machine.
Another challenge I faced during the process was the breaking of my circuit. After all the components were put together, the battery wire broke from the parallel LED circuit as I had forgotten to add the heat shrink tubes there and hence, had to re-solder the battery wire to the circuit. This time I remembered to add the heat shrink tubes!
Here are some more pictures of my process:
If I had more time to work on this project, I would have definitely added more “sass” to my monster character like I have shown in my initial sketch. I would have added a belt, more flare to the pants and arms and a pocket to the pants to keep the battery pack. I also wanted to add velcro to the arms so that the arms would stick when you hug it. Moreover, I would have experimented a bit more with the LEDs to see what combination of the LEDs worked the best for the toy.
Even though this project was quite challenging, I definitely learned a lot. I can sew a button or a small tear with confidence now! And Randall Boo is going to be my desk buddy from here on!
I wanted my plush night toy to be something that kids love to hug all night. My initial idea was to design it in the shape of a crab because more “hands” to hug!
However, I decided to change it since the making of all “hands” might not turn out the way I want it to.
So the idea I will be working on now is a twist on the concept of “Monsters under the bed” and turn it into “Monsty to hug on your bed”!
Since it’s meant to be hugged by kids between the age of 6-10 years when they go to sleep, I wanted to make the arms long and maybe add velcro straps to the end of the arms so that the kids could strap it onto their arms or anywhere they wish and wouldn’t feel alone at night. I was also thinking of using a fabric that stretches so that the kids can play with it without having to worry about tearing the toy.
The LED lights would be placed on the main hug touch points like the arms and heart of the plush toy. 3 LEDs would be used for each touch points.
I got various kinds of fabric and few scrap patches, like the white frilly patch, as I want to experiment by creating different patterns, bring in different textures on it and learn how to sew them all into one toy!