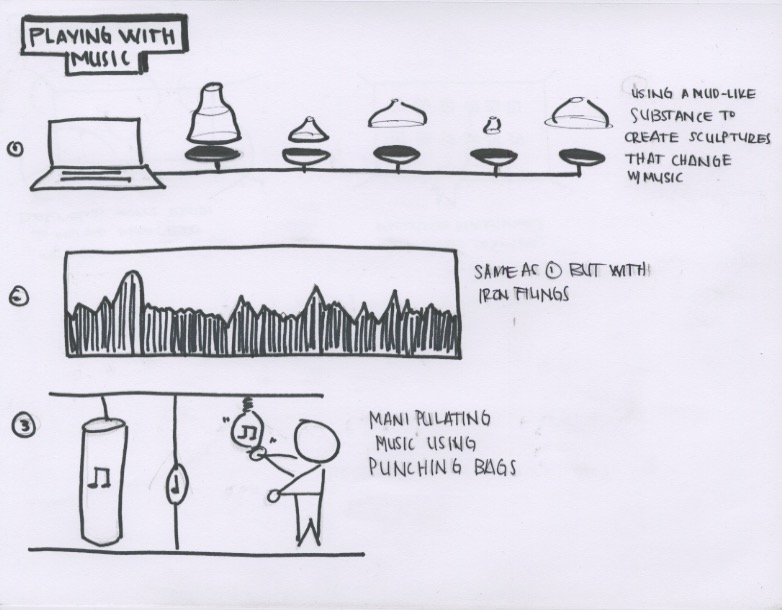
Panisa’s NEW Final Project Idea

NEW IDEA 1

This idea is inspired by musical cocktail glass. Each water level initiate different musical notes. Using water level sensor, user can create their own notes for each glasses. Then they can play a musical piece.

musicalwineglasses

music-02

music-01

NEW IDEA 2

The second idea is related to last week concept of meditation. It is inspired by Japanese traditional device using water power to create sound. “Scare the deer” Shishi-odoshi is a A trickle of water into the upper end of the tube accumulates and eventually moves the tube’s center of gravity past the pivot, causing the tube to rotate and dump out the water. The heavier end then falls back against the rock, making a sharp sound, and the cycle repeats. 

Shishiodoshi

en-light-tenment-02 The idea is inspired by color combinations in Impressionist Paintings. Soft and peaceful palettes create inner calm to the audience.  en-light-tenment-03

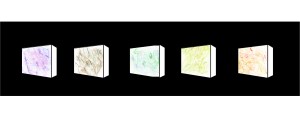
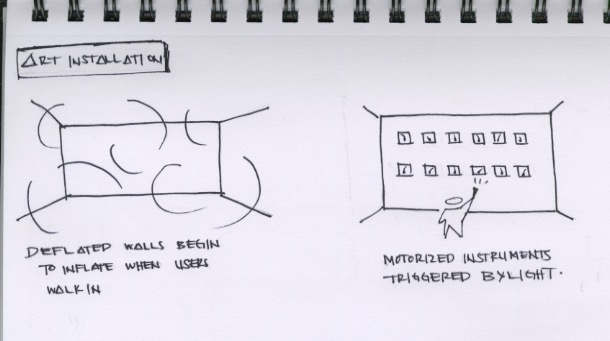
The diffused colorful light on the panel change. 

Having experienced many meditation trainings, I often found myself having trouble concentrating when I try to practice at home. Therefore, I want to create the light panel that does not only keep you calm, but also warn you that you are not concentrating.

en-light-tenment-01

The panel goes white when the object in front of it moves. The colors movement continues when the object stays still.

EN-LIGHT-ENMENT  is not only meant for adults create inner peace, but also meant for young audience. Since many studies show that meditation is great for child’s development, children are encourage to practice in school, at home, and in temple. Each instructors have their own ways of dealing with kids. Therefore, this light panel is one of the tools that could help children concentrate and stimulate their visual sensory.

img_8331 201107057941540

These are some sensors I think could work for this idea.

Screen shot 2014-11-13 at 1.13.53 AMor…

Screen shot 2014-11-13 at 1.05.46 AM

Toddlers!! Arduino voice or audio activated robots.

I want to make robots. Everytime I desribe Arduino projects to my family and friends they always ask me” oh, like a robot?” So this projects seems to make sense. I also am excited to see my baby toddle and these are inspired by her.

My preliminary sketches are rough but I believe could be beautiful in the end. It seems to me I can have an arduino, a bread board all the circuitry, a couple servos to move the wheels and a power source on a platform or encased within a cylinder. The hope here is that when you speak in a low menacing tone the toddler would back up away from you and if you used a sweet and encouraging tone the toddler would approach you.

The wheels would have a shape unlike traditional wheels to give the movement an awkward and bumpy movement not unlike a child learning to crawl or walk.

Im not sure if the audio sensor can be programed to react to different frequencies or if it would just be volume.

Sketches…

unnamedunnamed-1unnamed-2

After having done some basic research on the SERB I wondered if this would be a decent kit to hack?

Screen Shot 2014-11-13 at 8.24.21 AMawesome!

who else is programming robots?? Adam Fujita would like to work with you…

Final Project Ideas: wearable design

Visualize Tiredness1

Research

Visualize Tiredness2

This is a Project I did last year. I tried to visualize the tiredness of our body. Based on research, for the people who always sitting in front of computers, they’re highly suggested to stand up and do some office exercise to keep their neck and backbone healthy. A lot of people know this but they always forget or too lazy to move their body.


HOW IT WORKS:

There’re bubbles place on the suit. The bubbles will be inflated in 15 minutes to remind you to take a rest. The inflation of the bubbles show how tired your body is. When the bubbles are all inflated, you need to push out the air in the bubbles. Based on the gestures of office exercise, you’re taking office exercise when you try to reach a bubble.

Cat pad

The second idea is a reminder for people to take a rest from the computer. Inspired by the cat-pad, the bubble is place in palm. And your fingers cannot reach the keyboard any more when it inflates.

Final Project Concept

IMG_8840

Concept#1 is musical gloves for physical therapy. Each finger gets an instrument sound, and you can play music (compose music) by bending fingers.

IMG_8839

Concept#2 is mittens that will warm up when you hold other people’s hand. If it is not for couples, it will be an interesting social experiment.

IMG_8841

Concept#3 is punching art therapy. I would love to have a wall that is made out of punching bag material and a pair of boxing gloves to punch punch punch punch punch when you get stressed out or angry. To make that action rewarding and even motivating, I want to put sensor patches behind the punching wall (in a grid) and transfer the punches as input to arduino and make them into visual output.

Final Project Ideas

wpid-img_20141112_213657.jpg

My first idea is to revisit my anti-vanity mirror. I would like to use an Ultrasonic sensor to detect people in front of the mirror. Matthew said during class that I ought to be able to get the wood of the frame thin enough to have the audio pings not detect the wood – I think that this would really enhance the “magic” of the experience of using the mirror. I would also try to split the 12V power supply into both the supply to the glass [using a 12V 40V convertor] and to the adafruit trinket board [a smaller board that I hope to supply using a 12V 5V convertor]. The only issue that might arise is that the amperage from the wall socket might be too high for the board.

wpid-img_20141112_213711.jpg

This next idea has more of a social bent to it. Police abuse has been pretty rampant lately in American society. This idea is meant to counteract the abuse of power by the boys in blue – namely by automatically recording any conversations with the police. The FM scanner would scan for the police frequency [since all policemen wear radios on their chest] and start an audio recording if a frequency that matches the police frequency is within range for more than 5 seconds [indicating interaction with a cop]. This is more of a speculative design, I’d have to check with Becky to see if it’s feasible. I think that the instructable aspect of this design is especially compelling.

wpid-img_20141112_213726.jpg

This last design is more one that is concerned with the form of the final object. I want to make this lamp look BEAUTIFUL. It’ll be powered by a tilt switch – when the lamp is horizontal and low over the surface that it is resting on, it’ll turn on. I envision using it when I’m drawing at my desk and I don’t want to disturb others with the light.

Cheshire/Constellation/RGB Lamps

leila_cheshire-cat

IDEA #1 – Cheshire cat again, but now the smile would appear whenever lights are off, after a few seconds, as a friendly reminder that “everyone is mad here”, and then turn off again. leila_constellation

IDEA #2 – An educational constellation globe. As the user touches a star, the constellation it belongs to would light up. It could possibly be made using a light sensor behind each star, but that might get too complex..

leila_rgb-light

IDEA #3 – RGB Lamp. This lamp would have three (or six, or nine…) simple LEDs in it, one of each color, and a light diffusor. Each color would have individual adjustments so that the user could play with the colors, either by making the lamp colorful, or by adjusting the color temperature to a warmer or cooler white.

Visualizing music, art installations & everyday objects – 3 Ideas for Final Project

Scan 3 Scan 5

Initial sketches for the final project

Play with Music

I would love to find a way to take the music visualizer in iTunes (hit command+T when you’re listening to a song) and make that into something 3D. (1) and (2) are potential ideas.

Manipulating sound through movement is another idea I’m exploring. I imagine a room full of punching bags and using punches and kicks to change the music. See (3) below.

Scan

Art Installation

I want to make something large scale and epic! I drew inspiration from these two videos:

An idea I’m exploring is having an empty room with what look like “flat” walls, but as soon as the user enters, the walls start to inflate and appear to “swallow” the user. Another idea would be similar to Zimoun and the work by panGenerator in that I would explore multiplication of a simple item. Imagine a wall covered in Zimoun’s drum like machines being controlled by light e.g. from a flashlight.

Scan 1

I am looking to collaborate so if you think you’d be into one of these ideas let me know!

Lou’s TAXI gloves


This glove is is a special taxi glove. It is composed of two conductive threads: one on the top of the middle finger, on the inside of the hand and one on the top of the index finger, on the back of the hand. When we connect the two conductive parts, ‘TAXI’ will light up in the palm of our hand, so that taxis see us more easily during winter when it’s freezing and dark.

taxi4

taxi1

taxi2


taxi3


https://vimeo.com/111783921


Lou


Light Slide (Oscar de la Hera Gomez)

Greetings !

Todays project concept was to create an innovative switch that activates when a ball passes by it. This idea was originally inspired by the following video, which incentivised me to create an electronic musical ball slide, which would activate when the ball would hit the step, causing the step to light up.

The initial project sketches for the musical slide are shown below and involved a series of components which would act as support for the slide. LED strips would be placed in a smaller inner piece, which would be activated via Arduino when the infrared sensors would be triggered. This inner piece was split into two parts to ensure that it could be supported by the inner structure. Additionally,  the components that would hold this inner piece would include a small hole at the bottom of the frame, to allow the wires to go through, with the intention of cloaking the majority of the design.

IMG_20141105_115232_edit1

Drawing

The components were then designed in Illustrator to the measurements from the sketches and were laser cut to ensure maximum accuracy. The results of this process is shown below !

IMG_20141105_115652_Edit1
Components

The next stage of the process was the most challenging of all. How would I bend the plastic to ensure that it would match the laser cut curve ? Although I admit that I should have first bent the plastic and then laser cut the curve, I must say that this experience was extremely rewarding and satisfying. The process shown below demonstrates how the curve was achieved and is the result of four attempts !

The ‘centerpiece’ was place between a jig in such a way that the curve start point would match the edge of the jig. The piece was duct taped to the jig to ensure that little movement would occur.

IMG_20141105_131452_edit1
Placing the Center Piece

The pipe was the attached to the jig and was placed in such a way that the centreline matches the line drawn of on the on the centrepiece. The piece was then heated up until it began to bend and was then adjusted very slowly, applying pressure from ‘centreline’-up to ensure a perfect bend.

IMG_20141105_131827_edit1
Heating the centrepiece

For those attempting to replicate this process, please be patient. One must heat up and cool down the component various times to ensure a perfect curve. The result of this process is shown below.

IMG_20141105_132551_edit1
That curve.

And as promised, the curves matches the bend !


IMG_20141105_130746_edit1
Aligned to perfection.

It was at this point that I had to redesign the slide as the initial components would not allow the infrared components to sit at the right points. So I decided to scrap the inner components and go for a hollow design. Additionally, due to budget issues I decided to use big LEDs instead of LED strips as they would not require an alternate 12 V power source and could run of my computer power. Finally, due to losing my code in the last second I could not include the musical effect when the lights were triggered.

The next step involved putting all the pieces together. This was done using a duct tape to hold the piece at the right place and a glue gun to stick the parts together.

IMG_20141106_121416_edit1 IMG_20141106_121423_edit1


The components were then soldered to wires and were taped onto the holes to ensure that I could reuse the components at a later date. The LEDs where then also soldered onto wires and taped on off the sensors to allow them to hang off in the air, in the middle of the design, allowing maximum illumination.

IMG_20141106_144645_edit1
Soldering the LEDs

Here is the final result!

Ready, Set, Go – Switch Project – Chelsea Stewart

I tend to leave the house and get to my destination without everything I need for the day. I will forget seemingly simple things like my keys or wallet. But, I plan on changing my forgetfulness and creating a new way to keep track of my belongings before I leave, so I can become a bit less forgetful. My project Ready, Set, Go is a new way to keep track of your belongings when at home or in the office. By connecting to your belongings with copper tape and conductive materials, each belonging you need to reminding of. So for example, you are always forgetting your favorite pen, comb, or glasses. This product its adaptable for your needs. Looking forward, this project would be able to expand into multiple avenues of reminding needs. A great example of its future scale would be the new key finder tile.

https://vimeo.com/111156845
IMG_4721 IMG_4735 IMG_4737 IMG_4748 IMG_4774 IMG_4782 IMG_4786