The step one was a failure trying on make a 4 legs dog on sewing machine, that made me cry;(
So I made it out of my hand sew(a ugly and small version), so i got the shell finished then I did the soldering and ran the test on Gema⬇️
After I decided to just having the light for the eye part and put all light part inside the eye and sew the shell close (and it worked out), the light decided not to work;) ⬅️this is a trying not to cry again face
The only light worked was the light on Gema board…
So I finally I still took the pic of when the (ugly)dog skeleton with me
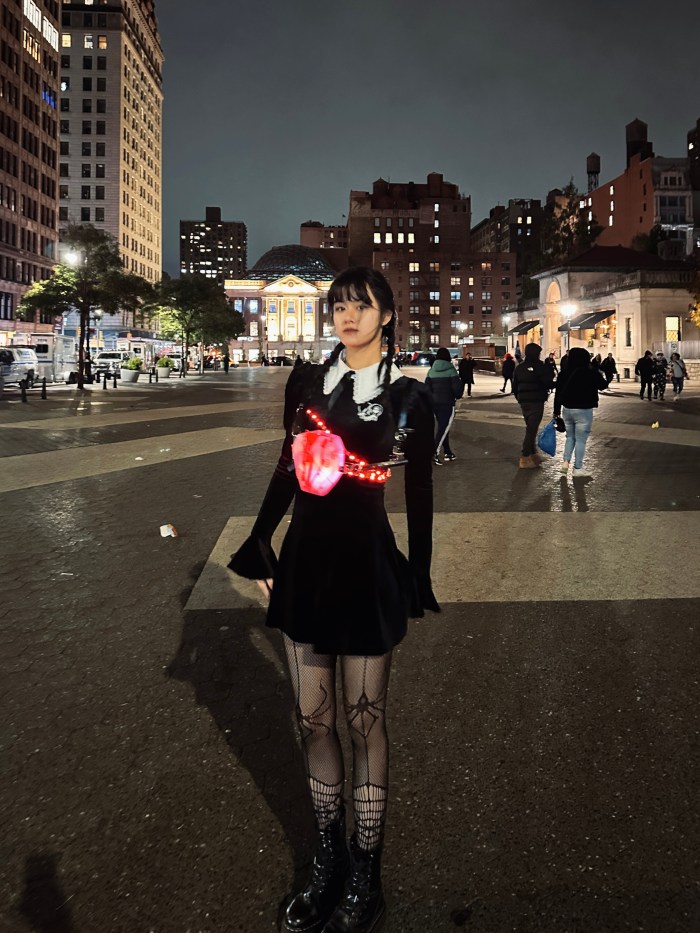
I call my costume “Witch Couture”, I really wanted to incorporate drapery into my costume to create a more sophisticated chic hat. I also was really excited about making a magical crystal ball which levitated into the air. I think this accessory tied the whole costume together while still keeping with the intended aesthetic.
When putting the costume all together and wearing it on Halloween night I felt very beautiful and elegant. It is exactly how I imagined it however when getting to the Halloween parade I did feel a little basic since I saw 100 other people that looked just like me :(. I mean next time I will just have to think a bit more outside the box but I still think it was one of my best halloween costumes I’ve ever put together.
Materials:
Large Christmas Decoration (amazon)
Witch hat (Micheals)
Black fabric (from previous project)
Silver sheer fabric (Prime Fabrics)
Wire (found in studio)
Metal Pipe (found in studio)
Black foam board (found in studio)
Gemma
12 led neopixel
Circuit Diagram:
Arduino Code:
#include <Adafruit_NeoPixel.h>
#ifdef __AVR__
  #include <avr/power.h>
#endif

#define PIN 1

Adafruit_NeoPixel strip = Adafruit_NeoPixel(12, PIN, NEO_RGBW + NEO_KHZ800);

void setup() {
  #if defined (__AVR_ATtiny85__)
    if (F_CPU == 16000000) clock_prescale_set(clock_div_1);
  #endif

  strip.begin();
  strip.setBrightness(100);
  strip.show();
}

void loop() {
  //
  colorWipe(strip.Color(192, 192, 192), 50); // Silver
  colorWipe(strip.Color(91, 100, 137), 20); // Grey Blue
  colorWipe(strip.Color(92, 49, 255), 112); // Purple


}

// Fill the dots one after the other with a color
void colorWipe(uint32_t c, uint8_t wait) {
  for(uint16_t i=0; i<strip.numPixels(); i++) {
    strip.setPixelColor(i, c);
    strip.show();
    delay(wait);
  }
}

void rainbow(uint8_t wait) {
  uint16_t i, j;

  for(j=0; j<256; j++) {
    for(i=0; i<strip.numPixels(); i++) {
      strip.setPixelColor(i, Wheel((i+j) & 255));
    }
    strip.show();
    delay(wait);
  }
}

// Slightly different, this makes the rainbow equally distributed throughout
void rainbowCycle(uint8_t wait) {
  uint16_t i, j;

  for(j=0; j<256*5; j++) { // 5 cycles of all colors on wheel
    for(i=0; i< strip.numPixels(); i++) {
      strip.setPixelColor(i, Wheel(((i * 256 / strip.numPixels()) + j) & 255));
    }
    strip.show();
    delay(wait);
  }
}

//Theatre-style crawling lights.
void theaterChase(uint32_t c, uint8_t wait) {
  for (int j=0; j<10; j++) {  //do 10 cycles of chasing
    for (int q=0; q < 3; q++) {
      for (uint16_t i=0; i < strip.numPixels(); i=i+3) {
        strip.setPixelColor(i+q, c);    //turn every third pixel on
      }
      strip.show();

      delay(wait);

      for (uint16_t i=0; i < strip.numPixels(); i=i+3) {
        strip.setPixelColor(i+q, 0);        //turn every third pixel off
      }
    }
  }
}

//Theatre-style crawling lights with rainbow effect
void theaterChaseRainbow(uint8_t wait) {
  for (int j=0; j < 256; j++) {     // cycle all 256 colors in the wheel
    for (int q=0; q < 3; q++) {
      for (uint16_t i=0; i < strip.numPixels(); i=i+3) {
        strip.setPixelColor(i+q, Wheel( (i+j) % 255));    //turn every third pixel on
      }
      strip.show();

      delay(wait);

      for (uint16_t i=0; i < strip.numPixels(); i=i+3) {
        strip.setPixelColor(i+q, 0);        //turn every third pixel off
      }
    }
  }
}

// Input a value 0 to 255 to get a color value.
// The colours are a transition r - g - b - back to r.
uint32_t Wheel(byte WheelPos) {
  WheelPos = 255 - WheelPos;
  if(WheelPos < 85) {
    return strip.Color(255 - WheelPos * 3, 0, WheelPos * 3);
  }
  if(WheelPos < 170) {
    WheelPos -= 85;
    return strip.Color(0, WheelPos * 3, 255 - WheelPos * 3);
  }
  WheelPos -= 170;
  return strip.Color(WheelPos * 3, 255 - WheelPos * 3, 0);
}
In-progress Images:
I did a really terrible job at documenting my work…I’m sorry.
Thanks for reading! I had a lot of fun executing this project 🙂
This year for Halloween I was a fallen angel. I wore black under a red cloak I purchased from Amazon, and the star of the show was the glowing winged collar I created in this class.
I was inspired by this photo, and adapted the headpiece design to make it spookier for the occasion. I changed the color to red, so it would have a more daemonic feel, and I added glowing red LEDs that cycle through at the pace of breathing, so it would feel animalistic.
The wings are worn around the neck and secured in place with velcro dots. The wires for the microcontroller and batter pack went down my back under my cloak and sat in my back pocket.
In the process, I learned about feather patterns for wings (big thanks to Lynn for the help here!):
I also got more comfortable with C++, re-familiarizing myself with variable definitions, importing libraries, and writing functions (which I haven’t done much of since doing a backend Python bootcamp during COVID). I also got more practice soldering, and debugging/interpreting error messages!
If I had to do this project again, I would:
ADJUST THE SHAPE: –> use narrower feathers overall to give greater clarity of shape to the wings. The size of the wings to the size of the feathers was difficult to get right as a first-timer (its hard to gauge size when ordering feathers online!). The final wings were a bit stumpy looking and compared to the size of the collar, and don’t taper to the top in the way I intended.
2. DIFFUSE MORE LIGHT: –> add another layer of diffusion for the lights around the collar between the felt and the feathers, to make the LED spots less obvious
3. MAKE IT LESS HOT: –> given how hot it was Halloween night, I woulud also re-design how the wings are worn, so that they attach from the back only, rather than wrapping around the front of the neck, which was crazy hot. It was so hot that the glue on the velcro dots melted off while I was wearing them.
/*  PulseSensor™ Starter Project   http://www.pulsesensor.com
 *
This an Arduino project. It's Best Way to Get Started with your PulseSensor™ & Arduino.
-------------------------------------------------------------
1) This shows a live human Heartbeat Pulse.
2) Live visualization in Arduino's Cool "Serial Plotter".
3) Blink an LED on each Heartbeat.
4) This is the direct Pulse Sensor's Signal.
5) A great first-step in troubleshooting your circuit and connections.
6) "Human-readable" code that is newbie friendly."
*/


//Initialize
#include <Adafruit_NeoPixel.h>
#ifdef __AVR__
 #include <avr/power.h> // Required for 16 MHz Adafruit Trinket
#endif

// Which pin on the Arduino is connected to the NeoPixels?
// On a Trinket or Gemma, change to 1:
#define LED_PIN 1

// How many NeoPixels are attached to the Arduino?
#define TOTAL_LEDs  50

// NeoPixel brightness, 0 (min) to 255 (max)
#define BRIGHTNESS 50 // Set BRIGHTNESS to about 1/5 (max = 255)

// Declare our NeoPixel strip object:
Adafruit_NeoPixel strip(TOTAL_LEDs, LED_PIN, NEO_GRB + NEO_KHZ800);
// Argument 1 = Number of pixels in NeoPixel strip
// Argument 2 = Arduino pin number (most are valid)
// Argument 3 = Pixel type flags, add together as needed:
//   NEO_KHZ800  800 KHz bitstream (most NeoPixel products w/WS2812 LEDs)
//   NEO_KHZ400  400 KHz (classic 'v1' (not v2) FLORA pixels, WS2811 drivers)
//   NEO_GRB     Pixels are wired for GRB bitstream (most NeoPixel products)
//   NEO_RGB     Pixels are wired for RGB bitstream (v1 FLORA pixels, not v2)
//   NEO_RGBW    Pixels are wired for RGBW bitstream (NeoPixel RGBW products)

void setup() {
  // These lines are specifically to support the Adafruit Trinket 5V 16 MHz.
  // Any other board, you can remove this part (but no harm leaving it):
#if defined(__AVR_ATtiny85__) && (F_CPU == 16000000)
  clock_prescale_set(clock_div_1);
#endif
  // END of Trinket-specific code.

  strip.begin();           // INITIALIZE NeoPixel strip object (REQUIRED)
  strip.show();            // Turn OFF all pixels ASAP
  strip.setBrightness(BRIGHTNESS);

}

void loop()
{
  breathe(255, 0.008, 5);
}

void breathe(float MaximumBrightness, float SpeedFactor, float StepDelay)
{
  // Make the lights breathe
  for (int i = 0; i < 6000; i++) {
    // Intensity will go from 10 - MaximumBrightness in a "breathing" manner
    float intensity = MaximumBrightness /2.0 * (1.0 + sin(SpeedFactor * i));
    strip.setBrightness(intensity);
    // Now set every LED to that color
    for (int ledNumber=0; ledNumber<TOTAL_LEDs; ledNumber++) {
      strip.setPixelColor(ledNumber, 255, 0, 0);
    }

    strip.show();
    //Wait a bit before continuing to breathe
    delay(StepDelay);
  }
}
In-progress images/sketches
Here are some images of my process!
I made the headpiece armature from galvanized steel… …wrapped it in felt… …wrapped the felt in the LED strand… …checked light placement and tested the code to optimize it… …started applying feathers… …soldered my lights to my GEMMA M0… … added velcro to close the collar… … and finished adding the feathers!
This the progress I’ve made so far with the spear. A completed product and professional image to come soon!
I love how the light turned out! The light effect is meant to fade from purple to blue when the button is press as a way to replicate the fight scenes in Wakanda.
Challenges
Soldering has been my worse enemy, but biggest lesson thus far. Due to the fact that I needed the wires to fit inside of the PVC pipe and thread a button and usb I had to make sure my connections were very strong.
Takeaways
Writing your code, and creating the physical product are equally as important and both require just about the same time. You must leave time for error . Also always over compensate with materials!!
PS- Sorry Lauren! I used your desk for a a short time. I cleaned up right after 🙂
I am making “Appa” the character as a coat. I want my costume to be cozy and comfortable and I kind of want to project that feeling to others through my costume.
The Idea
Instead of the arrow and the other details on it’s back being dark brown, I want them to light up.
I also want the details to light up in a kind of “ombre” way. I’m not sure how to explain it but look under settings (3).
Arduino Techniques
For the Arduino techniques I want to have 3 light settings:
Light turned off
Light turned on
Ombre Light (Only white)
For light setting 3, I need to find a way to make them blink in a row, I know this is possible because the NeoPixel LED stick did that in the last Arduino Exercise.
I want to have a button in the hood or in the sleeve that allows me to change the light setting. I only want to have one button so I’m thinking of having it that if I press it once it turns on and if I press it again it goes ombre and if I press it then again it turns off.
Circuit diagram
Materials
White/Cream Faux Fur (similar to Faux Fur from Mood Fabrics)
I started tracing a hoodie that I liked the shape of.
Next I traced the shapes to the faux fur fabric.
I didn’t have enough fabric so I had to make one sleeve out of 2 parts instead of one, but it turned out alright.
I pinned my pieces and sewed them together. The most challenging stuff was sewing the sleeves to the body😅. I also added the ribbed jersey material to the bottom of the jacket. That made the jacket look really nice and fitted.
I ran out of the ribbed material, so I had to head to the fabric store to buy more. I also bought a zipper, but when I examined it closer, I found out that I couldn’t zip it all the way down :/
I sewed the ripped material to the sleeves, I had to do it twice because the first time I sewed it, I turned it the wrong way.
LED lightning
I was kind of unsure how to make the arrow so I had to draw them up a few times. I ended on choosing this design.
This diagram shows the LED lights (green) and it’s connections.
I drew the circuit in Tinkercad to check if it worked and got confirmation from Becky.
I’m not gonna lie, this was very challenging for me because I wasn’t sure what the best way was to make these connections.
I started setting up my lights and then I tried connecting the wires to them. My soldering wasn’t the best so I had to redo it because the wires were to close to each other.
I decided to try another method where I make a “Y” out of the wire. This minimizes the risk of the wires connecting. That did not go so well so I tried a new method.
I taped down the LED lights to my desired shape with electric tape. After that, I soldered together 3 wires and connected them to the LED lights. This ended up working very well and I put electric tape over my connections to make them extra stable.
I soldered my arrow to a long strip and to the Gemma M0. Before I added the button I checked if my LED strip worked which it did!
I soldered the button to long wires soldered to the Gemma M0. When I finished soldering all the parts I secured the connections with electric tape and sewed the lights to the coat.
I found out that the button wasn’t working because I connected it wrong. The right way to connect it is diagonally. When I fixed that everything started to work.
Coding
Getting the code to work
I started by using the code from our past assignments and changed it a bit. I first noticed that the code wasn’t properly working for my LED lights. The problem was that the LED lights only read GRB values but not the RGBW. I’m not sure why that was but when I changed it to NEO_GRB the lights worked flawlessly.
The second thing I changed was the rainbowOverWhite class. I wanted it to be black over white. So I made a new function called “blackOverWhite” where the color black is (0,0,0) and white is (255, 255, 255).
First I had to tell Arduino that my button was connected to pin 2. I did that by writing:
#define BUTTON 2
Next, I had to define what state the button was in because I wanted the button to change after what state it was in. Then I had to define what the last state of the button was, which is High. The button has 2 states, high and low, which kind of means on and off. Next, I defined the counter because I want the counter to go up if the button is pressed. Then I had to apply debounce so it switches when only the button is pressed. Here are the 2 websites I used to help me code the button. https://docs.arduino.cc/built-in-examples/digital/Debounce/, https://docs.arduino.cc/built-in-examples/digital/Button/.
  // Check if button state has changed and apply debounce
  if (reading == LOW && lastButtonState == HIGH && (millis() - time) > debounce) {
    counter++; // Increment counter to change LED mode
    time = millis(); // Update last debounce time
  }
This is checking if the button has been pressed and it is not a mistake (removing noise) Read about Debouncing.
Here is my full code.
#include <Adafruit_NeoPixel.h>

#define PIN 1
#define NUM_LEDS 53
#define BRIGHTNESS 50
#define BUTTON 2 // Button connected to pin 2

int buttonState = 0; // Current button state
int lastButtonState = HIGH; // Previous button state
int counter = 0;

long time = 0; // The Debounce time
long debounce = 200; // Debounce delay in milliseconds

Adafruit_NeoPixel strip = Adafruit_NeoPixel(NUM_LEDS, PIN, NEO_GRB + NEO_KHZ800);

void setup() {
  strip.setBrightness(BRIGHTNESS);
  strip.begin();
  strip.show();
  pinMode(BUTTON, INPUT_PULLUP);
}

void loop() {
  // What state the Button is in (HIGH or LOW)/(ON or OFF)
  int reading = digitalRead(BUTTON);

  // Check if button state has changed and apply debounce
  if (reading == LOW && lastButtonState == HIGH && (millis() - time) > debounce) {
    counter++; // The counter changes
    time = millis(); // Update last debounce time
  }

  lastButtonState = reading;

  // Cycle through LED modes based on counter
  if (counter == 0) {
    colorWipe(strip.Color(255, 255, 255), 50); // White
  } else if (counter == 1) {
    blackOverWhite(20, 70, 5);
  } else if (counter == 2) {
    colorWipe(strip.Color(0, 0, 0), 50); // Off
  } else {
    counter = 0; // Reset counter to cycle through modes
  }
}

// Fill the LEDs one after the other with a specified color
void colorWipe(uint32_t c, uint8_t wait) {
  for (uint16_t i = 0; i < strip.numPixels(); i++) {
    strip.setPixelColor(i, c);
    strip.show();
    delay(wait);
  }
}

// Non-blocking version of blackOverWhite animation
void blackOverWhite(uint8_t wait, uint8_t whiteSpeed, uint8_t whiteLength) {
  static int head = 0;
  static int tail = -whiteLength;
  static int loopNum = 0;
  static unsigned long lastTime = 0;

  if (whiteLength >= strip.numPixels()) whiteLength = strip.numPixels() - 1;

  // Only update the animation if enough time has passed
  if (millis() - lastTime > whiteSpeed) {
    for (uint16_t i = 0; i < strip.numPixels(); i++) {
      if ((i >= tail && i <= head) || (tail > head && i >= tail) || (tail > head && i <= head)) {
        strip.setPixelColor(i, strip.Color(255, 255, 255)); // White
      } else {
        strip.setPixelColor(i, strip.Color(50, 50, 50)); // Dim white
      }
    }

    head++;
    tail++;
    if (head == strip.numPixels()) {
      head = 0;
      tail = -whiteLength;
      loopNum++;
    }

    if (loopNum >= 3) {
      loopNum = 0;
      return;
    }

    lastTime = millis();
    strip.show();
    delay(wait);
  }
}
Final Thoughts
I’m very happy with the outcome, however I wish to sew a zipper to the costume. If I had extra time I would sew material inside of the coat so the you can’t feel the LED strip. I was kind of stressed about ripping the wiring.
I was hooked on the character after watching Wednesday. She is strange and unique, although she has a cold appearance, she has a hot heart. That’s also the reason why I designed the costume this time.
I think the essence of LED is movement, and the light effect produced by combining with different materials. And the size of the area is also important
I stuck my hand between the handle and the acrylic sheet, hiding wires and circuits and batteries in my sleeve. But there are no pockets in my costume, so I have no place to put my phone.
I learned that acrylic sheets need to be tested for sculpting. Where the wires can’t be soldered, I bend them into a hook shape and hook them together before soldering. The length of the wire and the relative position of each component need to be planed.
If I did it again, I wanted to make the acrylic cleaner, make the handles as transparent as possible, and leave room for battery replacement (because this time I taped the battery case completely to prevent my clothes from interfering).
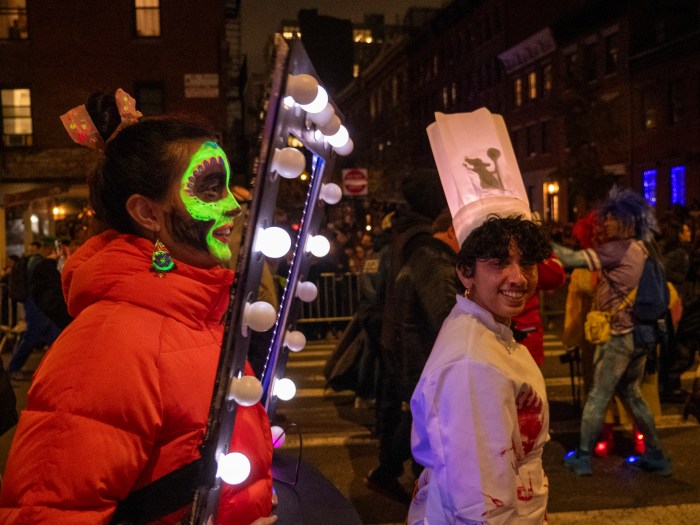
The Final Countdown Costuuuume Wooooo! We paraded! We got selfies with strangers! The press even snapped a few pics! I await my two seconds of NYC Halloween faaaame!
Introducing my Making Studio Halloween costume: Foremost a Hollywood-style vanity mirror, it could also be considered a variety of other things—a portal to another world, a look into our alter ego… whatever you wish it to be.
The main mirror element, with the bright, flashing lightbulbs, was meant to accomplish two things: be easily identifiable, as well as fun and flashy. The secondary element of UV lights and UV makeup I added for an additional twist. When deciding my UV lewk, I considered a glamorous make-up look with UV makeup (maybe drag-inspired), or something improvised, but ended up going with a Coco-inspired skull, which felt most in line with Halloween (and easier to manage, with my extremely limited makeup skills).
I used cloth straps to attempt to secure it to my body, but these turned out to be of limited utility (I ended up mostly propping the mirror up with my hands, which was totally fine, since the whole thing is very light). The main drawbacks to not having achieved more of a backpack-style suspension system were: (1) not being able to dance with my arms (2) not getting the height of the mirror quite right — in most photos, my head is at the very top of the frame, rather than more towards the middle. If I made this again, I would work on backpack-style straps early into the making process.
In terms of the process, I learned what I seem to learn time and time again: Things always take longer than I anticipate! I’m always debating between more advance-planning and more figuring-it-out-as-I-go (and by debate, I mean that I always go route #2 then later consider route #1). What I mean in this context is that, for example, I could have considered the backpack straps at the beginning of the construction and design process, rather than trying to work them in at the end. I could also have tested out a few lewks, giving myself options before landing on the one I chose. As for the vanity mirror itself, I’m very happy with how that element turned out! At the end of the day, Halloween is about having fun—and that was certainly accomplished.
I’ll definitely say—this costume project has opened my eyes to the world of possibilities opened up by incorporating light and electronics into a costume. I will *definitely* be incorporating lighting into future costume ideation! And also rollerblades…
Foam board & black acrylic paint for mirror frame & mirror counter
Sturdy black cloth for suspender mechanism
Sewing supplies for suspender mechanism
Ping pong balls (thanks, Becky!)
Reflective mirror-like paper (Blick)
Paper for hair decoration
Hot glue gun, soldering equipment, tape
A Glimpse into the Process!
Circuit Diagram
LED dots + gemma testing
Arduino code For some reason, my LEDs weren’t executing the fade or pulse function, so I ended up just using theaterchase. Harsha helped me troubleshoot, so the code was on her computer, but I’ll work on recreating a closer version to share here!
The reason I made this costume is that I always saw the videos about this costume several years ago. It was really funny and left a strong impression on me. So when we need to consider the idea of halloween costume, it was the first idea I thought of!
1. Cut the LED strips to the right length
2.Sew the LED strips onto the clothes
3.Weld each LED strip
4.Weld the LED strips, button and Gemma M0
5.Input the code
6.Test!
In this process, I learned how to sew the LED strips(it was really difficult!) and how to series and parallel circuits. And I think if I have enough LED strips, I can made some patterns on the clothes to make it fancy!
There are still a lot of problems with the circuits! It dropped a lot of times! I really need some advice to improve it!
I also had a lesson that I need to give myself enough time to test and fix after I wear it even if I have tested one time.