
Category: Tutorials
Jenna’s Updated Circuit 6
For my revision to circuit 6, I edited the music and added a little LED flair.
Special shout out to Disney/MiceChat for the sweet it’s a small world character graphics.
The full edited code can be found below:
//Edited Arduino Code 6 – it’s a small world version
int speakerPin = 9;
int LED1 = 10;
int LED2 = 11;
int LED3 = 12;
int length = 36; // the number of notes
char notes[] = “ffafggg ggbgaaa aaCabbbagcef “; // a space represents a rest
int beats[] = { 4, 1, 2, 2, 4, 1, 3, 0, 0, 0, 4, 1, 2, 2, 4, 1, 3, 0, 0, 0, 4, 1, 2, 2, 4, 1, 3, 1, 1, 6, 6, 6, 0, 0 , 0, 0 };
int tempo = 100;
void playTone(int tone, int duration) {
for (long i = 0; i < duration * 1000L; i += tone * 2) {
digitalWrite(speakerPin, HIGH);
delayMicroseconds(tone);
digitalWrite(speakerPin, LOW);
delayMicroseconds(tone);
}
}
void playNote(char note, int duration) {
char names[] = { ‘c’, ‘d’, ‘e’, ‘f’, ‘g’, ‘a’, ‘b’, ‘C’ };
int tones[] = { 1915, 1700, 1519, 1432, 1275, 1136, 1070, 956 };
// play the tone corresponding to the note name
for (int i = 0; i < 8; i++) {
if (names[i] == note) {
playTone(tones[i], duration);
}
}
}
void setup() {
pinMode(speakerPin, OUTPUT);
pinMode(LED1, OUTPUT);
pinMode(LED2, OUTPUT);
pinMode(LED3, OUTPUT);
}
void loop() {
for (int i = 0; i < length; i++) {
// Turn on LEDs
if (notes[i] == ‘c’ || notes[i] == ‘f’ || notes[i] == ‘b’){
digitalWrite(LED1, HIGH);}
else if (notes[i] ==’d’ || notes[i]==’g’ || notes[i]==’C’) {
digitalWrite(LED2, HIGH);
}
else
digitalWrite(LED3, HIGH);
//Play notes
if (notes[i] == ‘ ‘) {
delay(beats[i] * tempo); // rest
} else {
playNote(notes[i], beats[i] * tempo);
}
digitalWrite(LED1, LOW); //turn LEDS off
digitalWrite(LED2, LOW);
digitalWrite(LED3, LOW);
// pause between notes
delay(tempo / 2);
}
}
** REVISION:
I realized after posting that the part of the code to include rests in between notes is incorrect. In the notes vector, it should only include one space per rest and the length of the rest should be modified by the corresponding number in the beats vector. I tried to edit and reupload, but my piezo speaker lost a leg in the process! 🙁
Jenna’s Arduino Tutorials 2 and 6
Toddlers!! Arduino voice or audio activated robots.
I want to make robots. Everytime I desribe Arduino projects to my family and friends they always ask me” oh, like a robot?” So this projects seems to make sense. I also am excited to see my baby toddle and these are inspired by her.
My preliminary sketches are rough but I believe could be beautiful in the end. It seems to me I can have an arduino, a bread board all the circuitry, a couple servos to move the wheels and a power source on a platform or encased within a cylinder. The hope here is that when you speak in a low menacing tone the toddler would back up away from you and if you used a sweet and encouraging tone the toddler would approach you.
The wheels would have a shape unlike traditional wheels to give the movement an awkward and bumpy movement not unlike a child learning to crawl or walk.
Im not sure if the audio sensor can be programed to react to different frequencies or if it would just be volume.
Sketches…


After having done some basic research on the SERB I wondered if this would be a decent kit to hack?
 awesome!
who else is programming robots?? Adam Fujita would like to work with you…
Sewing and Soldering
Adafruit Guide To Excellent Soldering
Marianna has the special LEDs I brought in for you guys, check with her to get some! If you need more switches or batteries, you can check out your local Radio Shack or order LEDs from SuperBrightLEDs.com, Adafruit, or elsewhere online. Order early if you are having anything shipped, so you have time to work and play with your materials!

10 Adorable Stuffed Animals You Can DIY
The 5 Best Fabric Stores In New York according to CBS 2012
Fabric stores list on Shop the Garment District
Lumi Lock VIdeo
Here is my video introducing “Lumi Lock” a light/lock messenger bag, that highlights safety and convenience. It comes with a comfortable padded nylon strap and LEDS all which you make by clicking on the Instructables link found below.
Here is my link to my Instructables.
http://www.instructables.com/id/Lumi-Lock-Messenger-Bag/


Here is my link to the Lumi Lock video!

Thank you
Slooow Strand Test
I had a hard time trying to decipher all of the code in the strandtest sample. I couldn’t quite figure out how to isolate the series of functions within the entire cycle. I did manage to figure out how to manipulate a few individual functions.
My favorite alteration was significantly slowing down the first series. I did this by altering the delay function. This function pauses the program for the amount of time (in milliseconds) specified as parameter. To slow down the sequence significantly I altered the code from delay(wait) to delay(5000). This added a 5 second break between each pixel lighting up.
Here is the part of the code I altered:

Here is the result:
Trick or treat! Animated GIF
TRICK OR TREAT!

This post will briefly explain how to make a flashing image of monsters.
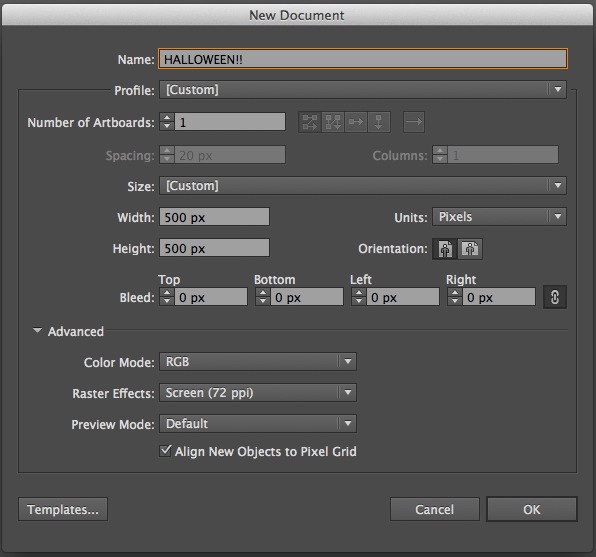
First, create a new file in Adobe Illustrator. I decided to make 500 x 500 pixel image with 72 dpi (for web) in RGB (for screen).
Next, make a circle as a template and create different characters in the illustrator using line, shape, and pen tool on the template. Here’s an example of a pumpkin:

When satisfied with the result, go to File > Export and save the image as JPEG. When you save, remember to keep the resolution in 72 ppi. Default is set to be in 300 ppi.  >
> 
Repeat above steps to create few characters. I made 10 different ones. Here’s what all of mine looks like:
Now I have 10 images ready to put together as an animated GIF. Open Photoshop, and go to File > Scripts > Load Files Into Stack. Click on Browse, and grab all the images to put together and hit OK.
When those files open in a stack, a new photoshop document with 10 layers will be created. Drag the layers up and down in the order of how the animation should run.
When All the layers are prepared, it’s time to put them in each frames. Go to Window > Timeline, or Window > Animation depending on your Photoshop version. A small window will pop up on the bottom of the screen. Click on the drop down menu on the upper right corner, and click Make Frames From Layers.
Here’s all the frames created from 10 layers. For each frame, you can change the duration time. I chose 0.07 second for each frame. Click on the Play button at the buttom to preview if you like the speed.
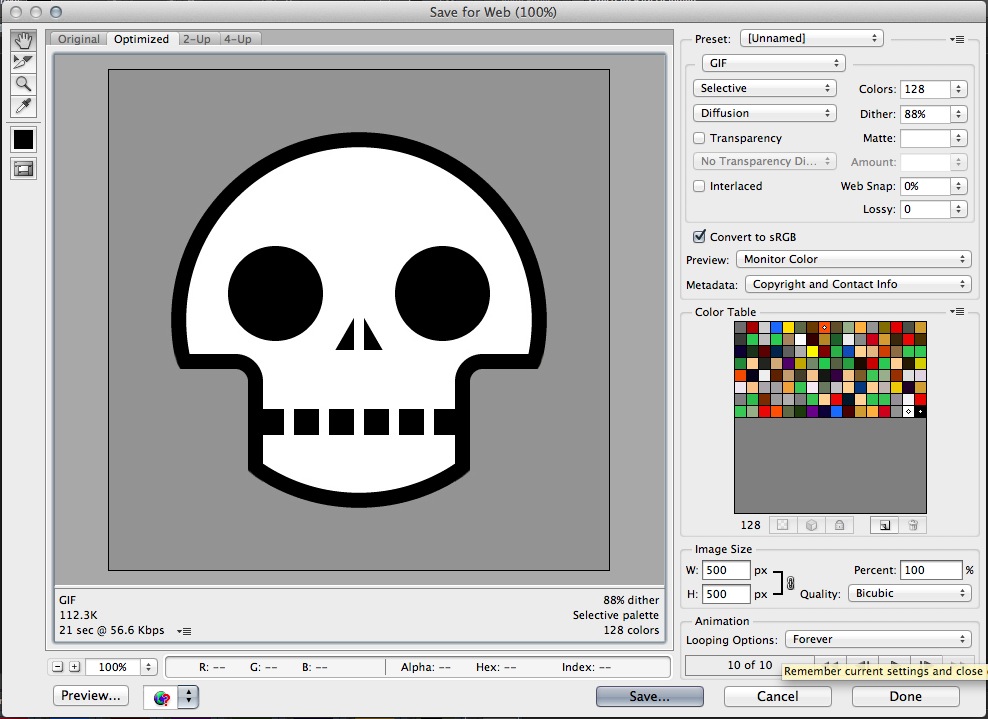
When satisfied with the result, go to File > Save for Web. Here, you can change the palette of colors – 32, 64, or 128 bit. This will determine the file size like how the changing of the output image size will do. Before pressing Save, it’s always good to click on Preview on the bottom left to final check everything. It will not only show you how the GIF is going to look like, but also its file size and other info. After checking, click on Save.
DONE!
LED Headdress Tutorial Final Version
Hi all,
Here is my final version of my LED light Headdress tutorial:
http://www.instructables.com/id/How-to-make-an-LED-light-headdress/
I decided to add some background to my Instructables because I was receiving a lot of comments regarding the LEDs being too close to the eyes. I also made some final tweaks to the copy.

Alternative gyoza tutorial #3

http://www.howdoesshe.com/gyozas-a-favorite-food-to-make-as-a-family/
I love this tutorial mainly for the great photos. Granted, they have a bit too shallow of a depth of field but the color saturation and watermark logos really make the whole presentation look professional (which it is, I believe).