My halloween costume is Wall·E, my favorite Pixar character.
Costume
Initial Idea Sketch from week 6 Wall·E with blinking eyes (with Blue LED, changed from Red heart emoji)
Process Head gear (1) Structure I cut two blocks of blue foam and sanded those to make the head gear structure. (2) Eyes I started to work on the head gear first. For Wall·E’s starry eyes, I 3D printed the lens structure and added two layer of PVC film. (3) Assembly/Wiring This was probably the hardest part in this project. Things are about to be put all together and I was afraid to ruin it all. I measured and carefully carved out the blue foam where two LEDs, the circuit and the battery go. Then taped it to put all the pieces together and finally covered the structure with decorative paper.
Cardboard costume – Compared to the head gear, I enjoyed making the cardboard costume with no pressure, I sprayed the colored paper to the cardboard and added details with sharpie.
List of Material Used (1) Head gear – Blue foam – 3D printed lens structure – PVC filim – Decorative color paper – Duck tape – Leather lace
I’m tired of hearing all about ‘sunny LA’. I’m stuck in the concrete jungle and I wonder, how come rain never gets good press? This halloween I wanted to let rain take the stage and strike a pose. Hopefully this gets us more The Notebook, Singing in the Rain, and Shawshank Redemption moments. Plus, blue is the best color ever.
To see the final code for the rain best, click here.
I would definitely add more light segments to the code as well as a button switch through them and turn the LEDS off altogether.
I would also separate the LED segments and have them connect with JST-connectors instead of soldering the entire circuit shut. This way I wouldn’t have to pull out the battery every time.
Circuit working!
Making it wearable
Sewing the silk fabric onto the velvety fabric was a huge challenge. Sewing is harder than I thought!
The vest is light, relatively comfortable and it’s gotten really good feedback. People like the velvety back and how the umbrella helps describe what the costume is about.
Because this project was done in such a short amount of time, I opted to staple the LED strip onto the fabric to keep them in place, instead of hand-stitching it. However, I did accidentally cut through one of data lines of the strip when stapling it. Yikes! I had to cut through my base fabric and carefully re-attach the data wire.
I was extremely happy when the sewing was done. YAY!
Before and after of this not-so-clear umbrella
Party Time!
The final photoshoot: bringing some joy to this rainy costume with a big smile!
Acknowledgements
Thanks to Becky Stern for her guidance with the coding program and for lending me her umbrella. Thanks to Nihaarika Arora for partnering up for some coding troubleshooting. Thanks to Helena Yang for lending her sewing tools and expertise. Thanks to all my classmates for raising up the bar very high!
I play the Green Snake, she is the snake demon in the four major Chinese folk love story “The Legend of the White Snake”.I want to integrate traditional Chinese culture with western culture, and I am also a native of Zhejiang province, so I chose the characters from the legends occurring in my native hometown.
How it is to wear it
This is a snake that can shine all over, wrap it around your neck, and your entire costume will be lit by it. In addition, after the snake is wrapped around the body, there is a momentary button near the right hand, you can use it to control the different states of light.
What I learned in the process
In the basic welding stage of the circuit, the welding must be clear and tested to prevent breakage. After the test is passed, it can be reinforced with hot glue. In case of uncertainty, PlAN B should be prepared, as this time the costume was only delivered 2 days before Halloween. In fact, the code is not so difficult, I must first master its basic language logic.
What you would do differently if you had to do it over again
I will reconsider light-transmitting fabrics so that they look good enough under natural light.
During the parade, I will bring my own music player, which can really bring the atmosphere of Chinese culture to the streets of New York.
sketchsketchWelding circuitlight testHide the circuit in the snakeFabric and lighting testSew more than four hoursAlmost finishAdd pingpong ballsCode adjustmentFinal code import
My costume was a shirt with the light of 5 neopixels diffused by white ping pong balls. I downloaded the code with help from Becky to get a random pattern of white lights. The hardest part beyond looking with glassy-eyed wonder at the Arduino code was keeping a steady (and once, a red-hot) hand to solder such a tiny thing repeatedly to 6 different wires per pixel. I had to resolder a few pieces and learned that the energy flow only goes one direction on pixels. The thread I had to sew the neopixels through the tiny holes in the fabric and around the wires was weak so I sewed it many times through creating a wild mass that looked like a bird’s nest…..but it held. Between the sewing and a small amount of hot glue for attaching the ping pong balls, I was sure the costume would fall apart in route to school so I brought plenty of supplies. Much to my amazement, the costume was perfect for the whole evening.
While I picked the costume because I thought it would be cute and doable, I would probably refashion my plush nightlight to be an eyeball and make another 10 or more blinking eyes. I think a multitude of lights would create a more impactful visual show. Also, other than the ball on my back the other lights ran down my arm. I would probably have varied the placement to be in different parts of my trunk too.
Items needed for costume. https://www.adafruit.com/product/4356 for the neopixels one Adafruit Gemma circuit, 3 different colors (for keeping things straight) of many-thread wire, solder, ping pong balls, one cheap long black shirt from Goodwill, battery pack and 3 AA batteries, hot glue, thread.
Circuit diagram
Arduino code – eyeball
Progress pics
Shopping for the shirt at Goodwill with handsome HarryInspo eyesRepeated warningsHours soldering in the South ClassroomLined upNice!Will it hold?
Character overview: Harley Quinn is a character in the comic books published by DC Comics. Harley has often been said to have a demented mind, but she is also very intelligent. She is known to be messy, There’s little reason to Harley’s moods, which makes her impossible to predict. But above all, Harley strives to enjoy life.
Why I chose Harley Quinn?
I chose Harley Quinn because her personality is the complete opposite of mine so I wanted to explore what it would feel like to embody somebody else for a night.
Final look
Harley Quinn (left) with her impersonator (right)
Costume Summary
My costume consists of a red dress that is ripped on the side to represent the original Harley Quinn costume which has a slit to her thighs.
Cons of the Costume
It was a cold day and my costume was not made for the cold weather, however, I was having so much fun, I often forgot about how cold it was.
3D printing the bat was harder than I had imagined. It took multiple trial and error to come up with a good model.
It was a challenge to fit the LED strip inside of the bat. It would not stick to the end of the bat, so I had to find different ways from epoxy glue, to three different types of tape and superglue, nothing was really helping. My last resort was to glue a piece of cloth on the inside and then attach the LED strip on top of the piece of cloth. So the end result ended up looking like hot glue- cloth- more hot glue- LED strip- again more hot glue – Tadaaaaa!!! it worked. The LED strip stayed in place all night. (hot glue gun is officially my best friend)
The process of soldering the LED strip was more challenging that I thought. Because I cut the strip into three different pieces, (to accommodate the turning in the bat), I ended up having to solder more than required. After consulting with Becky, I found out that I didn’t have to cut the LED strip. For next time, I know what to do.
I didn’t expect that it would be so hard to insert the LED strip inside the bat. I think the issue was how narrow it was at the bottom, so if i had to redo the bat, I would accommodate the width of the LED strip and battery.
3D printing the bat turned out to be a challenge in itself, but after I saw the end results, everything became worth it. It’s a much better choice than buying a plastic bat.
Material preparation – Soldering – Coding – Test – Drill – Spray Paint – Re-soldering – Add diffusion paper – Combining parts – Final test
Material List
Black boots – Borrow from second year students
Black cape – PartyCity
Vader’s helmet – PartyCity
Diffusion paper – Blick
Button – Adafruit kits
Wire – VFL
12 inches Translucent Tube – Canal Plastic
Steel Tube – PoD scrap
Neopixel Strip – Adafruit
Plastic Cap – Homedepot
Spray Paint – Homedepot
Battery – Adafruit kits
Learning
Soldering: shorten the cut parts of wires to avoid touching each other. Shrinking cover the wire and strip’s cover.
2. Hiding: think in advance how to hide the wire, battery, circuit, and especially how to put the button stably.
3. Diffusion: think about how to better diffuse light more equal in 360 degrees’ angles. (Drafting paper V.S. translucent polystyrene paper)
Coding
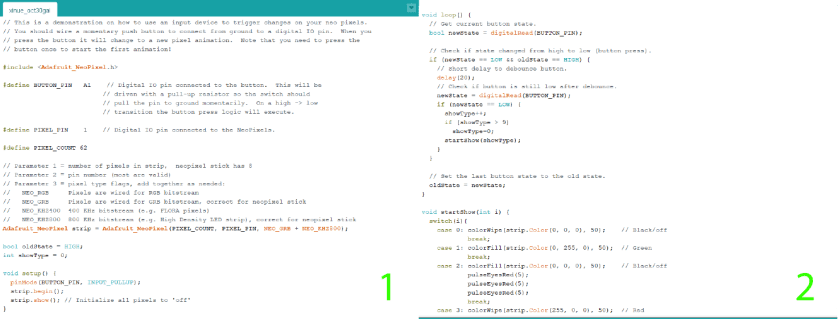
// Simple demonstration on using an input device to trigger changes on your // NeoPixels. Wire a momentary push button to connect from ground to a // digital IO pin. When the button is pressed it will change to a new pixel // animation. Initial state has all pixels off — press the button once to // start the first animation. As written, the button does not interrupt an // animation in-progress, it works only when idle.
include
ifdef AVR
#include // Required for 16 MHz Adafruit Trinket
endif
// Digital IO pin connected to the button. This will be driven with a // pull-up resistor so the switch pulls the pin to ground momentarily. // On a high -> low transition the button press logic will execute.
define BUTTON_PIN 2
define PIXEL_PIN 1 // Digital IO pin connected to the NeoPixels.
define PIXEL_COUNT 34 // Number of NeoPixels
define BRIGHTNESS 220
int led = 1; // the PWM pin the LED is attached to int brightness = 0; // how bright the LED is int fadeAmount = 5;
// Declare our NeoPixel strip object: Adafruit_NeoPixel strip(PIXEL_COUNT, PIXEL_PIN, NEO_GRB + NEO_KHZ800); // Argument 1 = Number of pixels in NeoPixel strip // Argument 2 = Arduino pin number (most are valid) // Argument 3 = Pixel type flags, add together as needed: // NEO_KHZ800 800 KHz bitstream (most NeoPixel products w/WS2812 LEDs) // NEO_KHZ400 400 KHz (classic ‘v1’ (not v2) FLORA pixels, WS2811 drivers) // NEO_GRB Pixels are wired for GRB bitstream (most NeoPixel products) // NEO_RGB Pixels are wired for RGB bitstream (v1 FLORA pixels, not v2) // NEO_RGBW Pixels are wired for RGBW bitstream (NeoPixel RGBW products)
void setup() { pinMode(BUTTON_PIN, INPUT_PULLUP); strip.begin(); // Initialize NeoPixel strip object (REQUIRED) strip.show(); // Initialize all pixels to ‘off’ }
void loop() { // Get current button state. newState = digitalRead(BUTTON_PIN);
// Check if state changed from high to low (button press). if((newState == LOW) && (oldState == HIGH)) { // Short delay to debounce button. delay(20); // Check if button is still low after debounce. newState = digitalRead(BUTTON_PIN); if(newState == LOW) { // Yes, still low modeNum = modeNum + 1; if(modeNum > 3){ modeNum = 0; } if(modeNum == 0){ // turn off colorWipe(strip.Color(0,0,0), 0); delay(1000); } if(modeNum == 2){ // colorwipe to red then stop. // this only run once after button click, so this part is // put inside the button click block colorWipe(strip.Color(255,0,0), 100); } /if(++mode > 3) mode = 0; // Advance to next mode, wrap around after #8 switch(mode) { // Start the new animation… case 0: colorWipe(strip.Color(255,0,0), 0); // Black/off break; case 1: colorAll(strip.Color(255,0,0), 50); // Red break; case 2: analogWrite(strip.Color(255,0,0), 50); // Red break; }/ } }
// Set the last-read button state to the old state. oldState = newState;
/if(modeNum == 0){ // turn off colorWipe(strip.Color(0,0,0), 0); delay(1000); }/ if(modeNum == 1){ // colorwipe red, then fully dark colorWipe(strip.Color(255,0,0), 100); colorWipe(strip.Color(0,0,0), 0); } /else if(modeNum == 2){ // this part cannot be run with loop }/ else if(modeNum == 3){ // all fade in and out fadeInOutOnce(10); } }
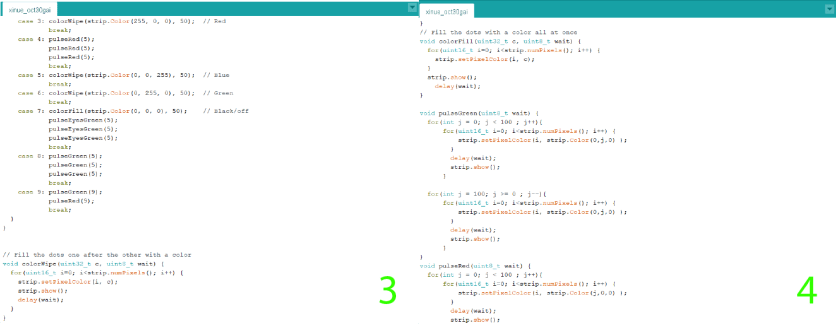
// Fill strip pixels one after another with a color. Strip is NOT cleared // first; anything there will be covered pixel by pixel. Pass in color // (as a single ‘packed’ 32-bit value, which you can get by calling // strip.Color(red, green, blue) as shown in the loop() function above), // and a delay time (in milliseconds) between pixels. void colorWipe(uint32_t color, int wait) { for(int i=0; i<strip.numPixels(); i++) { // For each pixel in strip… strip.setPixelColor(i, color); // Set pixel’s color (in RAM) strip.show(); // Update strip to match delay(wait); // Pause for a moment } }
void fadeInOutOnce(int wait) { for(int j = 0; j < 160; j++){ for(int i=0; i 0; j–){ for(int i=0; i<strip.numPixels(); i++) { // For each pixel in strip… strip.setPixelColor(i, strip.Color(j,0,0)); // Set pixel’s color (in RAM) strip.show(); // Update strip to match } delay(wait); // Pause for a moment } }
For this project, I decided to create Dr. Strange’s Eye of Agamotto. for those of you that are not familiar with this character, he is a sorcerer from the Marvel Comics Universe. He’s also appeared in the Marvel Cinematic Universe in various films, played by Benedict Cumberbatch. Also, the Eye of Agamotto is an amulet that houses one the 5 Infinity Stones, in this case, the time stone. This project has been really fun to make, specifically because I am a huge MCU fan. I had always wanted to make a prop from the movie and I finally had the opportunity to do it.
As for the process of the project, I decided to 3D print the body of the amulet. After the 3D print was done, I decided to sand it, and paint the product with acrylic paint. I usually prime and spray paint 3d prints, but since I wanted to convey an old, oxidized metal look I believe I chose the right method even though it was risky. The Neopixel LED was later added to the center of the eye and it is diffused by a regular plastic rhinestone. To get a little bit of more diffusion, I sanded the back of the rhinestone to get like a frosted effect. Finally I used a thick leather cord and braided it to create the necklace.
Why this costume? Although not the main character, Edna Mode is such an iconic and memorable character from The Incredibles animation saga. I really relate to her spunky attitude (have also been told many times how similar I am to her, personality and look-wise).
How was it to wear? I didn’t take the weather into consideration when choosing this character but was grateful for this decision because her outfit is pretty covered up and I was able to add some warm layers to beef it up even more.
The LED pink neck piece was made out of felt so it was also very comfortable to wear.
Process
1. Neckpiece
Materials: – 2 pieces of pink felt – pattern designed on Illustrator – hot glue gun – velcro – 2 6 LED bulbs strips – battery – Gemma – pins – wires – soldering machine – tubings – wire tape
Cut out fabric from patternFit testGlue soldered circuit onto one sideHot glue another piece of felt on top with a small opening for battery change.
painting the straw to look like a cigarette holderWire left long and wrapped in black tape to fit nicely into one’s palm
Circuits
// NeoPixel test program showing use of the WHITE channel for RGBW
// pixels only (won't look correct on regular RGB NeoPixel strips).

#include <Adafruit_NeoPixel.h>
#ifdef __AVR__
 #include <avr/power.h> // Required for 16 MHz Adafruit Trinket
#endif

// Which pin on the Arduino is connected to the NeoPixels?
// On a Trinket or Gemma we suggest changing this to 1:
#define LED_PIN     1

// How many NeoPixels are attached to the Arduino?
#define LED_COUNT  12

// NeoPixel brightness, 0 (min) to 255 (max)
#define BRIGHTNESS 70 // Set BRIGHTNESS to about 1/5 (max = 255)

// Declare our NeoPixel strip object:
Adafruit_NeoPixel strip(LED_COUNT, LED_PIN, NEO_GRBW + NEO_KHZ800);
// Argument 1 = Number of pixels in NeoPixel strip
// Argument 2 = Arduino pin number (most are valid)
// Argument 3 = Pixel type flags, add together as needed:
//   NEO_KHZ800  800 KHz bitstream (most NeoPixel products w/WS2812 LEDs)
//   NEO_KHZ400  400 KHz (classic 'v1' (not v2) FLORA pixels, WS2811 drivers)
//   NEO_GRB     Pixels are wired for GRB bitstream (most NeoPixel products)
//   NEO_RGB     Pixels are wired for RGB bitstream (v1 FLORA pixels, not v2)
//   NEO_RGBW    Pixels are wired for RGBW bitstream (NeoPixel RGBW products)

void setup() {
  // These lines are specifically to support the Adafruit Trinket 5V 16 MHz.
  // Any other board, you can remove this part (but no harm leaving it):
#if defined(__AVR_ATtiny85__) && (F_CPU == 16000000)
  clock_prescale_set(clock_div_1);
#endif
  // END of Trinket-specific code.

  strip.begin();           // INITIALIZE NeoPixel strip object (REQUIRED)
  strip.show();            // Turn OFF all pixels ASAP
  strip.setBrightness(BRIGHTNESS);
}

void loop() {
  // Fill along the length of the strip in various colors...
  //colorWipe(strip.Color(255,   0,   0)     , 50); // Red
  //colorWipe(strip.Color(  0, 255,   0)     , 50); // Green
  //colorWipe(strip.Color(  0,   0, 255)     , 50); // Blue
  //colorWipe(strip.Color(  0,   0,   0, 255), 50); // True white (not RGB white)

  //whiteOverRainbow(75, 5);

  pulseBlue(5);

  //rainbowFade2White(3, 3, 1);
}

// Fill strip pixels one after another with a color. Strip is NOT cleared
// first; anything there will be covered pixel by pixel. Pass in color
// (as a single 'packed' 32-bit value, which you can get by calling
// strip.Color(red, green, blue) as shown in the loop() function above),
// and a delay time (in milliseconds) between pixels.
void colorWipe(uint32_t color, int wait) {
  for(int i=0; i<strip.numPixels(); i++) { // For each pixel in strip...
    strip.setPixelColor(i, color);         //  Set pixel's color (in RAM)
    strip.show();                          //  Update strip to match
    delay(wait);                           //  Pause for a moment
  }
}

void whiteOverRainbow(int whiteSpeed, int whiteLength) {

  if(whiteLength >= strip.numPixels()) whiteLength = strip.numPixels() - 1;

  int      head          = whiteLength - 1;
  int      tail          = 0;
  int      loops         = 3;
  int      loopNum       = 0;
  uint32_t lastTime      = millis();
  uint32_t firstPixelHue = 0;

  for(;;) { // Repeat forever (or until a 'break' or 'return')
    for(int i=0; i<strip.numPixels(); i++) {  // For each pixel in strip...
      if(((i >= tail) && (i <= head)) ||      //  If between head & tail...
         ((tail > head) && ((i >= tail) || (i <= head)))) {
        strip.setPixelColor(i, strip.Color(0, 0, 0, 255)); // Set white
      } else {                                             // else set rainbow
        int pixelHue = firstPixelHue + (i * 65536L / strip.numPixels());
        strip.setPixelColor(i, strip.gamma32(strip.ColorHSV(pixelHue)));
      }
    }

    strip.show(); // Update strip with new contents
    // There's no delay here, it just runs full-tilt until the timer and
    // counter combination below runs out.

    firstPixelHue += 40; // Advance just a little along the color wheel

    if((millis() - lastTime) > whiteSpeed) { // Time to update head/tail?
      if(++head >= strip.numPixels()) {      // Advance head, wrap around
        head = 0;
        if(++loopNum >= loops) return;
      }
      if(++tail >= strip.numPixels()) {      // Advance tail, wrap around
        tail = 0;
      }
      lastTime = millis();                   // Save time of last movement
    }
  }
}

void pulseBlue(uint8_t wait) {
  for(int j=0; j<256; j++) { // Ramp up from 0 to 255
    // Fill entire strip with white at gamma-corrected brightness level 'j':
    strip.fill(strip.Color(j, 0, 0, 0));
    strip.show();
    delay(wait);
  }

  for(int j=255; j>=0; j--) { // Ramp down from 255 to 0
    strip.fill(strip.Color(j, 0, 0, 0));
    strip.show();
    delay(wait);
  }
}

void rainbowFade2White(int wait, int rainbowLoops, int whiteLoops) {
  int fadeVal=0, fadeMax=100;

  // Hue of first pixel runs 'rainbowLoops' complete loops through the color
  // wheel. Color wheel has a range of 65536 but it's OK if we roll over, so
  // just count from 0 to rainbowLoops*65536, using steps of 256 so we
  // advance around the wheel at a decent clip.
  for(uint32_t firstPixelHue = 0; firstPixelHue < rainbowLoops*65536;
    firstPixelHue += 256) {

    for(int i=0; i<strip.numPixels(); i++) { // For each pixel in strip...

      // Offset pixel hue by an amount to make one full revolution of the
      // color wheel (range of 65536) along the length of the strip
      // (strip.numPixels() steps):
      uint32_t pixelHue = firstPixelHue + (i * 65536L / strip.numPixels());

      // strip.ColorHSV() can take 1 or 3 arguments: a hue (0 to 65535) or
      // optionally add saturation and value (brightness) (each 0 to 255).
      // Here we're using just the three-argument variant, though the
      // second value (saturation) is a constant 255.
      strip.setPixelColor(i, strip.gamma32(strip.ColorHSV(pixelHue, 255,
        255 * fadeVal / fadeMax)));
    }

    strip.show();
    delay(wait);

    if(firstPixelHue < 65536) {                              // First loop,
      if(fadeVal < fadeMax) fadeVal++;                       // fade in
    } else if(firstPixelHue >= ((rainbowLoops-1) * 65536)) { // Last loop,
      if(fadeVal > 0) fadeVal--;                             // fade out
    } else {
      fadeVal = fadeMax; // Interim loop, make sure fade is at max
    }
  }

  for(int k=0; k<whiteLoops; k++) {
    for(int j=0; j<256; j++) { // Ramp up 0 to 255
      // Fill entire strip with white at gamma-corrected brightness level 'j':
      strip.fill(strip.Color(0, 0, 0, strip.gamma8(j)));
      strip.show();
    }
    delay(1000); // Pause 1 second
    for(int j=255; j>=0; j--) { // Ramp down 255 to 0
      strip.fill(strip.Color(0, 0, 0, strip.gamma8(j)));
      strip.show();
    }
  }

  delay(100); // Pause 1/2 second
}
Final Products
In the dark – at the parade
Learning
What I learned in the process
I was amazed by how many different skills were utilized for this project, from fashion design, prop design, soldering, to coding. Lots of creative problem solving.
Many things learned from working on the Plush Night Light project translate to this project as well. Like knowing which material to use, how to solder properly etc.
What I would do differently – Take more process photos of the cigarette holder – Use spray paint for a more polished look for the cigarette holder – Experiment with more complex code for the neck piece’s animation
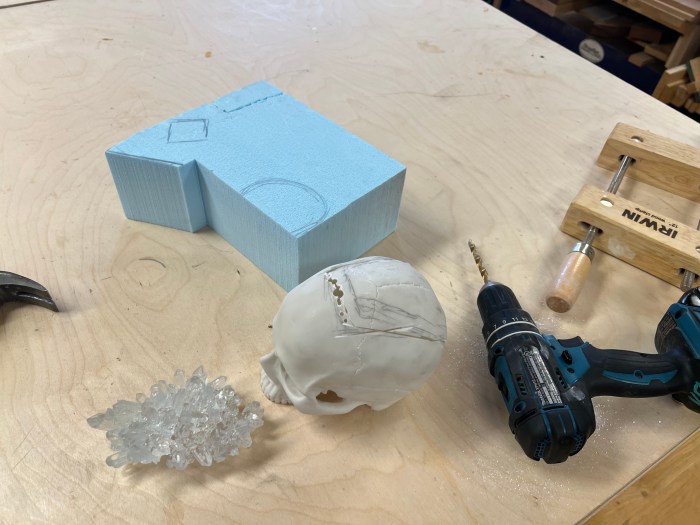
The Costume Summary My costume is a headless skeleton holding their own glowing crystal skull. I made it because I thought it was an interesting concept to try and pull off. I’ve never worn or created a headless costume. I also loved the idea of creating resin crystals that would light up. The crystals light up with light pulses and then a rainbow animation.
Wearability In terms of wearability. The skeleton is easy comfortable outfit. It’s made from an existing skeleton costume with reflect vinyl bones cut out and pasted over the top of the bones. The head is the delicate part. It is not completely secure so that the crystals can be removed and the LED and batteries inserted.
My Takeaways The process took much longer than I expected. The skull took the majority of the time because making the crystal piece took lots of playing around to get right. Cutting the vinyl bones was also tedious.
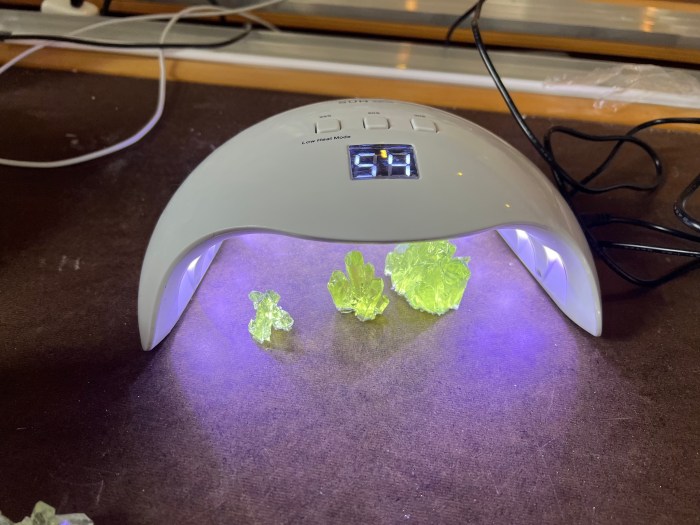
Overall, I really loved making the skull it was really satisfying to see it all come together. It look a lot of problem solving in terms of figuring out how to get the LED and crystals to sit properly in the skull. Next time, I’d anticipate spending more time on problems solving for something I’ve never made before. Also the resin took a lot longer because of the cure time and because I ended up making many more crystals since the molds were smaller than expected.
For the future, I wouldn’t want to shy away from doing something that seems difficult or that there is no real reference point for. I learned a lot it just takes longer!
#include <Adafruit_NeoPixel.h>
#ifdef __AVR__
 #include <avr/power.h> // Required for 16 MHz Adafruit Trinket
#endif

// Which pin on the Arduino is connected to the NeoPixels?
// On a Trinket or Gemma we suggest changing this to 1:
#define LED_PIN   A1

// How many NeoPixels are attached to the Arduino?
#define LED_COUNT  30

// NeoPixel brightness, 0 (min) to 255 (max)
#define BRIGHTNESS 50 // Set BRIGHTNESS to about 1/5 (max = 255)

// Declare our NeoPixel strip object:
Adafruit_NeoPixel strip(LED_COUNT, LED_PIN, NEO_GRB + NEO_KHZ800);
// Argument 1 = Number of pixels in NeoPixel strip
// Argument 2 = Arduino pin number (most are valid)
// Argument 3 = Pixel type flags, add together as needed:
//   NEO_KHZ800  800 KHz bitstream (most NeoPixel products w/WS2812 LEDs)
//   NEO_KHZ400  400 KHz (classic 'v1' (not v2) FLORA pixels, WS2811 drivers)
//   NEO_GRB     Pixels are wired for GRB bitstream (most NeoPixel products)
//   NEO_RGB     Pixels are wired for RGB bitstream (v1 FLORA pixels, not v2)
//   NEO_RGBW    Pixels are wired for RGBW bitstream (NeoPixel RGBW products)

// Change These Variables
int maxBrightness = 100;
int minBrightness = 6;
int fadeSpeed = 15;

void setup() {
  // These lines are specifically to support the Adafruit Trinket 5V 16 MHz.
  // Any other board, you can remove this part (but no harm leaving it):
#if defined(__AVR_ATtiny85__) && (F_CPU == 16000000)
  clock_prescale_set(clock_div_1);
#endif
  // END of Trinket-specific code.

  strip.begin();           // INITIALIZE NeoPixel strip object (REQUIRED)
  strip.show();            // Turn OFF all pixels ASAP
  strip.setBrightness(BRIGHTNESS);
}

void loop() {
    pulseColor(strip.Color(27, 103, 107), fadeSpeed); // Teal
    pulseColor(strip.Color(27, 103, 107), fadeSpeed); // Teal
    pulseColor(strip.Color(27, 103, 107), fadeSpeed); // Teal
    pulseColor(strip.Color(240, 40, 140), fadeSpeed); // Pink
    pulseColor(strip.Color(27, 0, 240), fadeSpeed); // Blue
    rainbow(13);

}

void pulseColor(uint32_t c, uint8_t wait) {
  //Increase Brightness / Fade In
  for(int i=minBrightness; i<maxBrightness; i++) {
      strip.setBrightness(i);
      for(int x=0; x<strip.numPixels(); x++){
        strip.setPixelColor(x,c);
      }
      strip.show();
      delay(wait);
  }
  //Lower Brightness / Fade Out
  for(int i=maxBrightness; i>minBrightness; i--) {
       strip.setBrightness(i);
      for(int x=0; x<strip.numPixels(); x++){
        strip.setPixelColor(x,c);
      }
      strip.show();
      delay(wait);
  }
}

//GRADIENT RAINBOW

void rainbowFade2White(int wait, int rainbowLoops, int whiteLoops) {
  int fadeVal=0, fadeMax=100;

  // Hue of first pixel runs 'rainbowLoops' complete loops through the color
  // wheel. Color wheel has a range of 65536 but it's OK if we roll over, so
  // just count from 0 to rainbowLoops*65536, using steps of 256 so we
  // advance around the wheel at a decent clip.
  for(uint32_t firstPixelHue = 0; firstPixelHue < rainbowLoops*65536;
    firstPixelHue += 256) {

    for(int i=0; i<strip.numPixels(); i++) { // For each pixel in strip...

      // Offset pixel hue by an amount to make one full revolution of the
      // color wheel (range of 65536) along the length of the strip
      // (strip.numPixels() steps):
      uint32_t pixelHue = firstPixelHue + (i * 65536L / strip.numPixels());

      // strip.ColorHSV() can take 1 or 3 arguments: a hue (0 to 65535) or
      // optionally add saturation and value (brightness) (each 0 to 255).
      // Here we're using just the three-argument variant, though the
      // second value (saturation) is a constant 255.
      strip.setPixelColor(i, strip.gamma32(strip.ColorHSV(pixelHue, 255,
        255 * fadeVal / fadeMax)));
    }

    strip.show();

    delay(wait);

    if(firstPixelHue < 65536) {                              // First loop,
      if(fadeVal < fadeMax) fadeVal++;                       // fade in
    } else if(firstPixelHue >= ((rainbowLoops-1) * 65536)) { // Last loop,
      if(fadeVal > 0) fadeVal--;                             // fade out
      } else {
      fadeVal = fadeMax; // Interim loop, make sure fade is at max
    }
  }

}

 // Rainbow cycle along whole strip. Pass delay time (in ms) between frames.
void rainbow(int wait) {
  // Hue of first pixel runs 5 complete loops through the color wheel.
  // Color wheel has a range of 65536 but it's OK if we roll over, so
  // just count from 0 to 5*65536. Adding 256 to firstPixelHue each time
  // means we'll make 5*65536/256 = 1280 passes through this outer loop:
  for(long firstPixelHue = 0; firstPixelHue < 5*65536; firstPixelHue += 256) {
    for(int i=0; i<strip.numPixels(); i++) { // For each pixel in strip...
      // Offset pixel hue by an amount to make one full revolution of the
      // color wheel (range of 65536) along the length of the strip
      // (strip.numPixels() steps):
      int pixelHue = firstPixelHue + (i * 65536L / strip.numPixels());
      // strip.ColorHSV() can take 1 or 3 arguments: a hue (0 to 65535) or
      // optionally add saturation and value (brightness) (each 0 to 255).
      // Here we're using just the single-argument hue variant. The result
      // is passed through strip.gamma32() to provide 'truer' colors
      // before assigning to each pixel:
      strip.setPixelColor(i, strip.gamma32(strip.ColorHSV(pixelHue)));
    }
    strip.show(); // Update strip with new contents
    delay(wait);  // Pause for a moment
  }
}
Process Photos
Initial sketch. It evolved to use reflective vinyl for the skeleton.I used a bandsaw and drill to cut opening in plastic skullThe beginning of my crystals from the silicon molds.The UV light I used. A few crystals curing after they are removed from the molds.Post-soldering of Gemma and 2 LED stripsTesting opacity of crystals over LED lightsI cut a blue foam insert and super glued the LEDs onto the insert.I used a small plastic Tupperware contain and a piece of flexible plastic (flexible cutting board mat) to create a base for the skull. This inserted into the skull opening and sat on top of the LED/Blue foam base.Cutting reflective vinyl after tracing bonesDon’t be too precious with your work!
I decided on Luke Skywalker because of his pivotal role in the Star Wars Saga and his character timeline fit well with our group as we had one character from each era of the movies. But more importantly, building a replica of his lightsaber that actually works was a childhood DREAM of mine, and now it is a reality.
What’s it like?
Holding this lightsaber feels great. Pressing the button and seeing the beam of light shoot out from the bottom of the sword is an awesome sight to behold.
What Would You Change?
If I had been able to do it over, I would have changed my material from wood to either a metal or plastic. Or applied several more coats of primer. The wood grain and texture showed through the paint slightly and gave away the allusion of the chrome metal.